xSuite Apps for SAP Fiori
Layout management
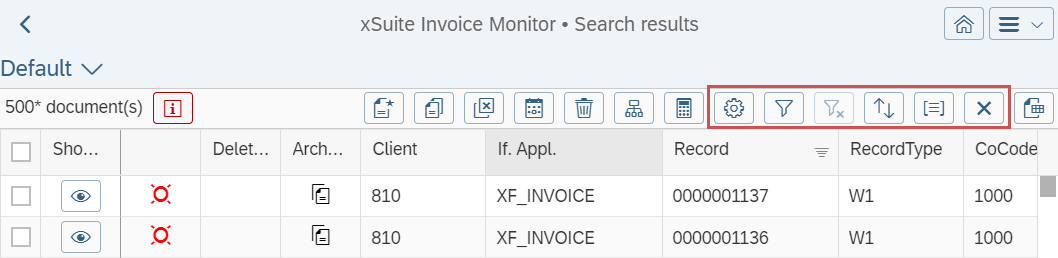
Layout management settings can be accessed via individual buttons.
 |
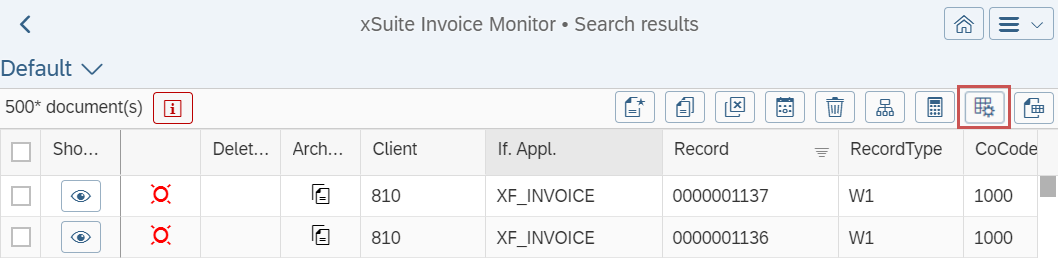
Alternatively, layout management can be called via the  Layout button. A user exit is necessary for this.
 |
The following buttons are available:
Notice
Whether these buttons are available depends on the type of table.
Button | Name | Information and comments |
|---|---|---|
| Columns | If column customizing is changed, it may be that, for example, the search result must be requested again at the back end. In xSuite Invoice Monitor, for example, the back end only provides the values for the fields that are displayed in the hit list. If more or different fields are shown, the search result must be delivered from the back-end with the changed column layout. |
| Filter | When filtering, only the data in the table that is displayed will be filtered. In the Invoice Monitor, the number of documents in the search result is limited to 500 by default, for example. When filtering in the hit list, filtering will only be performed for these 500 documents. If all documents are to be considered, the search parameters in the selection view must be changed. As this search is sent to the back end, all documents are then included there. |
| Clear all filters | |
| Sorting | Separation into different categories is always used for sorting as well. Categorization can be performed only in responsive tables. Non-responsive tables in the SAP UI5 framework do not support this functionality. |
| Categorization |


Settings for the view
The View Settings dialog will open when the button is clicked.
Depending on the type of table and the availability of the functions, you can set column customizing, filter, sorting and categorization for the table here.
The tabs allow the user to switch between the different settings.
 |
The following buttons are available:
Button | Description |
|---|---|
OK | Adopts the settings of all tabs and applies them. |
Cancel | Discards all changes made by the user in the dialog and closes the dialog. |
Restore | Restores all default values. |
Message | Shows additional messages relating to layout settings. An example would be the indication that the page is reloaded so that the current settings can be applied. If there are no messages, this button will not be displayed. |
Variant management
Until now, variant management in SAP Fiori was controlled via the Load, Save and Delete buttons in the page footer.
These buttons are no longer available. The variants of this variant management can no longer be used either.
Instead, SAP UI5 standard variant management is now used.
The xSuite VariantDialog has been removed as part of this conversion. User exits that previously used this variant must be adapted.
Variant data
In the search forms, the content of the forms is stored in the variants. When a variant is selected, the form is filled according to the data saved. If the form previously contained values, they will be removed beforehand.
Table variants include column layout, sorting, filtering, and categorizing – provided the user can customize each. Again, when a variant is selected, the current layout, sorting, etc. is discarded and replaced with that in the variant.
Variant types
Within variant management, a distinction is made between three types of variants:
Variant type | Description |
|---|---|
Standard | Variant available for all users This variant cannot be deleted, changed or renamed by any user. |
Private | Variants that each user can create Private variants are available only to the user who created them. The user can overwrite, rename or delete a private variant. |
Public | Variants that can be created only by users who have the xSuite user attribute WEB_GLOBAL_VARIANTS with the value Public variants can be used by all users. Only users who have the xSuite user attribute WEB_GLOBAL_VARIANTS with the value |
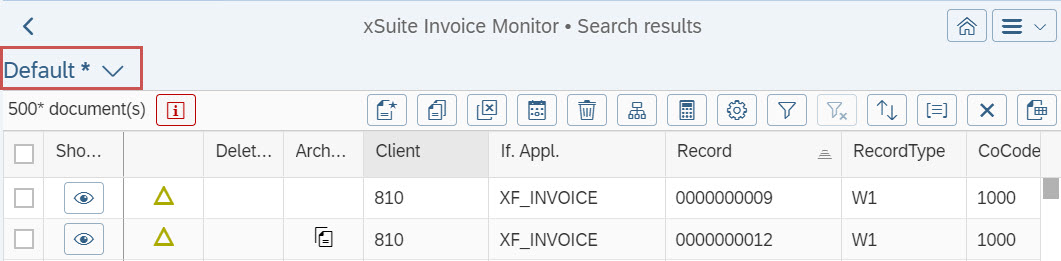
Creating a new variant — SAP Fiori
If changes are made in the selection view or in the hit list, this is indicated with an asterisk (*) in the name of the variant.
For search fields, the change will not apply until you leave the field.
 |
Changes are saved in the My Views selection dialog with the button Save or Save as.
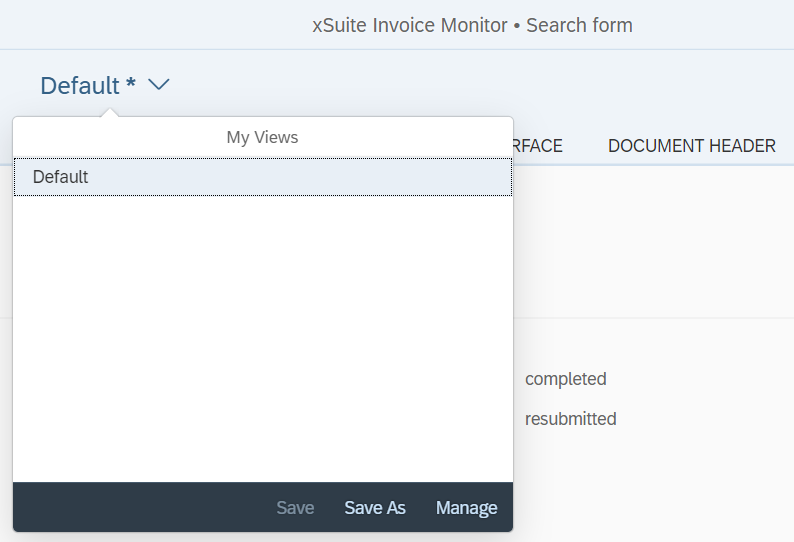 |
This dialog displays all variants that are marked as favorites. To load a variant, select it.
In the dialog My Views, the following buttons are available:
Button | Description | |
|---|---|---|
Save | Saves the changes made to the current variant. This button is displayed only if the current variant has been changed and it is a custom variant. | |
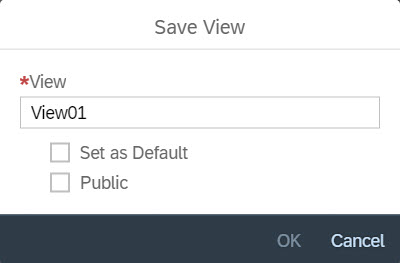
Save as | Saves the changes to the current variant as a new variant. Open the dialog Save View by clicking on the button.
Here, the user can make the following settings:
| |
Manage | Opens the dialog Manage Views. All available variants can be managed in this dialog. For more information, see Management of variants. |
Management of variants
In the dialog Manage Views, all variants to which a user has access are listed.
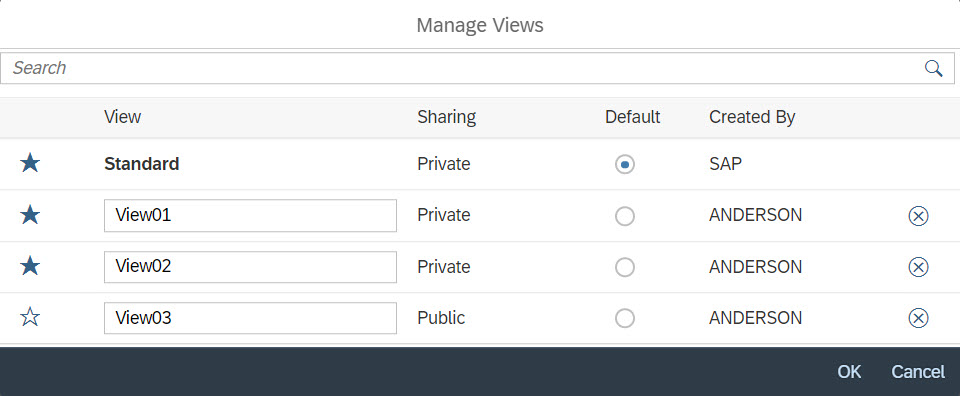 |
The Search field allows the user to search for specific variants and to filter the list of variants.
The Manage Views dialog consists of the following columns:
Column | Description |
|---|---|
Favorites | Shows one of the following icons:
To change the favorite status, click on the icon. Only variants marked as favorites are displayed in the selection dialog My Views. |
View | Variant name The user can rename his/her own variants. The name of the variant Standard and the names of variants created by other users are not editable. |
Sharing | Indicates whether a variant is public or private. This column is only displayed if there are public variants as well as private ones. |
Default | Indicates whether a variant has been marked as a default variant. By changing the selected radio button, the default variant can be changed. The default variant is called automatically when the application is launched. For each user, exactly one variant is always marked as the default variant. |
Created by | Name of the user who created the variant |
Delete | Shows the icon This icon can be used to delete your own variants. |


The Save button is used to save the changes. Deleted variants are not actually deleted until you have saved.
The Cancel button can be used to discard the changes made, including deletions.
SAP Fiori My Inbox
xSuite work items that are displayed in SAP Fiori in the xSuite Inbox (xSuite Inbox App) can also be integrated into SAP Fiori My Inbox 2.0 (on-premise).
Notice
SAP Cloud Foundry and SAP Neo Cloud currently do not support the integration of SAP Fiori My Inbox.
To integrate xSuite work items into SAP Fiori My Inbox, perform the following steps:
Step | Description | |
|---|---|---|
1 | SAP Fiori My Inbox App | The SAP Fiori My Inbox app must be configured and ready to run. For more information, see the SAP Knowledge Base, for example, Article 2424054. |
2 | xSuite Apps | The xSuite Inbox App and the xSuite Invoice Monitor App must be set up and configured. For more information, see the publication xSuite Apps for SAP Fiori Installation Guide. |
3 | xSuite Base Library ( | The following mappings must be stored for the RFC destinations used:
If a task is to be integrated into the SAP Fiori My Inbox app that requires the SAP Internet Transaction Server (ITS), it must be customized for ITS usage. For more information, see xSuite Base Library – settings.json. |
4 | Target mapping | For the xSuite Inbox App and the xSuite Invoice Monitor App, another target mapping must be created in the gateway system under transaction /UI2/FLPD_CUST. For more information, see Target mapping. |
5 | Task visualization | In the back-end system, the SWFVISU transaction must be used to configure the task visualization and the visualization parameters for each task to be displayed in the My Inbox app. For more information, see Task visualization. |
6 | Task name | In the back-end system, the task name can optionally be changed via transaction SPRO. For more information, see Task name. |
Limitations during integration
When integrating xSuite work items into the SAP Fiori My Inbox, certain limitations must be observed.
Limitations that affect the expert mode are to be distinguished from those affecting the "normal" mode.
The (OCI) catalogs are not available in the (preliminary) feeder.
When leaving an xSuite work item, the external window in which the attachments are displayed is always closed.
When tasks are integrated into SAP Fiori My Inbox that use the SAP Internet Transaction Server (ITS), they are displayed in the My Inbox app regardless of the end device.
However, the ITS functionality is not available on mobile devices.
Attachments are always opened in the external window. Inplace display is not supported.
Upon completion of a work item, some versions of SAP Fiori Launchpad or SAP My Inbox App may fail to exit the work item and return to the list of work items, or fail to update the list.
The reason for this behavior is the SAP Fiori My Inbox app. If this is the case, manually navigate to the list or refresh the list.
Notice
Work items opened via the followings apps use the cache functionality within SAP Fiori My Inbox:
xSuite Invoice Monitor App
xSuite Order Confirmation App
xSuite Sales Document Monitor App
xSuite ArchiveLink Monitor App
When leaving a work item such as this, e.g., by selecting another work item, the cache is discarded.
If the cache expires while a work item such as this is open, the work item is either reloaded or the work item is exited (expert mode only).
The SAP Fiori My Inbox task list is reloaded (expert mode and "normal" mode).
xSuite Base Library – settings.json
In the settings.json file of the xSuite Base Library, the following section must be configured:
"__comment__": "------------- MYINBOX SETTINGS -------------",
"myinbox": {
     "__comment__":
"***** MAPPING SYSTEM + CLIENT TO RFC ******",
     "sc": {
           "exampleSystem": {
                "clientA":                 "",
                "clientB":                 ""
           }
     },
     "__comment__": "***** MAPPING SYSTEMALIAS TO RFC **********",
     "alias": {
           "exampleAlias":                 ""
     }
},
Specify the systems plus client and the respective RFC connections under "sc". Store the system alias and the associated RFC connections under "alias".
The system is set up with the following structure:
SAP system | Client | System alias | RFC connection |
|---|---|---|---|
S01 | 100 | S01100 | RFC_S01_100 |
S01 | 800 | S01800 | RFC_S01_800 |
P02 | 200 | P_02 | RFC_P02 |
Configure the section in the settings.json file as follows:
"__comment__": "------------- MYINBOX SETTINGS -------------",
"myinbox": {
     "__comment__": "***** MAPPING SYSTEM + CLIENT TO RFC ******",
     "sc": {
           "S01": {
                "100":               "RFC_S01_100",
                "800":               "RFC_S01_800"
           },
           "P02": {
                "200":               "RFC_P02"

           },
     },
     "__comment__": "***** MAPPING SYSTEMALIAS TO RFC **********",
     "alias": {
           "S01100":                  "RFC_S01_100",
           "S01800":                  "RFC_S01_800",
           "P_02":                    "RFC_P02",
     }
},
Settings for the SAP Internet Transaction Server (ITS)
If tasks requiring the ITS are processed in the SAP Fiori My Inbox, ITS usage must be enabled in the settings.json file, and the corresponding ITS customizing must be performed.
For more information, see the publication xSuite Apps for SAP Fiori Installation Guide.
A functioning SAP Internet Transaction Server (ITS) is required.
Target mapping
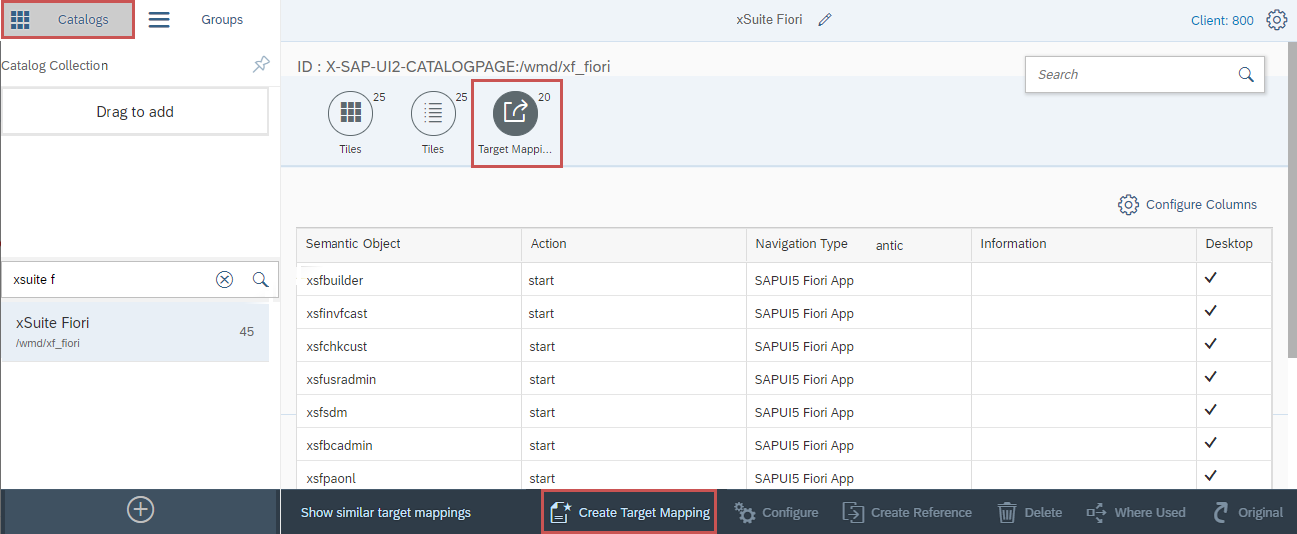
Create five new target mappings on the gateway system, using Transaction /UI2/FLPD_CUST.
Under Catalogs, select the catalog containing the xSuite App tiles and the corresponding target mapping
In the Target Mapping tab, use the Create Target Mapping button to create five new target mappings in succession.
 |
Click the Create Target Mapping button to open the Configure: Target mapping view.
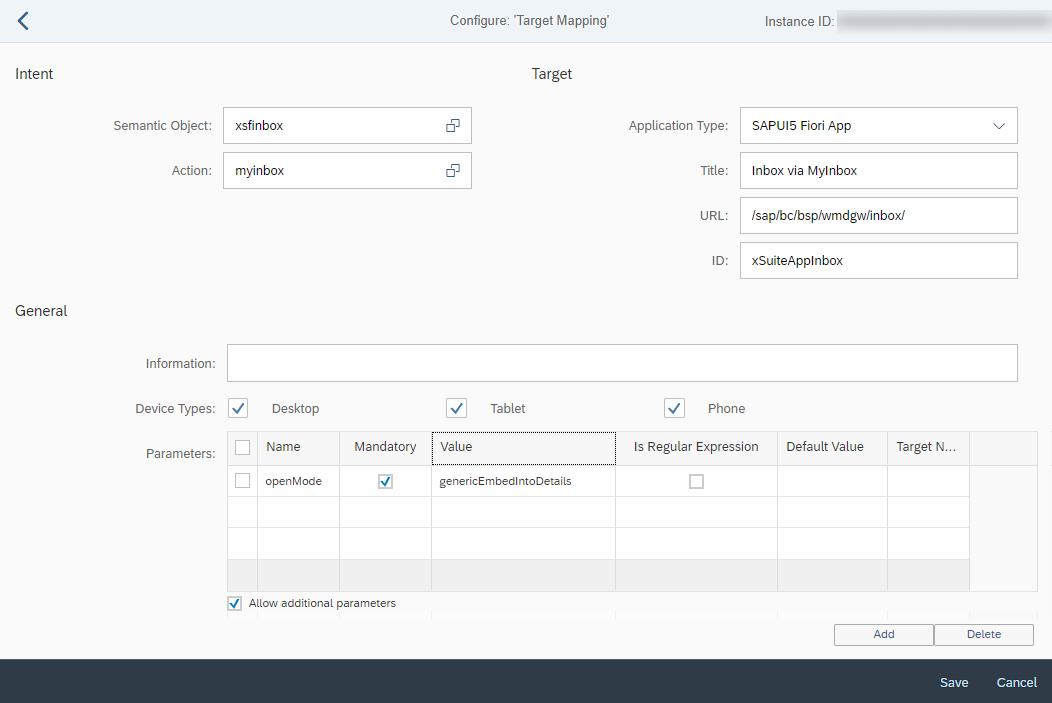 |
All values must be entered according to the following tables. Note that values are case-sensitive.
Notice
The title in the Title field can be selected as desired.
Field | Value | |
|---|---|---|
Semantic Object |
| |
Action |
| |
Application Type |
| |
Title |
| |
URL |
| |
ID |
| |
Device Type | Desktop | activated checkbox |
Tablet | activated checkbox | |
Phone | activated checkbox | |
Parameters | Name |
|
Mandatory | activated checkbox | |
Value |
| |
Is Regular Expression | disabled checkbox | |
Default Value | (Blank) | |
Target Name | (Blank) | |
Allow additional parameters | activated checkbox | |
Task visualization
The task visualization and the visualization parameters for each task to be displayed in the My Inbox app must be configured in the back-end system.
This configuration is performed via transaction SWFVISU.
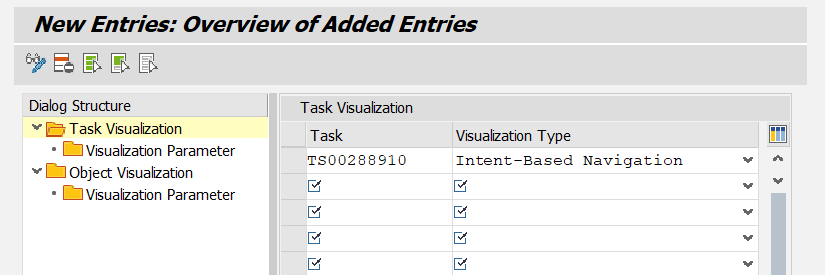 |
Create new entries under Task Visualization. In the Task column, enter the number of the task. In the Visualization Type column, always select the value Intent-Based Navigation.
In Visualization parameters, always create the visualization parameters for all task visualizations created.
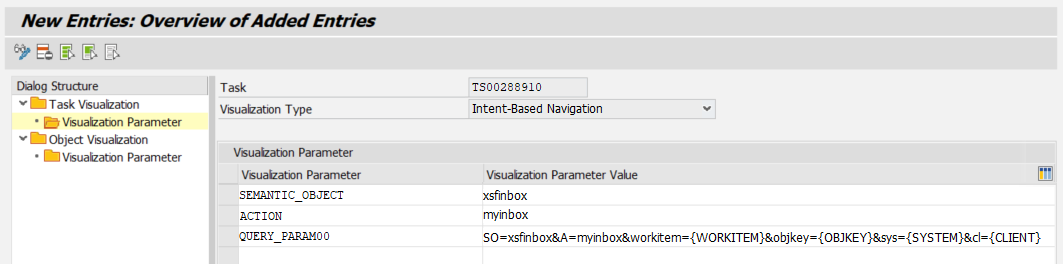 |
A list of all possible tasks and the corresponding visualization parameters can be found under:
Tasks and visualization parameters – Inbox without ITS
The tasks listed below can be integrated into the SAP My Inbox app. These tasks do not require the SAP Internet Transaction Server (ITS).
The tasks require the following visualization parameters:
Parameter | Value |
|---|---|
SEMANTIC_OBJECT |
|
ACTION |
|
QUERY_PARAM00 |
|
Tasks that can be integrated via the xSuite Inbox App without ITS usage:
Role | Task |
|---|---|
AAC0 | TS00288910 |
ACAG | TS00288921 |
ALVA | TS00297492 |
AREL | TS00288918 |
AVAG | TS00288903 |
AVAL | TS00288931 |
CDAG | TS00297424 |
CDC0 | TS00297427 |
CREL | TS00297430 |
FMAG | TS00297451 |
FMC0 | TS00297454 |
FREL | TS00297457 |
LAC0 | TS00288950 |
LACO | TS00288964 |
LCAG | TS00288961 |
LGPO | TS00288984 |
LREL | TS00288958 |
LVAG | TS00288947 |
LVAL | TS00288971 |
OCRE | TS00297507 |
OCVA | TS00297473 |
ORRE | TS00289088 |
ORSV | TS00289094 |
ORVA | TS00289082 |
PFCC | TS00289074 |
PFET | TS00289052 |
PFRE | TS00289043 |
PFSV | TS00289034 |
PFVA | TS00289025 |
PORE | TS00289037 |
POSV | TS00289028 |
POVA | TS00289019 |
PRRE | TS00289040 |
PRSV | TS00289031 |
PRVA | TS00289022 |
SIRE | TS00297530 |
SIVA | TS00297515 |
XIGR | TS00288998 |
XIRE | TS00288991 |
XIVA | TS00288994 |
Tasks and visualization parameters – Inbox with ITS
The tasks listed below can be integrated into the SAP My Inbox app. These tasks require the SAP Internet Transaction Server (ITS).
The tasks require the following visualization parameters:
Parameter | Value |
|---|---|
SEMANTIC_OBJECT |
|
ACTION |
|
QUERY_PARAM00 |
|
Tasks that can be integrated via the xSuite Inbox App with ITS usage:
Role | Task |
|---|---|
AAC1 | TS00288913 |
AAC2 | TS00288934 |
AAC3 | TS00288928 |
AACC | TS00288916 |
AACO | TS00288924 |
ALER | TS00297501 |
ARD0 | TS00297410 |
ARD1 | TS00297413 |
ARD2 | TS00297416 |
AREV | TS00288940 |
CDC1 | TS00297433 |
CDC2 | TS00297439 |
CDC3 | TS00297445 |
CDCC | TS00297436 |
FMC1 | TS00297460 |
FMC2 | TS00297466 |
FMC3 | TS00297472 |
FMCC | TS00297463 |
LAC1 | TS00288953 |
LAC2 | TS00288974 |
LAC3 | TS00288968 |
LACC | TS00288956 |
LREV | TS00288980 |
ORET | TS00289085 |
POET | TS00289046 |
PRET | TS00289049 |
XIPO | TS00289004 |
Tasks and visualization parameters – Invoice Monitor
The tasks listed below can be integrated into the SAP My Inbox app. These tasks do not require the SAP Internet Transaction Server (ITS).
The tasks require the following visualization parameters:
Parameter | Value |
|---|---|
SEMANTIC_OBJECT |
|
ACTION |
|
QUERY_PARAM00 |
|
Tasks that can be integrated via the xSuite Invoice Monitor App without ITS usage:
Role | Task |
|---|---|
XIER | TS00289010 |
XIET | TS00288985 |
XIPR | TS00289013 |
Task name
On the back-end system, the labels of tasks displayed in SAP Fiori My Inbox can be optionally changed.
This configuration is performed via transaction SPRO → SAP Customizing Implementation Guide → SAP NetWeaver → SAP Gateway Service Enablement → Content → Workflow Settings → Maintain Task Names and Decision Options.
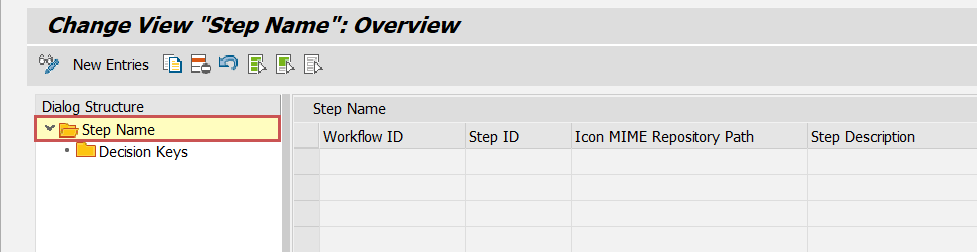 |
Under Step Name, an existing entry can be edited or a new entry can be created for this purpose. The entry is language-dependent, i.e. the description is maintained for the current SAP GUI logon language.
For each entry, the desired task name must be entered in the Step Description column for the corresponding combination of workflow ID and step ID.
In SAP Fiori My Inbox, the tasks of the AVAG and LVAG roles are both labeled Approval. To enable the user to distinguish between the tasks, the name for the AVAG role should be changed from Approval to AP Approval.
 |
The workflow ID for a role can be determined in the transaction /WMD/BC_SPRO → xSuite Business Solutions → Workflow → Basis → Basic Settings → Assign Roles.
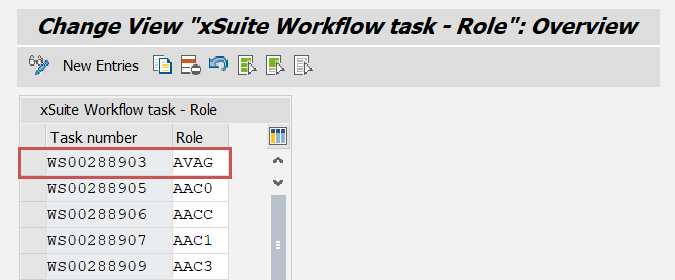 |
The work item ID searched for can then be determined for the role in the table. In this example, the searched work item ID of the role AVAG is WS00288903.
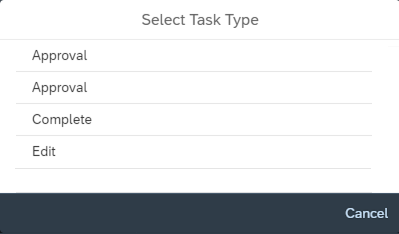
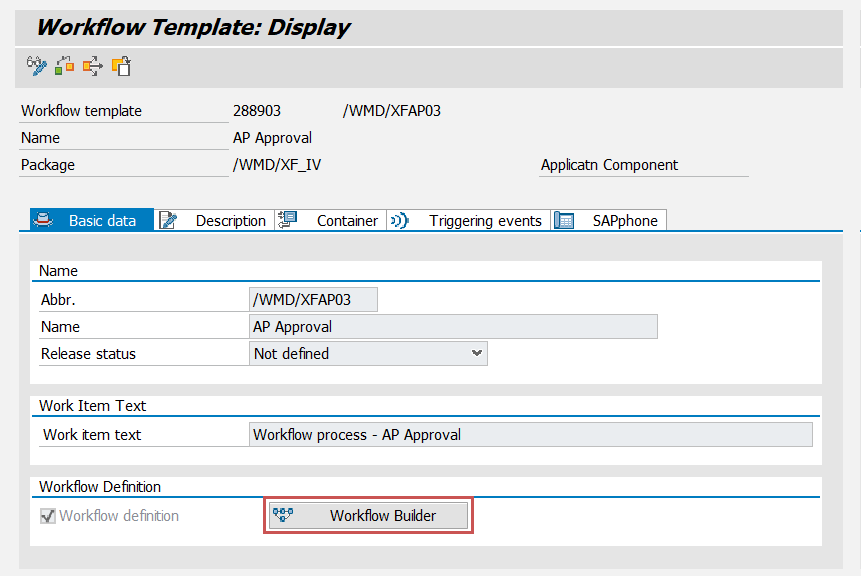
The step ID for the workflow ID can be determined via transaction PFTC in the Workflow Builder. There, the task type Workflow Template must be selected, and the ID of the task entered without WS, i.e. 00288903 in this example.
The Workflow Builder must be called up in the Basic Data tab.
 |
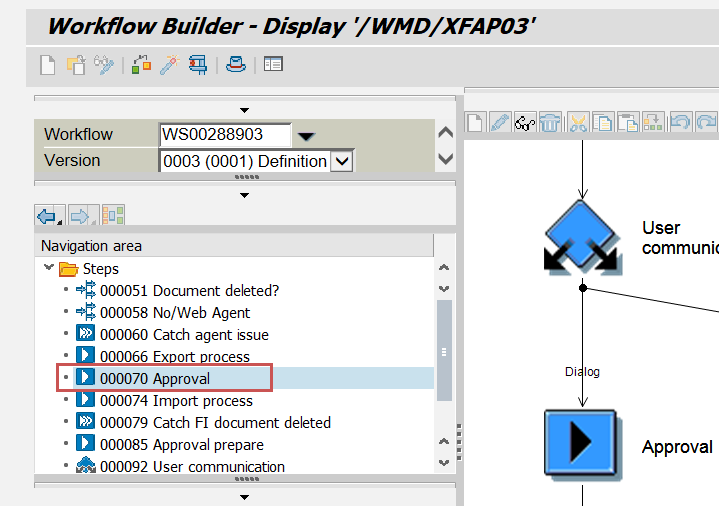
In the Workflow Builder, the Step ID can be determined for the Approval dialog in the navigation area. In this example, the step ID is 70.
 |
In transaction SPRO → SAP Customizing Implementation Guide → SAP NetWeaver → SAP Gateway Service Enablement → Content → Workflow Settings → Maintain Task Names and Decision Options, a new entry is created for workflow ID WS00288903 and step ID 70:
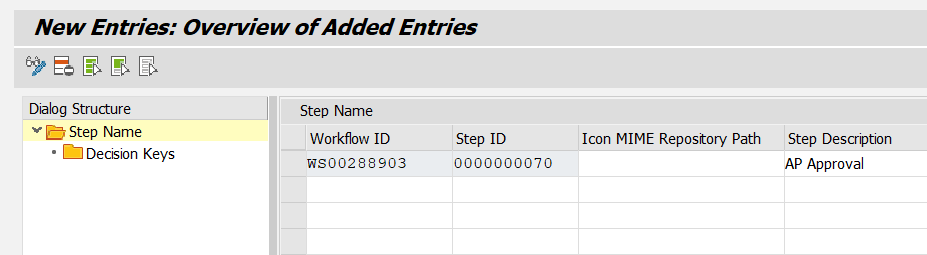 |
After saving the new entry, the new name AP Approval will be used in the SAP Fiori My Inbox.
Excel export – SAP Fiori
In all xSuite overviews and xSuite monitors, the hit list now contains the button  Export.
This button can be used to export all visible columns of a hit list as an Excel file.
 |
Dates without time are exported in the format YYYY-MM-DD. Dates with time are exported in the format YYYY-MM-DD HH:mm:ss.
When exporting columns with icons, the icon names are exported and not the icons themselves.
Table infobar – SAP Fiori
Tables in which multiple selection of rows is possible now have an infobar. In this infobar, two different pieces of information are displayed:
The number of rows selected
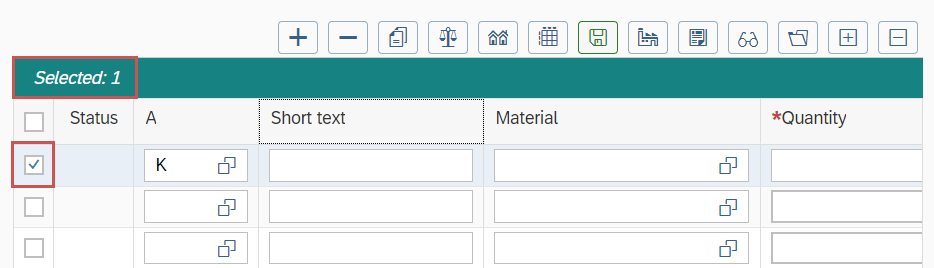
The names of columns to which a filter is applied
A maximum of 3 column names is displayed.
Click on the infobar to open the dialog box for setting filter criteria. The prerequisite for this is that the user can edit the filter manually.

If no rows are selected and no filter is set, the infobar will not be displayed.
Cache validation – SAP Fiori
When exiting the xSuite Invoice Monitor App, the xSuite Sales Document Monitor App or the xSuite Order Confirmation Monitor App: the cache of the currently opened work item is now correctly invalidated if a work item is open when exiting.
DocViewer – SAP Fiori
The DocViewer, which is used in the xSuite Invoice Monitor App, xSuite Sales Document Monitor App and xSuite Order Confirmation Monitor App: has been updated to version 1.6.6.
In addition, the highlighting in the DocViewer has been adjusted.
Until now, if the user selects a field for which no value was detected when field highlighting was enabled, the last highlighted value remained highlighted in the DocViewer. Now the existing highlighting in the attachment is removed.
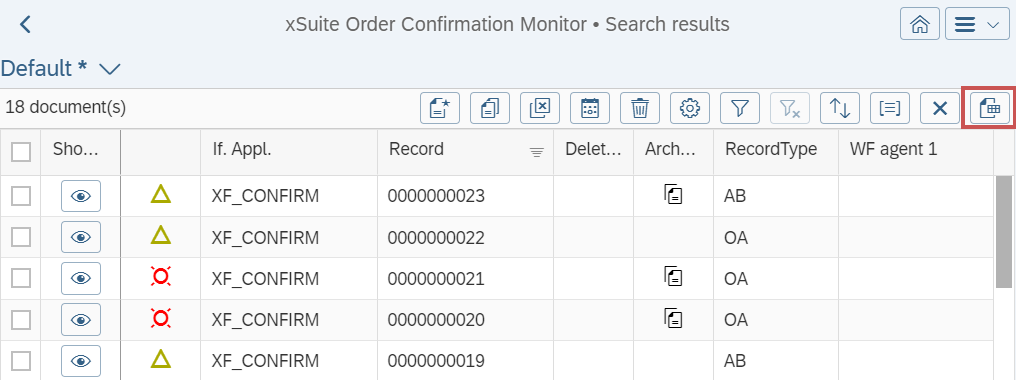
Totals function – SAP Fiori
The button  Total, which was already available in the xSuite monitors, is now also available in the xSuite overviews.
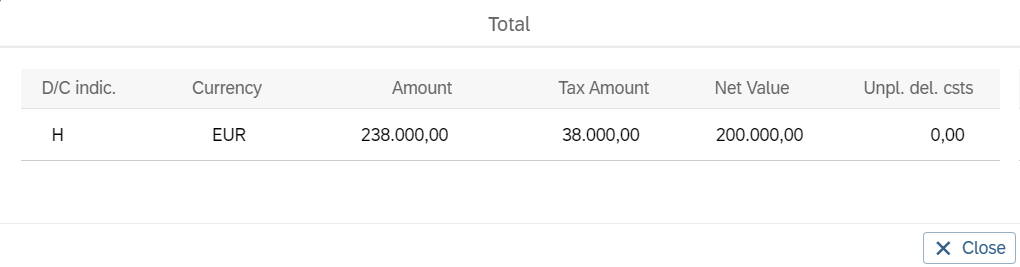
Also, the result of the totals function is now no longer displayed at the end of tables, but rather in the separate Total dialog. This was also the case on mobile devices before.
 |
Field name – SAP Fiori
When adding new fields, e.g., in the context of user exits, special characters in field names were not automatically recognized until now. In order to intercept special characters such as a slash (/), additional user exits of a comprehensive nature were required in the front-end.
This is no longer the case. Special characters in field names are automatically recognized as such.