Order Confirmation Monitor in SAP Fiori
As of version 5.2.5, the Order Confirmation Monitor from the SAP GUI (transaction/WMD/FP_OCM) is available as an xSuite App for SAP Fiori.
Login is only possible with a valid SAP user account. Pure xSuite web users are not supported.
Back-end user exits
Notice
Since the user exits are not exclusively valid for SAP Fiori, the consultant must check compatibility with the xSuite App for SAP Fiori.
Graphical SAP GUI elements such as dialogs cannot be displayed and must be deactivated in advance for Fiori if the user exit is executed from the application.
Start page
When the application is started, a search dialog similar to that in the SAP GUI is displayed.
Notice
Notes on the search fields:
A star (*) is used to indicate fields as mandatory. If mandatory fields are empty, they are outlined in red.
In the Interface Appl. field, the user can only enter a single value. All other fields allow you to enter multiple values with search operators, such as
starts withorcontains.When filtering with a single value, depending on the data type of the search field and the length of the entered value, the user uses the search operators
containsoris equal to.If the user enters two words, the system will consider them to be a single unit. For example: If the user enters the words
Max Nobodyin the Scan user field, the system will search for this exact string.If the user searches for two interdependent words, the F4 input help must be used. Only there can the search operator be changed.
Dates can only be entered using the F4 input help. If you click in a date field, the F4 input help will open automatically.
Search criteria entered appears as tokens. A token consists of an operator and a search value.

The user can delete tokens individually with the X button. Tokens can only be changed in the F4 input help.
The buttons in the footer toolbar can be used to execute the following actions:
Icon | Name | Description |
|---|---|---|
 | Sorting | Specifies the order in which the data is delivered from the back-end. This is particularly relevant if more results are found than the back end can transmit to the front end. |
 | Create | Creates a new document. |
 | Load variant | Loads a saved search variant. |
 | Save variant | When search parameters have been entered, this saves them as a search variant. The user can create a new variant or overwrite an existing one. |
 | Clear search form | Empties the search form. |
 | Search | Performs a search. Prerequisite: All mandatory fields are populated. |
Search results
The back end transfers a maximum of 500 documents as search results to the front end. If more than 500 documents are found, a warning is displayed in the table header. The filter and sorting functions only apply to these 500 documents. The user should therefore restrict the search so that a maximum of 500 documents is found.
The user opens a document with the button  Show document in the second table column.
Table toolbar
Icon | Name | Description |
|---|---|---|
 | Create | Creates a new document. |
 | Reactivate | Reactivates a document. A suitable document must be selected. |
 | Cancel data extraction | Aborts the data-extraction process. At least one matching document must be selected. |
 | Resubmission | Sets or removes resubmission. At least one matching document must be selected. |
 | Mass deletion | Deletes documents. At least one matching document must be selected. |
 | Filter | Sets a filter. This can be used to drill further down in the existing search result. |
 | Clear all filters | Removes all filters. |
 | Sorting | Sorts or categorizes search results. You can select multiple columns and specify the sort order (ascending/descending). Categorization can be defined with the responsive table. |
 | Restore default sorting | Removes the sorting/categorization set. |
Footer toolbar
Icon | Name | Description |
|---|---|---|
 | Show search criteria | Displays the search form of the Order Confirmation Monitor. The search form is filled with the search parameters that have resulted in the search results. |
 | Refresh | Executes the search again. |
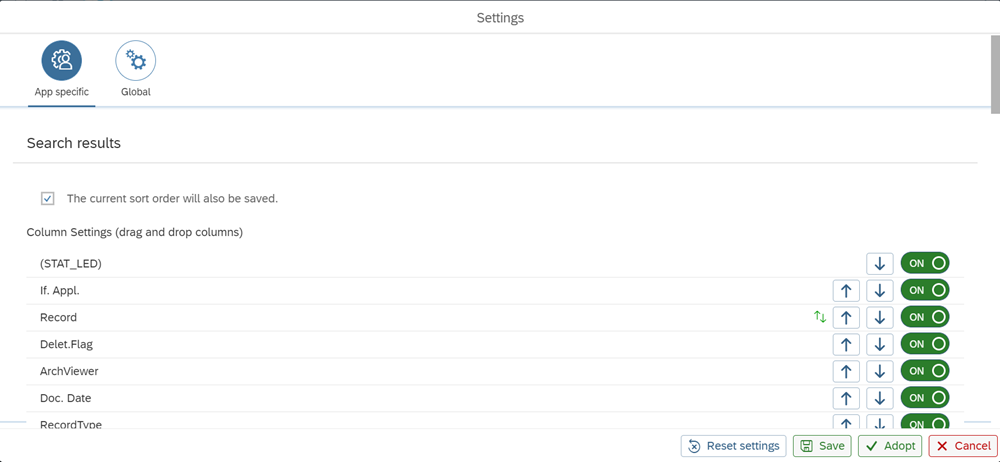
User settings for display of search results
The user can set the display of the search results via the header menu:
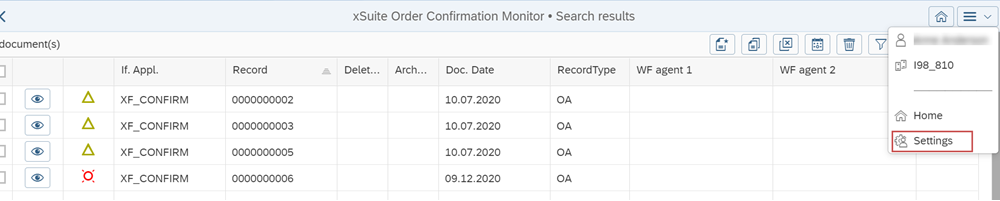
There, the user can specify whether the current sort order should be saved and thus be automatically reused the next time the app is opened.
The user can also use the arrow buttons to specify which columns in the result table are to be displayed, and in which order.
Cache
For better performance, the Order Confirmation Monitor App also uses a cache. The functionality is identical to that of the cache in the Invoice Monitor App.
Validation view
Data validation
In addition to being sent to the front-end for data validation, the header and item data are sent to the back end for validation immediately after input. Invalid data is discarded directly.
Buttons in the PO-item section
Icon | Name | Description |
|---|---|---|
 | Status | By clicking on the Status button, the user can call up the Status dialog with messages for the respective item data line. The icon of the button will already indicate the most negative type of signal (Error, Warning, Success). |
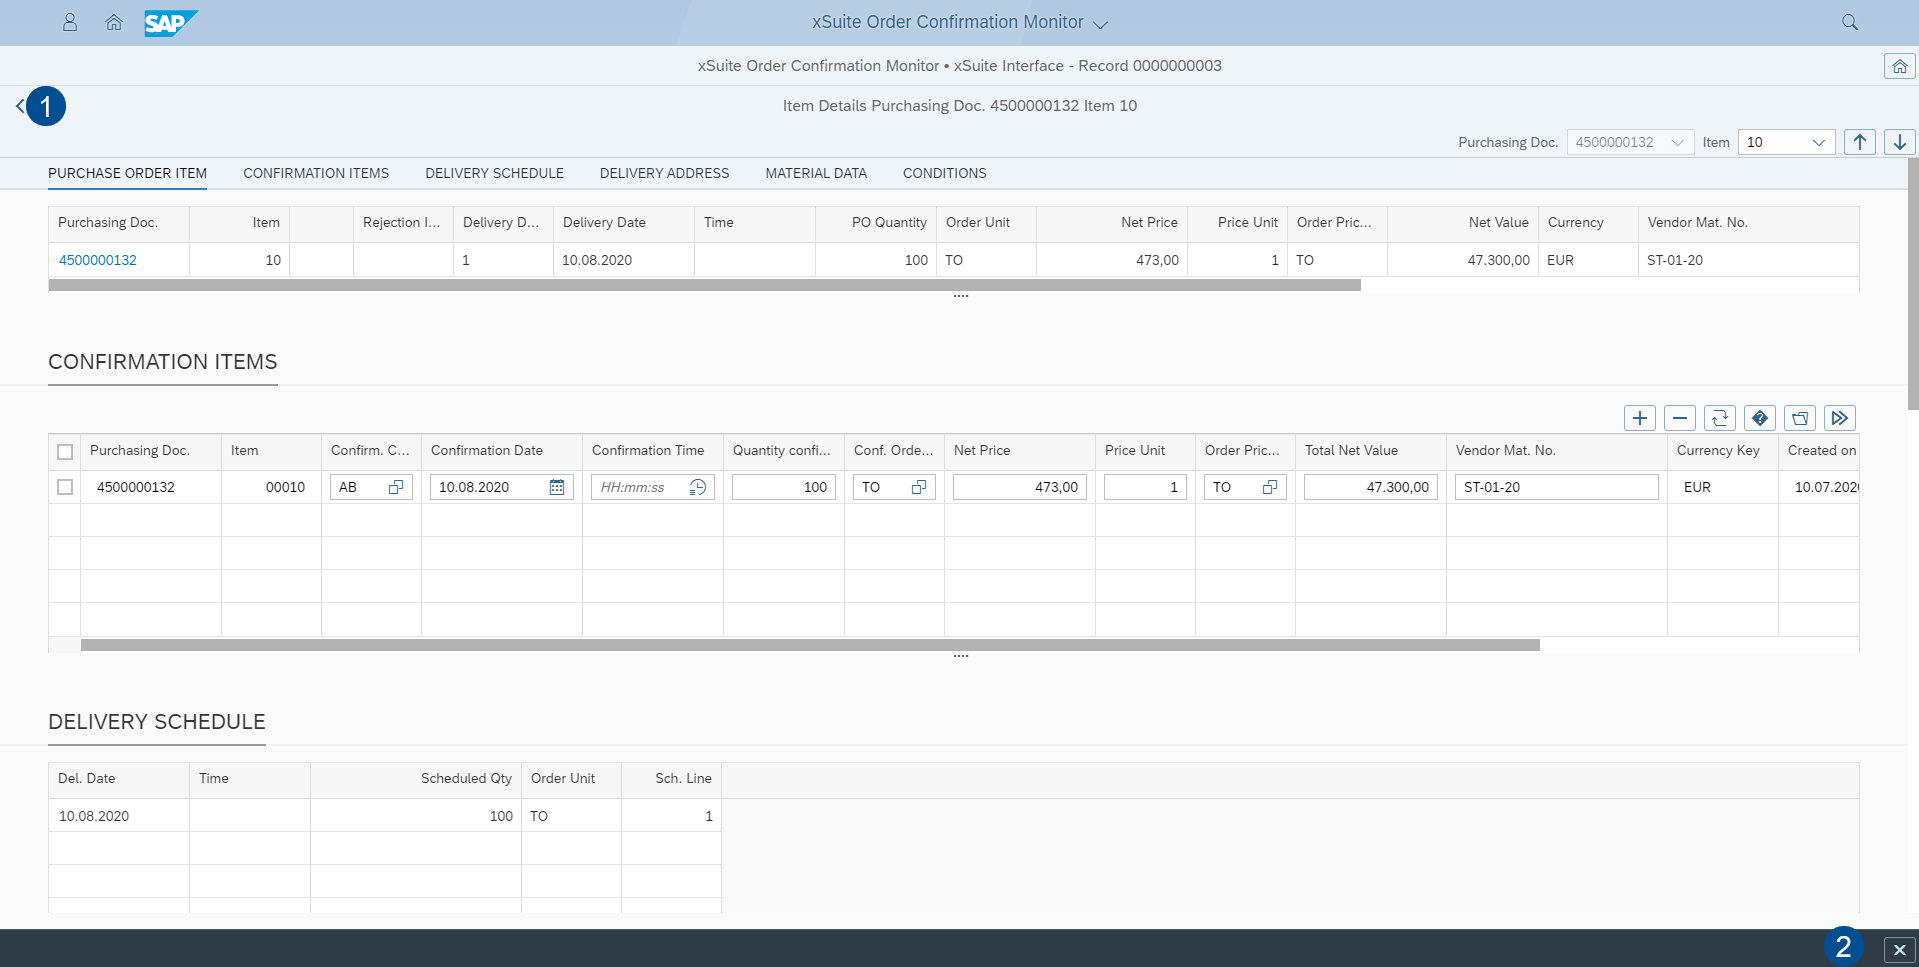
 | Header Data | The SAP GUI Order Confirmation Monitor displays all data in a single view. In the xSuite Order Confirmation Monitor App, on the other hand, the purchasing document header data and item details are displayed in separate views. Via the Header Data button, the user can display the header data of the relevant purchasing document. If the work item covers several purchasing documents, the user can toggle between them via the drop-down box or the buttons in the header. When toggling between documents, the user does not have to leave the respective view. Use the Close button in the header ( |
 | Display SAP documents | The SAP document is displayed within xSuite Web via the ITS service (Internet Transaction Server Service) (ME23N). The user can now also call up the SAP document in the Purchase Order Items area with the Display SAP documents button. |
 | Item Details | The Item Details button allows the user to display the item details of the relevant purchasing document. The item details will appear in a separate window. If the work item covers several purchasing documents, the user can toggle between the individual purchasing documents and items via the drop-down box or the buttons in the header. When toggling between documents, the user does not have to leave the respective view. By clicking the Close button in the header ( Fields of the confirmation items for which there are error messages and/or warnings are marked in color (see Status button). |


"Header Data" and "Item Details" view
In addition to front-end data validation, the header and item data are sent to the back end for validation immediately after input. Invalid data is discarded directly.
The SAP GUI Order Confirmation Monitor displays all data in a single view. In the xSuite Order Confirmation Monitor app, however, the header data and item details of a purchasing document are displayed in separate views.
If an OC work item is comprised of several purchasing documents and/or items, navigation is displayed in the page header of the relevant view. This navigation enables the user to toggle between the data of the individual purchasing documents/items without having to leave the relevant view.
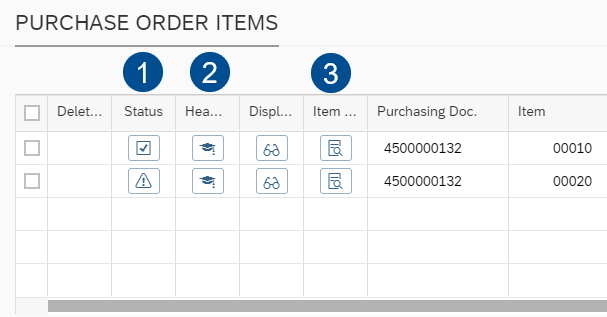 |
The user can call up the Header Data view with the Header Data button (2) (in the first screen shot) in the respective purchase order item.

The navigation in the Header Data screen consists of one drop-down box and two buttons.
The Next button (arrow pointing downward) and the Previous button (arrow pointing upward) display the previous or next purchasing document (1) respectively. Previous and Next always refer to the row in the Purchase Order Items table in the initial view.
In the Header Data screen, each purchasing document is only listed one time. This is also the case if the purchasing document exists with several items, since the header data is independent of the item.
If the user calls up the header data for a middle purchase order item line by:
clicking Previous, the purchasing document of the previous line will appear.
clicking Next, the purchasing document of the next line will appear.
However, if the next purchasing document is the same as the one in the previous row, this row will be skipped and the next row selected.
If there is no other purchase order item line, the first line will be selected and thus its purchasing document will be displayed.
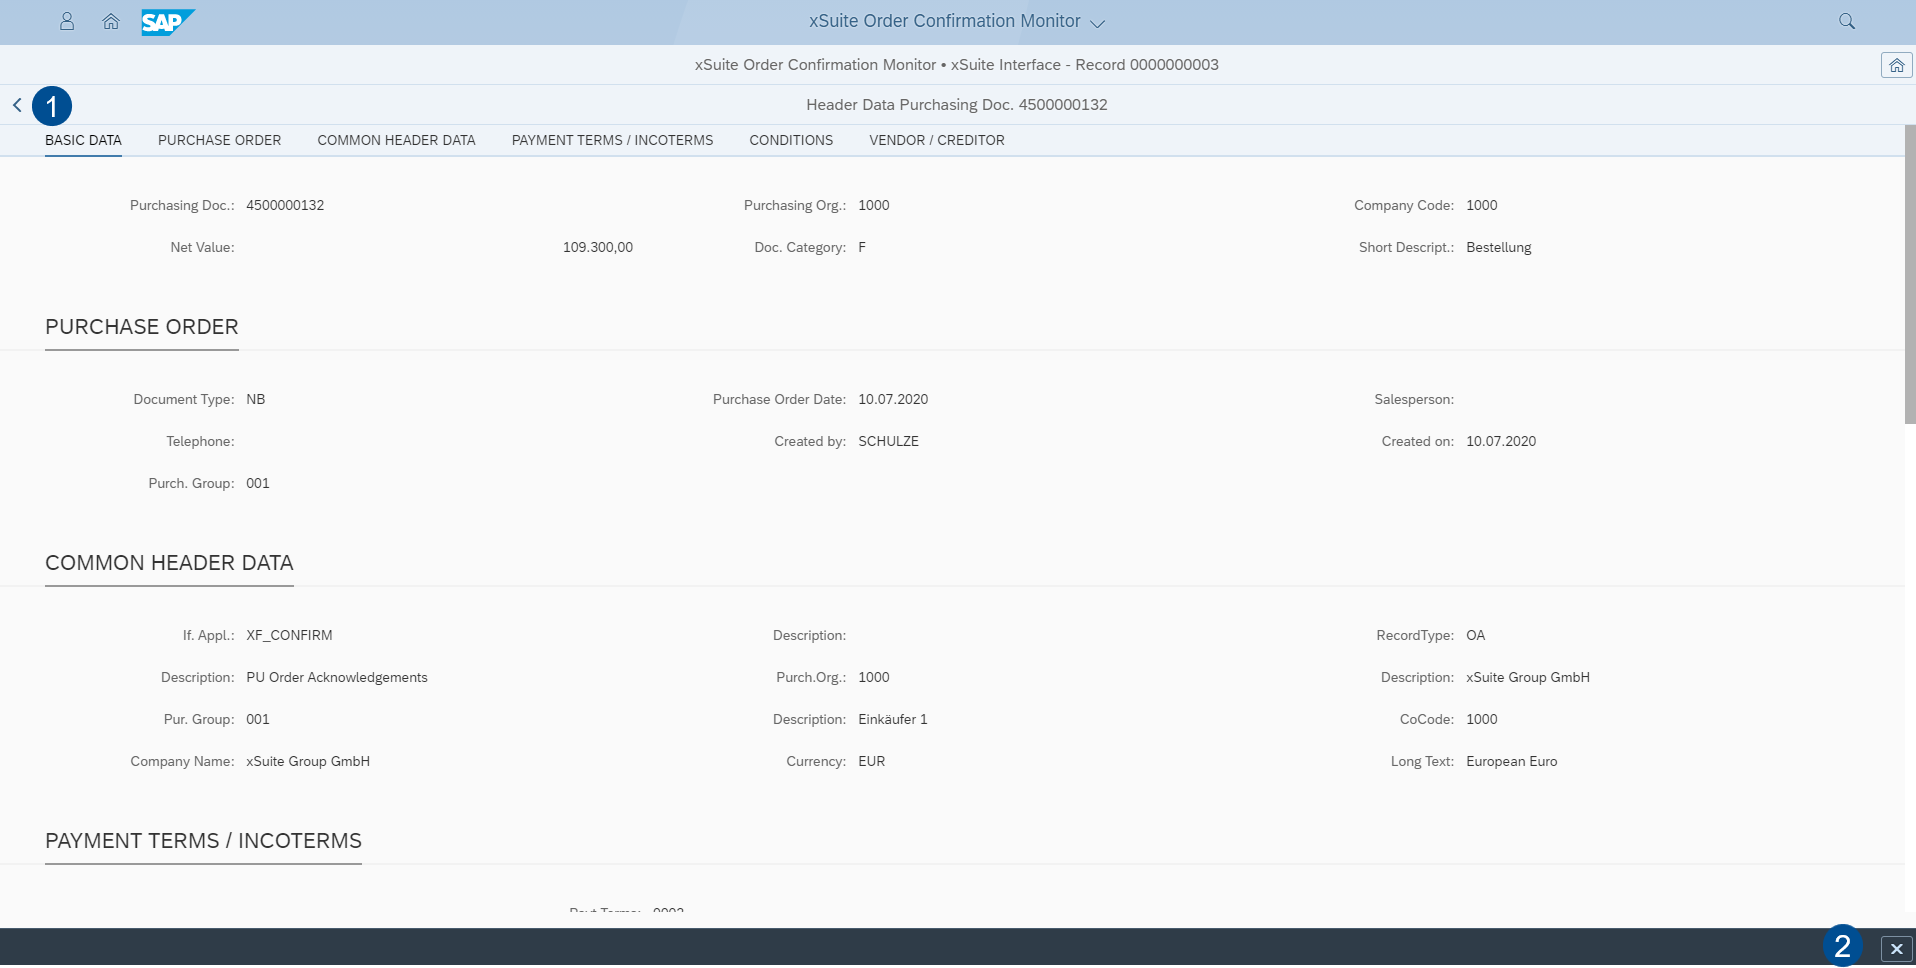
The user can exit the Header Data view with the button Close (1 or 2). The user will then be directed back to the original document view.
The Item Details view can be called up with the Item Details button (3) (in the first screen shot) in in the respective purchase order item.

The navigation in the Item Details view consists of two drop-down boxes and two buttons.
The Next button (arrow pointing downward) and the Previous button (arrow pointing upward) display the previous or next item (2) and, if applicable, the next/previous purchasing document (1). Previous and Next always refer to the row in the Purchase Order Items table in the initial view.
The drop-down box Item always provides only those items that match the selected purchasing document. If a purchasing document only contains a single line item, the drop-down box Item cannot be changed.
In the Item Details view, the user can use the drop-down boxes to select the desired purchasing document and, if applicable, the item.
If the user chooses a different purchasing document, which items are available may also change.
If, in the case of multiple items, the user calls up the details of an item in the middle by:
clicking Next, the item details for the purchasing document and the item of the next line will appear.
clicking Previous, the item details for the purchasing document and the item of the next line will appear.
The user can exit the Item Data view by clicking the Close button (1 or 2). The user will then be directed back to the original document view.
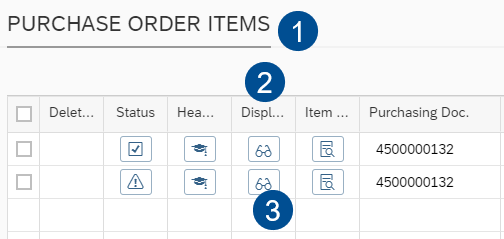 |
The Display SAP document button (3) in the column Display SAP document (2) under Purchase Order Items (1) will only be shown if the ITS (Internet Transaction Server Service) is configured and active.
When you click the Display SAP document button, the SAP document is displayed in the ITS.

The Link in Purchase Order Item (2) in the Item Details view (1) in the column Purchasing Doc. (3) will also only appear if the ITS is configured in the front-end settings of the xSuite App and has been activated.
If the ITS functionality has not been activated, the purchasing document number will be output as plain text and not as a link in blue font color.
Buttons in the footer
In the SAP GUI, a button bar is displayed in the validation view on the left side of the screen. These buttons can be found in the Order Confirmation Monitor app in the footer toolbar of the validation view.
Icon | Name | Description |
|---|---|---|
 | Check | Checks all PO items and refreshes the status in the column S (error status). The warning and error messages of all PO items are displayed together. |
 | Save | Saves all changes made to the document Caution: If the user leaves the document without saving, all changes will be discarded without a confirmation prompt. |
 | Workflow | Performs a document check and transfers the document to the Order Confirmation workflow. If the document contains errors, the workflow will be started in the editing step. If the document does not contain errors, the workflow will be started in the approval step. |
 | Post | If errors have not been found during validation, all PO items will be checked and the document posted. |
 | Record type | Changes the record type of the document. |
 | Create attachment | Adds an attachment to the document. For example, the user can add an original document at a later date. Attachments that have been added are not transferred to the purchase order until the document has been posted. Once attachments have been added, they cannot be deleted. |
 | Sends an e-mail. | |
 | Reset Purch. Doc. Category | Resets the purchasing document category. The document category is reset as soon as the SAP document data is merged again. |
 | Delete document | Sets a deletion indicator on the document (in the Order Confirmation Monitor and in the validation view). If the document is in the workflow, then the workflow will be aborted. The user can display the document, but can no longer edit it. Once set, the deletion flag cannot be removed. Deleted documents can only be reactivated (Order Confirmation Monitor → Button Reactivate). |
 | Refresh | Reloads the validation view. |