xFlow Invoice Monitor
In this release, the xFlow Invoice Monitor (Transaction /WMD/FP_INVM) has been made available as a web application for the first time. The web application can either be integrated into the Fiori Launchpad or operated in stand-alone mode without it.
The prerequisite is a login and valid SAP-user status. Users that only possess xFlow Web authorizations are not supported.
User exits in the back end
When user exits are available for the xFlow Invoice Monitor in the back end, they must be checked for whether they work in tandem with the web application.
User exits may not, for instance, have any graphic SAP GUI elements such as dialogs, nor may they generate them when the user exit is executed via the web application. It is necessary to set up switches for this.
Configuring the xFlow Invoice Monitor
The xFlow Invoice Monitor must be configured in SAP GUI as in the past.
The additional configuration necessary for the web application is performed in the file settings.json.
Operation without the Fiori Launchpad (stand-alone mode)
Prerequisite
The SAPUI5 framework must be freely accessible, i.e., without a Fiori login.
Configuration
Along with configuration with the file settings.json, the relative path specification to the SAPUI5 framework must be configured in the files index.html and sso.html.
User accounts
To allow a user to use the xFlow Invoice Monitor Fiori app, an SAP user is required—in contrast to the xFlow Fiori App or xFlow Web, which do not require it.
Login is performed from the Fiori Launchpad or in stand-alone mode, either on the login page of the app or on the SSO page.
F4 help
The F4 help in the xFlow Invoice Monitor Fiori app differs from the F4 help in the xFlow Fiori app or on the xFlow Web. Which of the functions mentioned here offers F4 help depends on the data field for which the respective F4 help is invoked, as well as on which data this field accepts (individual value or multiple values/ranges such as in the search dialog).
In the F4 help, either one or both of the following sections will appear:
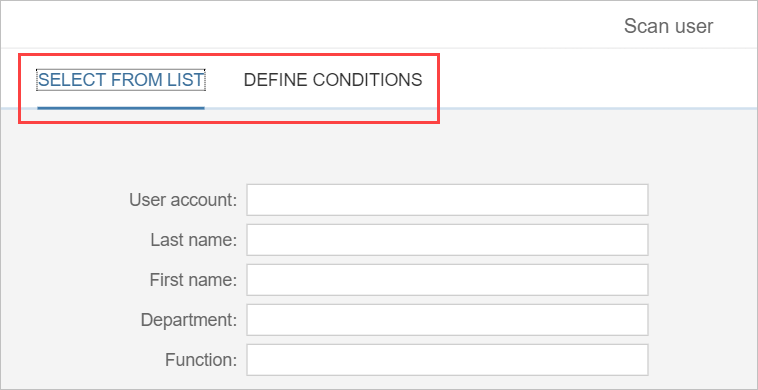
"SELECT FROM LIST" section
Available values can be selected from a list here.
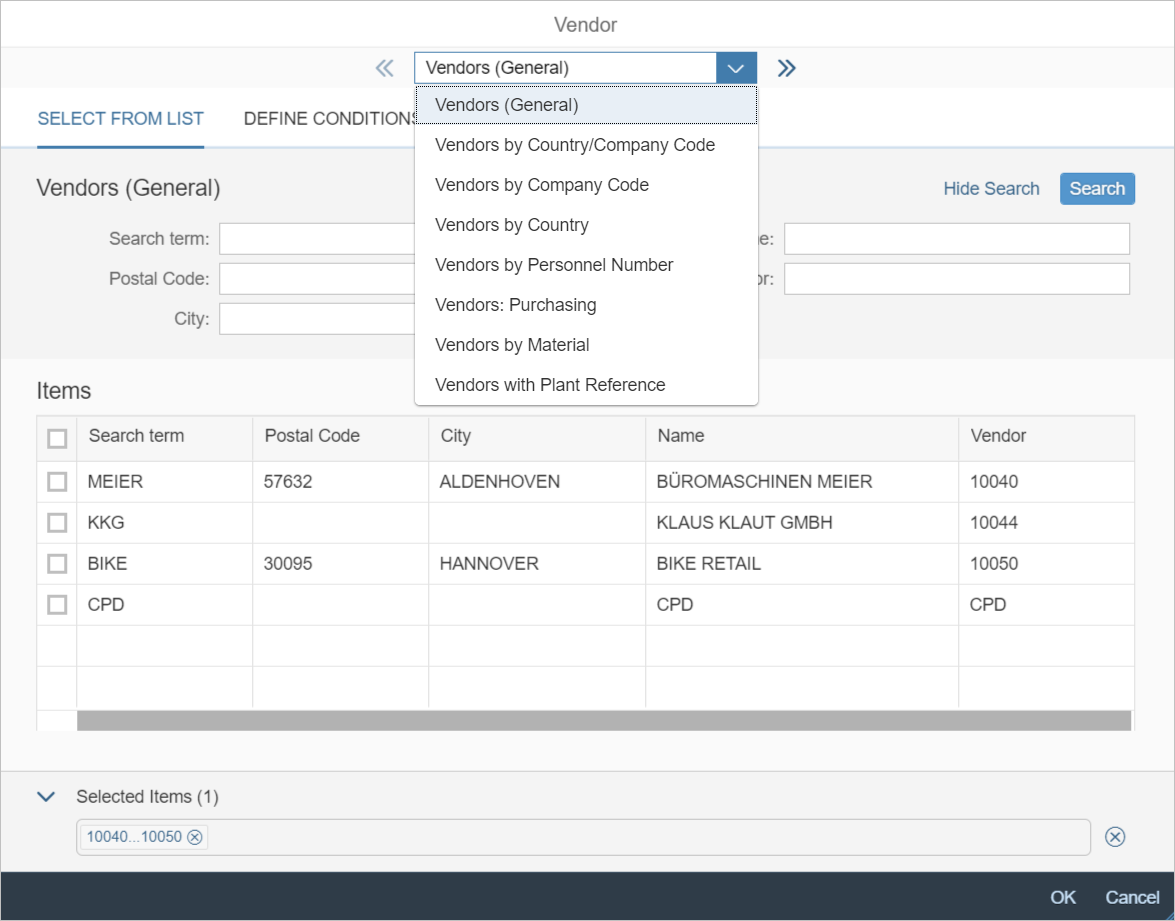
The upper pick list is comparable to the tab in the F4 help in the SAP GUI. To see the respective search fields, click on an entry. The values in all fields are linked with AND.
Each search field can be prepopulated with values. Some of the prepopulated values cannot be changed.
Multiple found elements can be selected with the check boxes in the first column.
"DEFINE CONDITIONS" section
Here, conditions can be defined for a search field—for example, for the scan user:
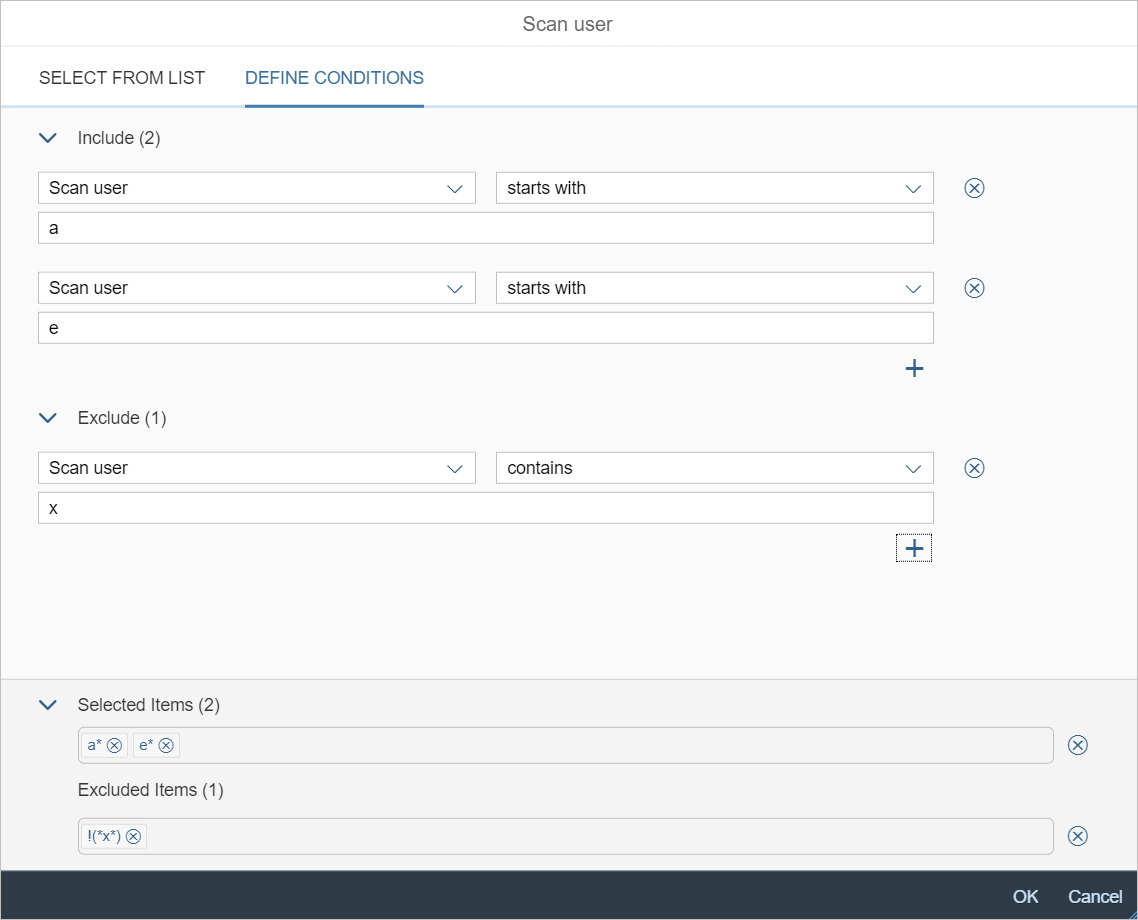
A condition always consists of three specifications:
Search field (generally preset and not changeable)
Search operator (such as "contains" or "equals", depending on the data type of the search field)
Value (search term)
To add a line, click the plus button. To delete a line, click the X button.
Inclusive and exclusive conditions can be defined.
Search operators of exclusive conditions should be read as negated.
Inclusive conditions and exclusive conditions are all linked with OR.
When there are inclusive and exclusive conditions, both condition blocks are linked with AND.
The search condition in the screenshot should be read as follows: The name of the scan user being searched for starts with an "a" or an "e" and does not contain any "x".
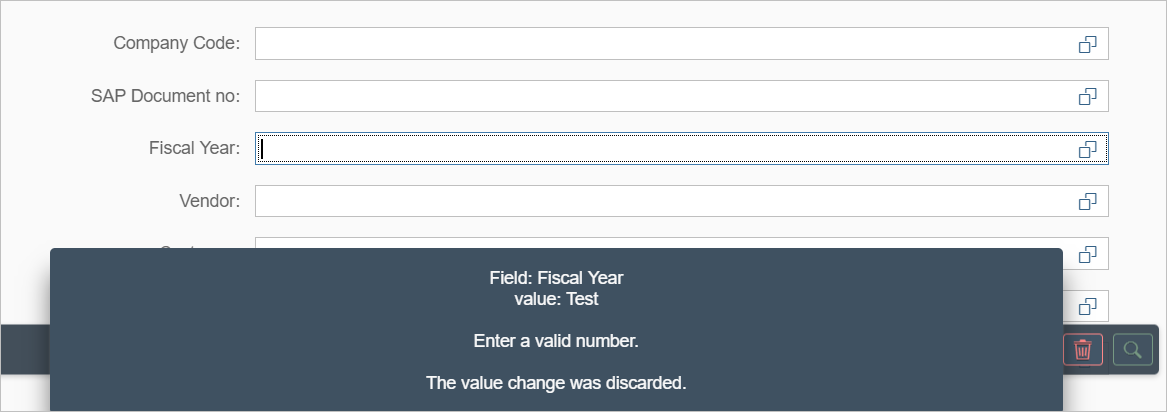
Invalid values
If a value is entered that is recognized incorrectly by the back end, without a check, the app will discard this value and a notification will appear.
The notification will disappear automatically.
Search form
When the xFlow Invoice Monitor app is opened, the search form is displayed.
Search fields
Fields are indicated as mandatory with a star (*). Empty mandatory fields are outlined in red.
In the field Interface Appl., only a single value can be entered. All other fields allow entry of multiple values with search operators such as "starts with" or "contains".
Independent of the data type of the search field and the length of the value entered, the search operators "contains" or "is equal to" are used for a value.
If two words are entered, they are observed as a unit. Example: If you enter the words "John Nobody" in the field Scan user, exactly this string will be searched for.
If you are searching for two words that are mutually independent, you will need to use F4 help since that is the only place where search operators can be changed.
The date can only be entered from F4 help. When clicking in the date field, F4 help will open automatically.
Search criteria entered appears as a token. A token consists of the operator and the search value.

Each token may be deleted again with the X button. Tokens can only be changed in F4 help.
Footer toolbar
The buttons in the footer toolbar can be used to execute the following actions:
Button | Name | Description |
|---|---|---|
| Create | Creates a new document. |
| Load variant | Loads a saved search variant. |
| Save variant | Saves the search parameter entered, as a search variant. A new variant can be created or an existing one overwritten. Prerequisite: All mandatory fields are populated. |
| Clear search form | Empties the search form. |
| Search | Performs a search. Prerequisite: All mandatory fields are populated. |


Search results
Maximum number of found documents
In the search results, a maximum of 500 documents can be shown. If more than 500 documents have been found, a notification will appear in the table header.
The filter and sorting functions only apply to these 500 documents. For this reason, we recommend making the search itself restrictive enough that a maximum of 500 documents are found.
Opening a document
To open a document, click the  Show document button in the second column of the table.
Table toolbar
The table toolbar has buttons for the following actions:
Button | Name | Description |
|---|---|---|
| Create | Creates a new document. |
| Reactivate | Reactivates a document. A suitable document must be selected. |
| Cancel data extraction | Aborts the data-extraction process. A minimum of one suitable document must be selected. |
| Resubmission | Sets or removes resubmission. A minimum of one suitable document must be selected. |
| Mass deletion | Deletes documents. A minimum of one suitable document must be selected. |
| Total | Executes a calculation such as a sum or an average. The calculation is performed for each field for amounts, separating calculation by currency plus credit/debit indicator. The result lines are displayed at the end of the table. |
| Filter | Sets a filter. In the search results available, you can use filters to drill further down. |
| Clear all filters | Removes a filter. |
| Sorting | Sorts or categorizes the search results. Multiple columns can be selected and the type of sorting—ascending or descending—determined. If the responsive table is used, you can set how results are to be subdivided. |
| Restore default sorting | Removes the sorting/subdivision set. |
| Settings | Makes settings for the search results. For more information, see User-specific settings for search results. |


Footer toolbar
The footer toolbar contains the following actions:
Button | Name | Description |
|---|---|---|
| Show search criteria | Displays the search form of the xFlow Invoice Monitor. The search form is filled with the search parameters that have resulted in the search results. |
| Refresh | Executes the search again. |


User-specific settings for search results
A user can make the following settings for his search results:
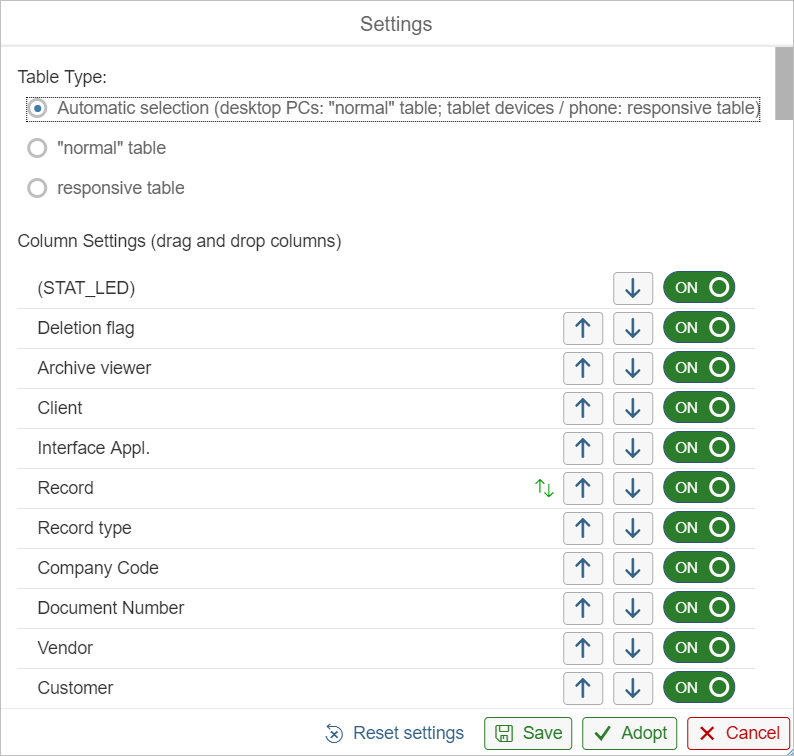
This is where to make settings for the type of table used to display search results. The following options are available:
Automatic selection: On tablets and smartphones, the responsive table is automatically used. On desktop PCs and laptops, the "normal" table is used.
"normal" table: The data from a document is displayed in a table line. If many of the data fields in the table are output, the table will become so wide that horizontal scrolling will be necessary.
Responsive table: In the responsive tables, the line of the table wraps at the edge of the screen. All other data of the line is then displayed in the vertical. Horizontal scrolling is no longer needed, only vertical scrolling.
This setting is practical for mobile end devices. However, on large monitors, a large amount space is lost because of the empty areas.
Here, all column/data fields are presented that can be output in the search results.
The order of the columns can be changed by drag-and-drop or with arrow buttons.
Use the on/off button to set whether a column is to be shown. The following applies:
A maximum of 30 columns can be displayed simultaneously. If 30 columns are set, the rest of the off-buttons will be disabled.
If columns with amounts—net amount or tax amount, for instance—are displayed, then the columns Credit/Debit and Currency will be turned on. These two columns can only be turned off if all amount columns have already been turned off.
Changed settings can be adopted permanently or temporarily with the following buttons:
Save
This saves the settings permanently in the back end. They are then used at the next log-in.
Adopt
This does not save the settings in the back end but only temporarily in the front end. The settings will only apply to the current session. The settings last saved in the back end will be used at the next log-in.
Documents
Cache
To improve the performance of the xFlow Invoice Monitor Fiori app, a cache is used for the documents. It is generated when calling a document for a user, and the actual document will be blocked for this user in the SAP GUI and for all other users in the app and in the SAP GUI.
Changes that are made in the app are written to the cache. The data from the cache is not written to the document until a completion action such as document saving is performed. Then the cache will be discarded and the document will be accessible again.
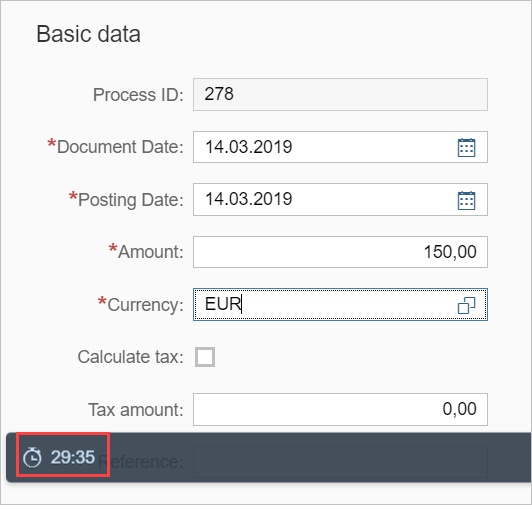
When generating a document cache, set the expiry time (in 30-minute units). When the expiry time has been exceeded, the cache will be discarded, the changes that are only retained in the cache will be lost, and the document will be unlocked. Certain actions in the app—changes in the header or line-item data, for instance—will trigger reset of the expiry time.
In the document view, a cache timer is located in the lower left corner. It specifies the number of minutes and seconds to elapse before the cache reaches its expiry time. To set the time back to 30 minutes, click the button. If another action is performed which changes the expiry time, the cache timer will automatically be reset to 30 minutes.
The cache changes two aspects of app usage as compared to xFlow Apps for SAP Fiori and xFlow web:
If a changed document is not processed to completion or is not saved before the cache expires, changes will be lost. The document can either be reloaded or exited. The user will receive a notification to this effect.
If a document is reopened, and the user still has a valid cache to this document—for instance, by having reloaded the document or the page (F5)—then the user must decide whether to continue to work with the cache and retain the changes or whether it is preferable to generate the cache anew, which would discard any changes already made. The user will receive a notification to this effect.
The longtext—in the Text field—can be saved with the button Save under the text field.
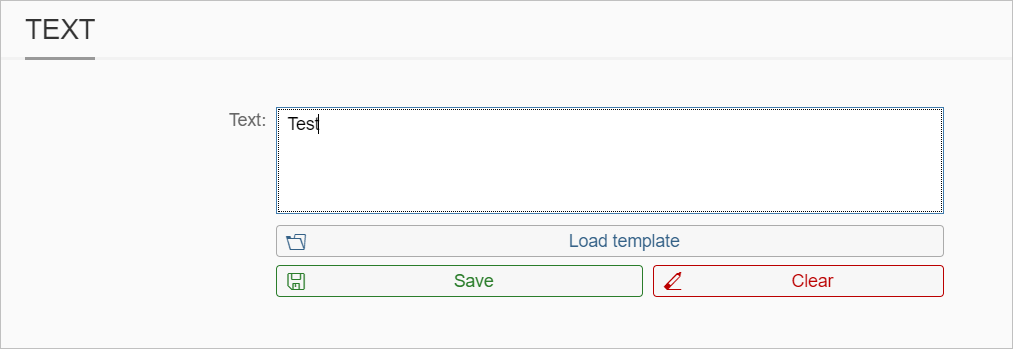
In this case, the longtext is written directly to the document and not in the cache. In other words, when the cache has expired or been discarded, the saved longtext is retained.
Data validation
Along with the front-end data validation described above, the header and line-item data is sent to the back end for validation as soon as it has been entered. Invalid data is discarded directly.
Footer toolbar
A toolbar is located on the left side of the validation screen in the SAP GUI. These buttons are displayed in the xFlow Invoice Monitor Fiori app, in the footer toolbar:
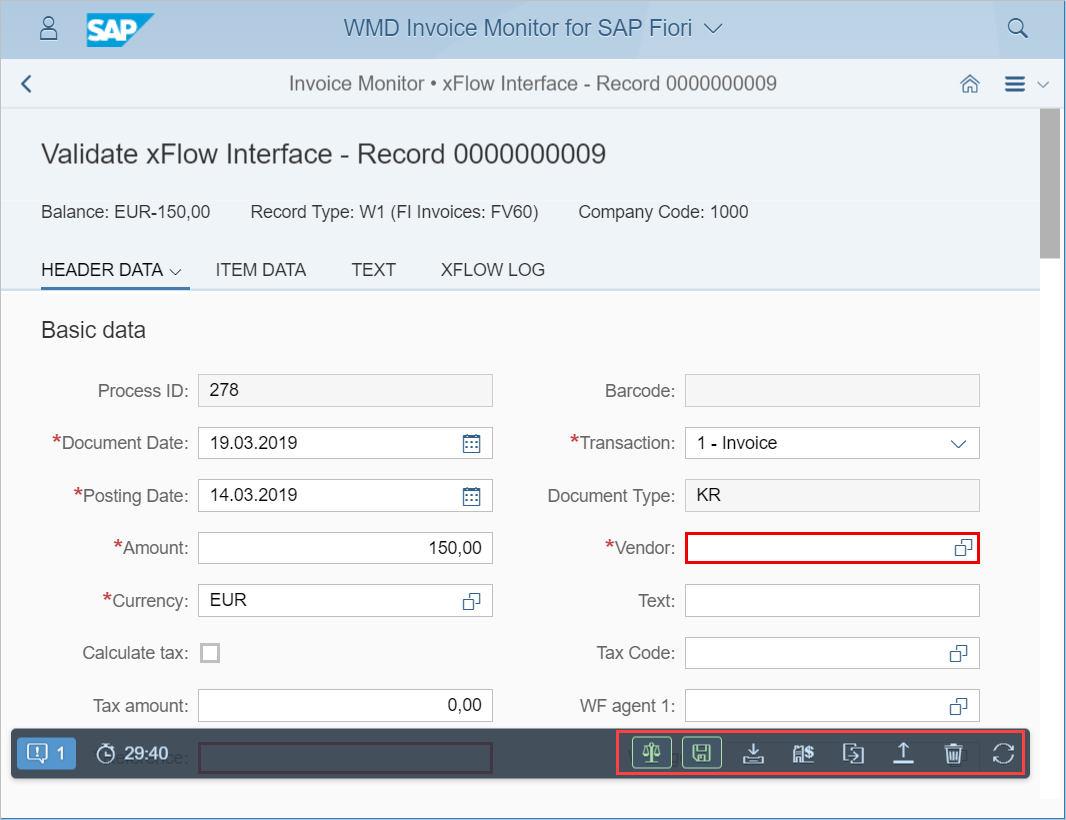
The following buttons are not available here:
Switch modes
A button is located in the toolbar of the line-item data if it is possible to switch modes.
Post (SAP)
Park (SAP)
Workflow
E-mail
Create vendor
Change documents
Display document
One-time-account vendors
When a one-time account vendor has been selected, the  Edit button is displayed after the Vendor field:
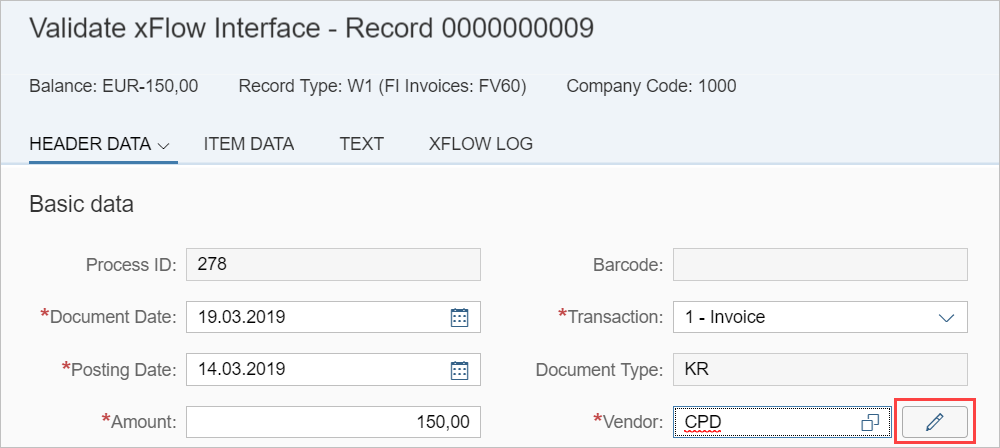
This button is also displayed in the subsection Vendor:

This button can be used to switch to the input dialog for the one-time-account vendor data.
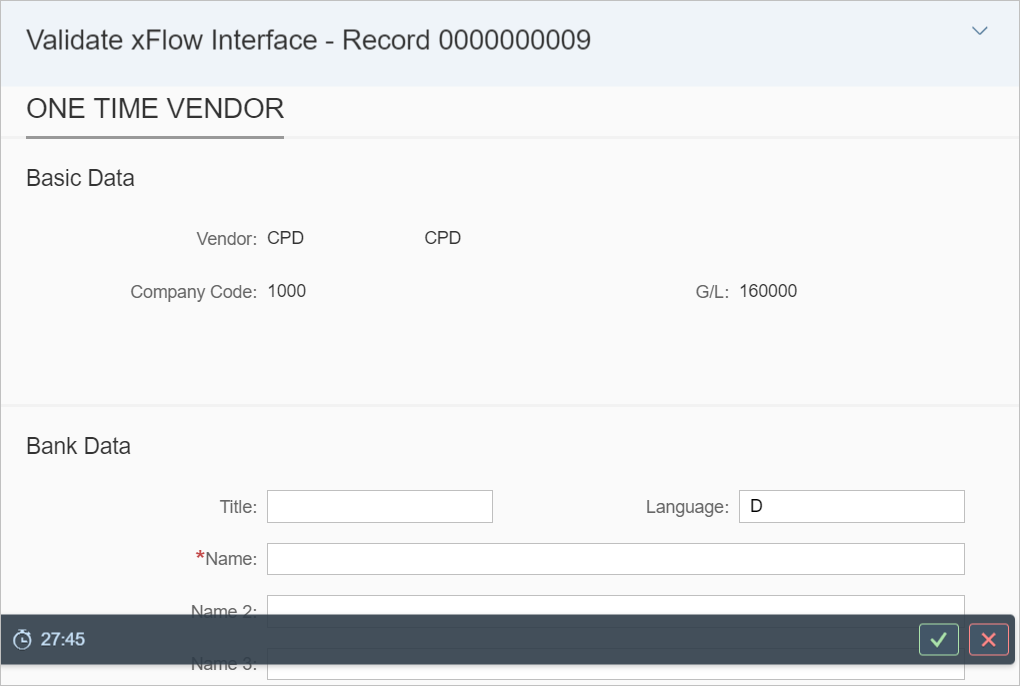
In the input dialog, there are two buttons in the footer dialog:
The
 Adopt button is for adopting the changes of the one-time-account vendor data to the cache.
The
 Cancel button is for discarding changes to the one-time-account vendor data.
In both cases, the user is routed from the dialog back to the document.
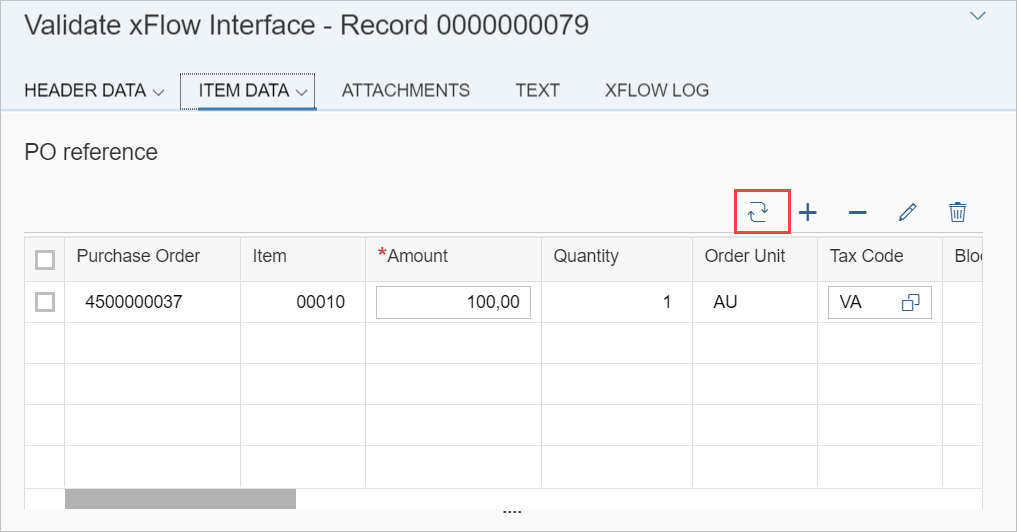
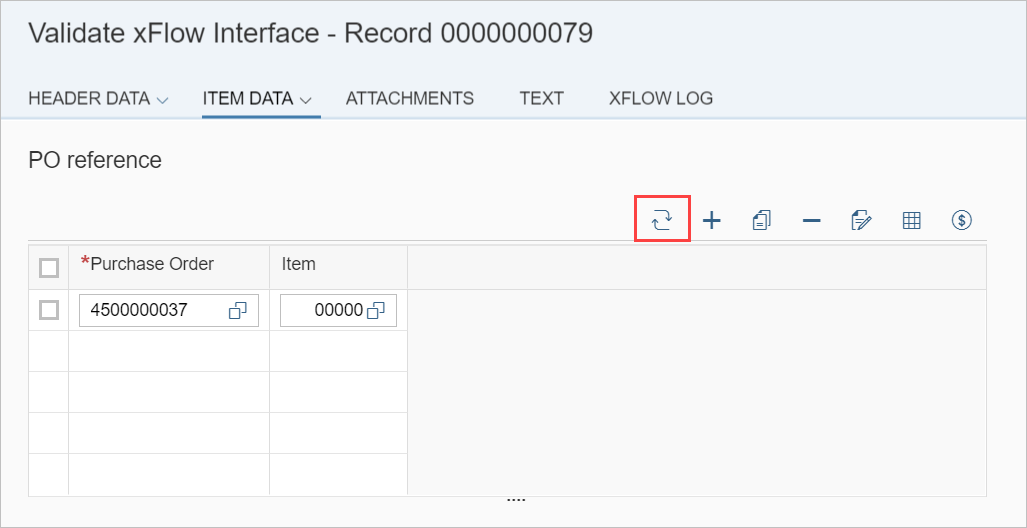
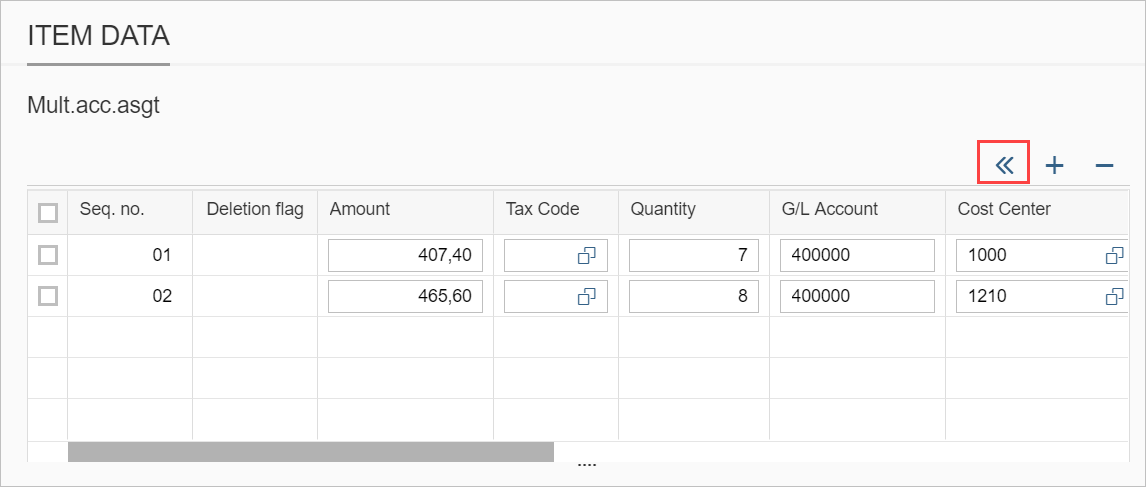
Line-item data
Whereas in the SAP GUI you need to switch between the different line-item data PO reference, G/L account, and material, in this application all these types of line-item data are displayed together. It is not necessary to click buttons to switch views.
Switch between "line item" and "purchase-order number" for PO reference:
A button appears in the Mult.acc.asgt column for a line item to be assigned multiple accounts:
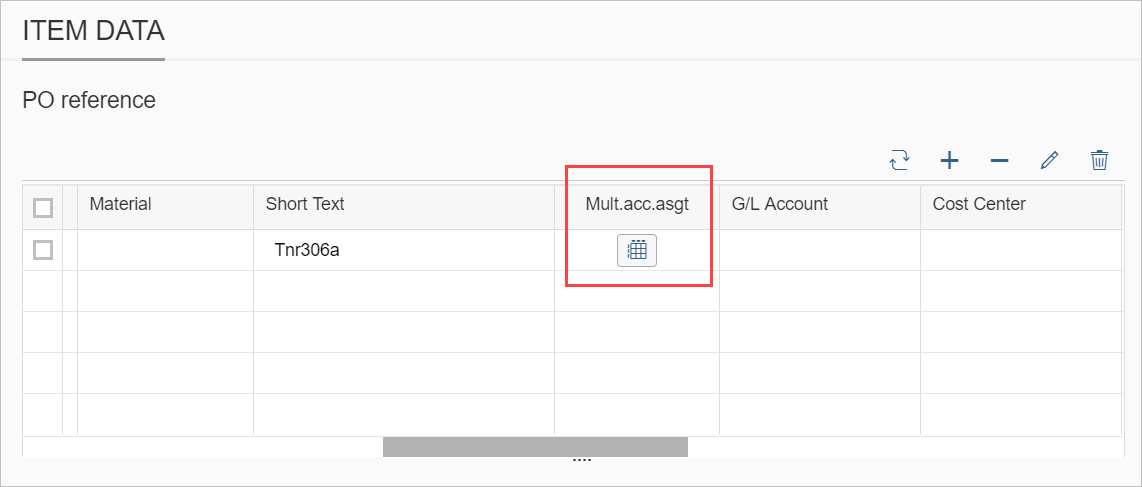
This button can be used to open multiple account assignment for the respective line item. The table PO reference is replaced with the table Mult.acc.asgt. To go back to the table PO reference, click the Back button.
The following buttons in the section Item Data in the SAP GUI are not available in SAP Fiori:
 Post goods receipt PO
 Insert account assignment
Appendices
If monitors of desktop PCs or laptops are particularly large, the browser screen will be divided to accommodate the display of attachment(s). Then the data is displayed on the left side and the attachments on the right.
On small browser screens, there will be two pages between which you can switch, using the navigation at the lower edge of the screen. The first page contains the data, the second the attachments.
When an invoice document of xFlow Bus 2.1 or higher has been extracted, it is displayed in the DocViewer. The prerequisite for this is that the DocViewer has been set up. For more information, see Setting up the DocViewer.
In the DocViewer, you can use highlighting. To activate/deactivate highlighting, use the button located in the document header:
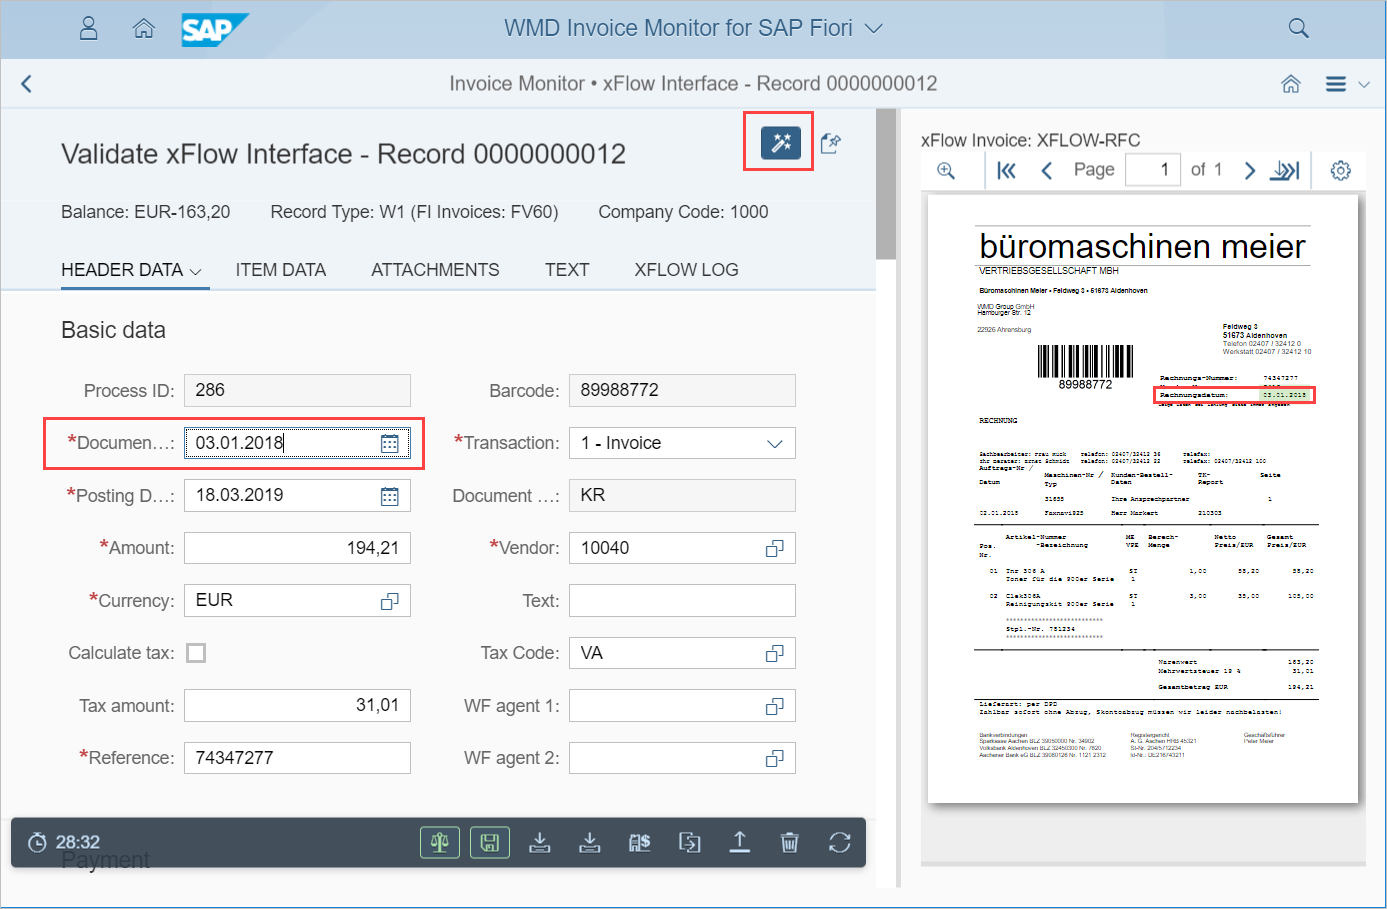
If a user clicks in a data field on the left side of the screen when highlighting is activated, the respective value will be highlighted in the attachment.
The prerequisite for this is that field mapping has been configured for the data field (Transaction /WMD/BC_SPRO: WMD xFlow Product Suite → xFlow Interface → Field Mapping) and that the information belonging to the data field is extracted in the invoice document.
Attached PDF files are displayed directly in the browser if a browser plug-in is installed for it.
To open any other file format, the file in question must be downloaded.
On mobile end devices such as tablets and smartphones, external display is always activated. On desktop PCs and laptops, external display can be activated as an alternative.
When external display is used, attachments are opened in a separate browser window.
If the button Excel upload is available in the line-item data, the structure of files must correspond to the upload requirements in the SAP GUI, in terms of the organization of its contents.
The file formats permitted are as follows:
File format | File extension(s) |
|---|---|
Excel 97 - Excel 2003 - binary file format | XLS |
Standard XML-based file format for Excel 2010 and Excel 2007 | XLSX |
CSV (with separators) |
|
Setting up the DocViewer
To enable use of the DocViewer in the Fiori Launchpad, a cross-origin request to the xFlow Capture server must be enabled.
For this, settings must be made for the Internet Information Services (IIS) on the xFlow Capture server.
Install the IIS CORS module on the xFlow Capture server.
Download under: , "https://www.iis.net/downloads/microsoft/iis-cors-module)
Note
For more information on the IIS CORS module, see https://blogs.iis.net/iisteam/getting-started-with-the-iis-cors-module.
Open the file
Web.configfrom xFlow Bus in the following folder for processing:C:\Program Files (x86)\WMD\xFlowBusWeb\xFlowBusWebServiceHost\Web.configEnter the segment of code
corsin the location depicted below: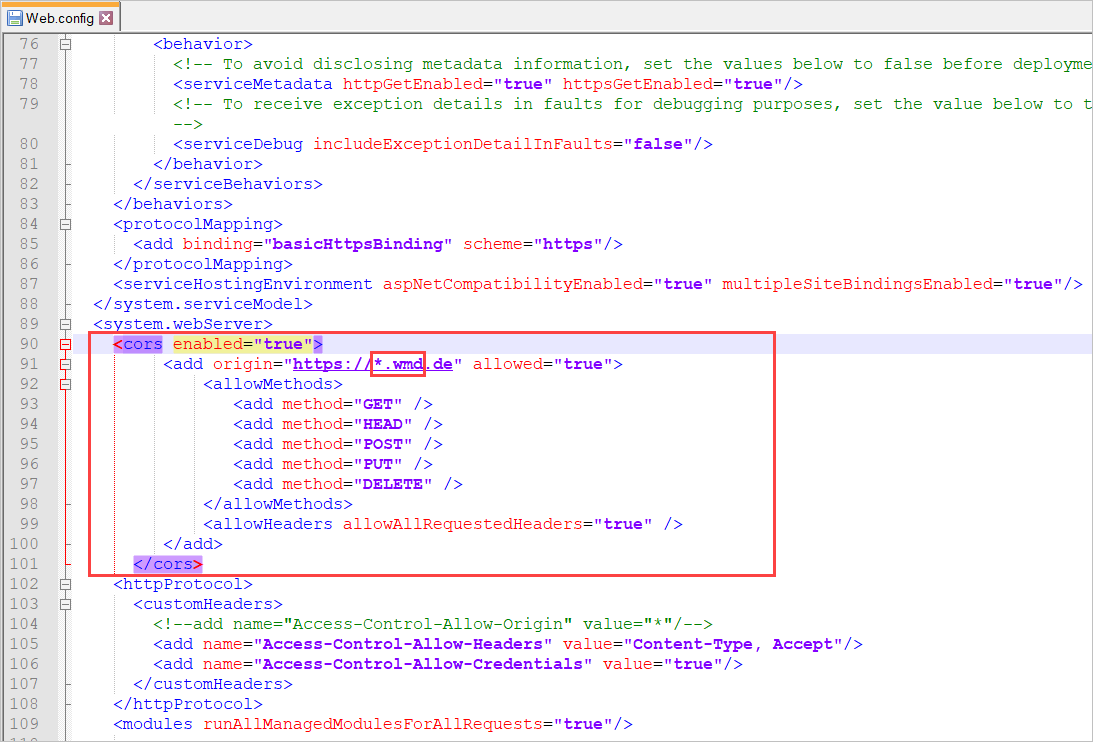
<cors enabled="true">
	<add origin="https://*.wmd.de" allowed="true">
		<allowMethods>
			<add method="GET" />
			<add method="HEAD" />
			<add method="POST" />
			<add method="PUT" />
			<add method="DELETE" />
		</allowMethods>
		<allowHeaders allowAllRequestedHeaders="true" />
	</add>
</cors>
In the segment of code
cors, replace the specification*.wmd.dewith the domain of the gateway server.Restart the IIS.