xSuite Apps for SAP Fiori
Multi-back-end
Previously, a separate tile had to be set up in the Fiori Launchpad for each back-end. Each tile had a different RFC tile parameter value. In standalone mode, the app had to be called with the corresponding RFC URL parameter in each case. This continues to work.
When multi-back-end functionality is used, multiple back-ends are accessed within the app.
When using the multi-back-end, the functionality of the individual apps may differ from that when using the single back-end . The differences are listed below.
The following xSuite Apps for SAP Fiori now support xSuite multi-back-end functionality:
xSuite Invoice Monitor App
xSuite Inbox App
xSuite Check Customizing App
Limitations in the names of RFC destinations
In addition to the general limitations on RFC destination names (see Limitations in the names of RFC destinations), there are further limitations when using the multi-back-end functionality.
The following characters and strings must not be included in the RFC destination name:
'(single apostrophe)&(commercial And)--(double minus sign)__(double underscore)
Customizing
Customizing of the multi-back-end functionality must be done in the back-end as in the past. The xSuite Apps for Fiori use this customizing.
In the front-end, the new parameter multibackend must be set to true in the settings.json file of the base functionality.

An xSuite App only uses the multi-back-end functionality if all of the following conditions apply:
The xSuite App basically supports this functionality.
The necessary customizing in the front-end has been completed.
The necessary customizing of the back-end, which is addressed by the app, has been completed.
If one of these conditions does not apply, only one back-end (RFC destination) will be addressed by the app, as before.
As a result, the xSuite Invoice Monitor can, for instance, be used both with and without a multi-back-end.
The use with and without multi-back-end would be possible in circumstances such as the following:
There are two back ends (RFC destinations): "RFC_1" and "RFC_2"
In the back-end "RFC_1" is the master system, i.e. multi-back-end customizing takes place there in the back-end.
"RFC_2" is the slave system.
In the front-end, the parameter multibackend is set to true and the RFC destination "RFC_1" is stored as the default RFC destination.
In the Fiori Launchpad, 2 tiles are created for the xSuite Invoice Monitor: One tile without RFC parameters, i.e. the default RFC destination is used, and one tile with the RFC parameter "RFC_2".
The Invoice Monitor with the back-end "RFC_1" meets all conditions of the multi-back-end functionality and uses it. This allows access to the back-ends "RFC_1" and "RFC_2".
The Invoice Monitor with the back-end "RFC_2" does not meet the conditions of the multi-back-end functionality — the back-end customizing is missing. As a result, only the back-end "RFC_2" can be accessed via this tile.
Data sources
User settings are always loaded from the master system in the multi-back-end, and are also stored there. TCURX data is also only loaded from the master system.
F4 value help, saving, deleting and loading templates, and the toolbar buttons always address the respective back-end of the document, search, etc., not necessarily the master system.
With single back-end, the user settings are stored in the respective back-end.
Invoice Monitor
Below are the differences between single and multi-back-end in the xSuite Invoice Monitor App for SAP Fiori.
Search form
Unlike the single back-end, no search variants can be stored in the multi-back-end.
With the multi-back-end, the search form is divided into several tabs. The Global tab includes the search parameters, which are identical for all back-ends to be searched. The system or systems (back-ends) to be searched must also be selected here.
A separate tab will appear for each system selected. In each tab, you can enter the search parameters to be used exclusively for the respective back-end search.
The maximum number of search results displayed applies to the respective back-end searched.
Search results
The Record type button is located in the toolbar of the Search results table, in the multi-back-end. This button can be used to perform record type changes corresponding to the back-end customizing in the search results.
In the table, the multi-back-end can be used to display the System column. This column indicates the back-end from which the respective document originates.
Settings
When using multi-back-end, the user can show and hide the System column and configure its position within the table in the app-specific settings.
Since the column is not part of the field catalog provided by the back-end, the user can define the width of the column.
These settings are stored in the user settings of the master system and are thus saved persistently.
xSuite Inbox App
Only one work item can be selected and edited in the Inbox with the multi-back-end. With single back-end, multiple work items can be selected.
xSuite Check Customizing App
With the multi-back-end, the table of work items contains the column System. This column indicates the back-end from which a given work item originates.
In the app-specific settings, the multi-back-end allows the user to show and hide the System column and to set the position within the table. In addition, the width of the column can be defined.
These settings are stored in the user settings of the master system and are thus saved persistently.
Accessibility
To improve accessibility in the xSuite Apps, the following changes have been made:
Code optimization: More labels and landmarks have been added
Extension of user settings: New option Extended Accessibility Mode
Code changes / SAPUI5 version
Some of the elements (e.g., some landmarks) added to improve accessibility require at least SAPUI5 Version 1.61.
Changes made are automatically activated if the necessary SAPUI5 framework version is used. Separate customizing is not required.
In addition, SAP significantly improved the accessibility for the SAPUI5 framework as of Version 1.78. If accessibility is a relevant issue, then this SAP UI5 version or a later version should be used.
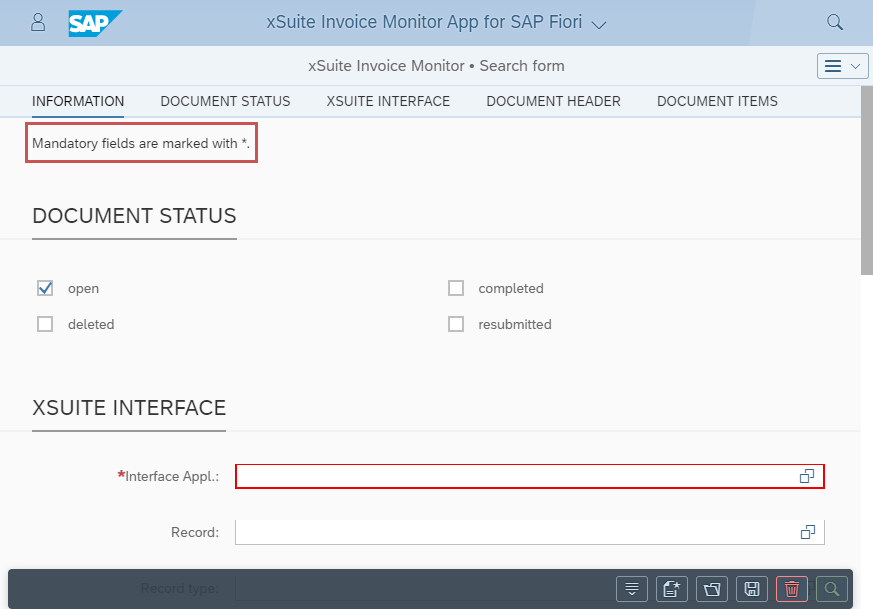
Info-texts and mandatory fields
Required fields are marked with an asterisk (*). In the tooltips of these fields there is also the note (Mandatory field).
With this release, there is a corresponding informational text at the beginning of pages that contain mandatory fields. In addition, other info-texts are used where necessary.
 |
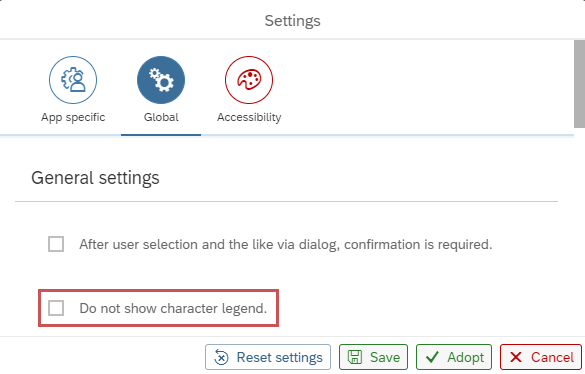
The user can disable these info-texts in the settings using the check box Do not show character legend. The info-texts are displayed by default.
 |
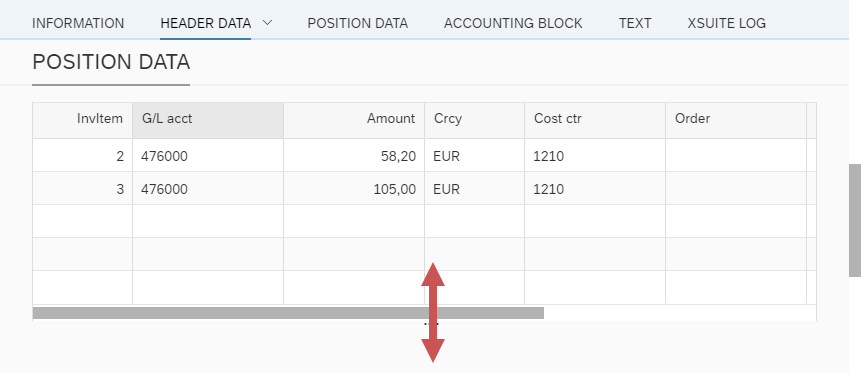
Default table row count
Tables that do not cover the entire page, for example the Position Data table in a work item, usually have a default number of rows that are displayed.
By shifting the end of the table, the height can be changed for these tables. This change has always been temporary so far. When the page was exited, the change of the table size was undone.
 |
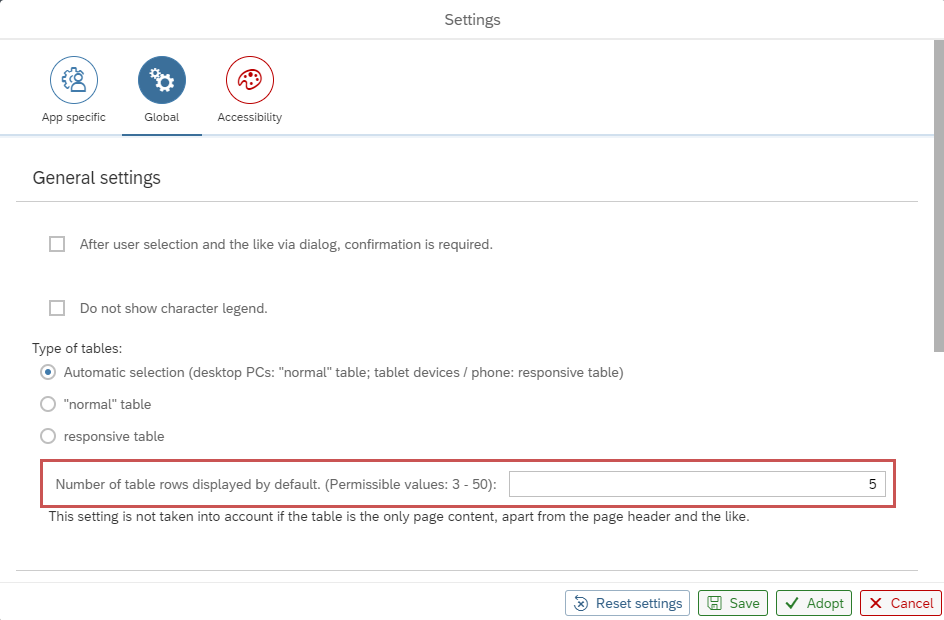
As of this release, the user can define the default number of table rows displayed in the user settings on an individual basis. The default value is 5.
 |
Notice
These settings do not affect full-page tables, responsive tables, or tables with a fixed number of lines.
Advanced accessibility mode
The user can enable or disable the advanced accessibility mode in the user settings of the xSuite Apps in the Accessibility tab. By default, this mode is disabled.
When the extended accessibility mode is active, the following options can be activated or deactivated individually:
Option | Description |
|---|---|
Use text buttons mandatorily | Buttons often have only one icon. A tooltip is generally available. If this option is active, buttons will always have a tooltip text — if the SAPUI5 framework allows it. In some cases, no icon will be displayed for individual buttons. |
Do not use the footer toolbar | By default, buttons that affect the entire page (e.g. Replace Document) are displayed in the page footer. (Translator's note: Replace Document = Return the document) If this option is active, no footer will be used, and the buttons will usually be displayed in the header area. |
Don't show charts if possible | One of two cases will apply:
|
Disable tooltip as single source of information | There is information that is only output in a tooltip, e.g. when you mouse-over a diagram element. If this option is active, the information is displayed in a dialog when clicking on an element such as one in the diagram. |
URL parameters: sap-accessibility / sap-ui-accessibility
If the Fiori Launchpad or the app is invoked in standalone mode with the URL parameter sap-accessibility or sap-ui-accessibility equal to true, X or 1, the extended accessibility mode with all options will always be active, regardless of user settings.
Then it will not be possible to deactivate the extended accessibility mode via user settings either.
xSuite Check Customizing App
In the xSuite Check Customizing App, work items of type "Check Customizing" are listed for xSuite administrators.
An SAP user is required to open the app. This SAP user must be authorized to call the transaction SBWP.

When the administrator executes a work item (button  Execute), the dialog Customizing task for xSuite administrator will open for this work item.
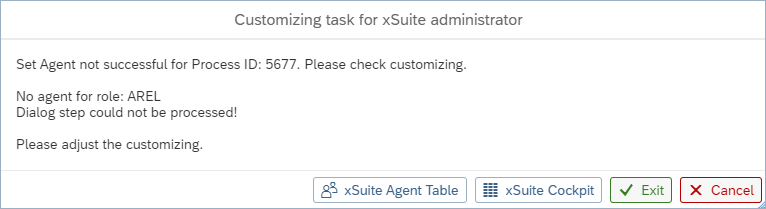
There are 4 buttons available in this dialog:
Button | Description |
|---|---|
xSuite Agent Table | Opens the role corresponding to the work item in the xSuite editor table. Any incorrect customizing can be corrected there. The Back button in the xSuite Sgent Table can be used to navigate back to the dialog in the xSuite Check Customizing App. |
xSuite Cockpit | Opens the work item that created this work item "Check Customizing" in the xSuite Cockpit App. In the xSuite Cockpit App, you can use the agent determination preview to check whether an agent is found with the (changed) customizing. |
Exit | If the customizing has been changed to allow an agent to be found in the preview, the task can be finished. The customizing task will then be removed from the list. The associated work item will be restarted in the workflow task and assigned to the appropriate agents. |
Cancel | If the task was not finished for reasons such as unfinished customizing, the dialog can be closed with this button. The customizing task will then remain intact. The associated work item will remain unchanged. |
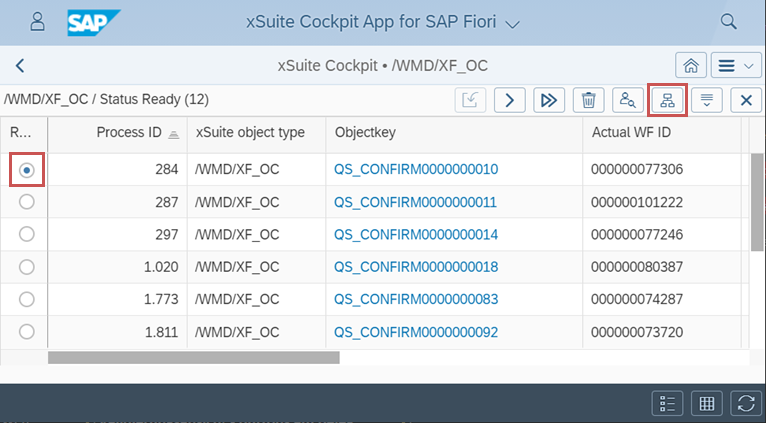
Additional functions in the xSuite Cockpit App
Route Preview
The route preview is now available in the detail view of the xSuite Cockpit App. The route preview shows the path that a work item will take in the workflow.
To open the route preview, the user must select a work item and then click on the  Route preview button.
 |
The route preview is output as a tree structure. The top level of the tree structure shows the individual workflow tasks and the conclusion of the workflow.
Below this, the levels, the users and the items each follow as their own level in the structure. The  icon behind an item indicates that the end indicator is present.
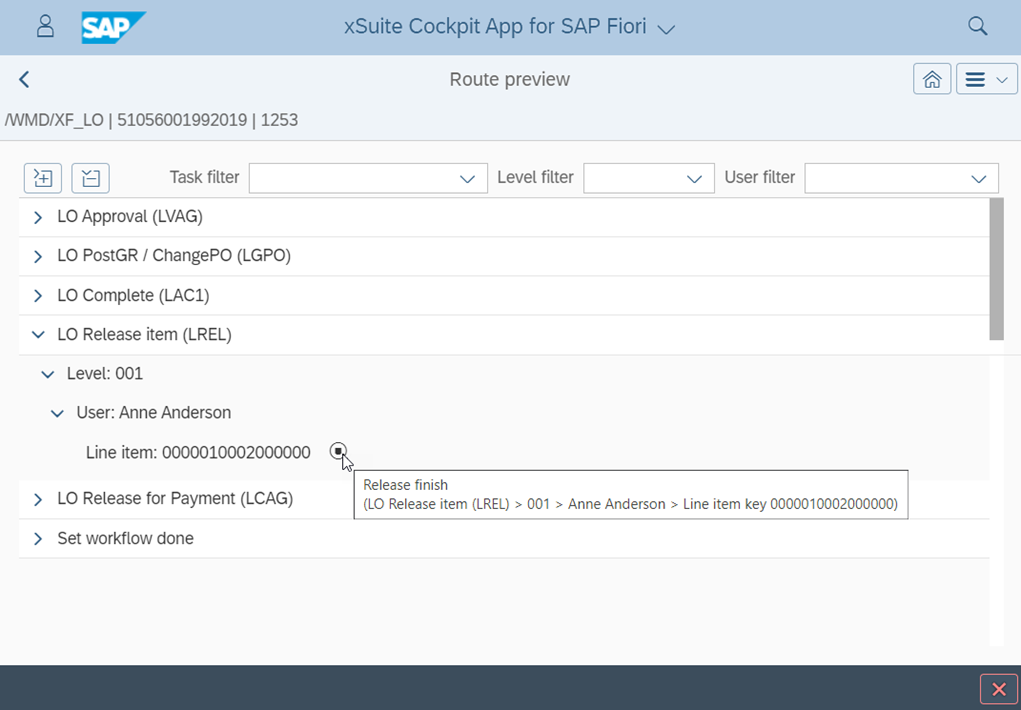 |
The tree structure can be expanded in its entirety with the button  Expand everything. The button
  Collapse everything collapses the entire tree structure..
The fields Task filter, Level filter and User filter can be used to filter the route preview by the tasks, levels and users.
Expert mode
The xSuite Cockpit App now supports the expert mode. Users with the xSuite user attribute XF_ADMIN_EXT equal to X run the xSuite Cockpit App in expert mode.
In expert mode, , the workflow is not restarted directly when the button  Restart Workflow (not to be confused with the button
  Restart Step) is clicked.
Instead, the user can select the workflow step in which the workflow is to be restarted.
SAP Cloud Platform
The xSuite Apps for SAP Fiori support deployment to the SAP Cloud Platform (SCP). The prerequisite is a valid SCP account that is connected to the customer's SAP ERP or S/4 HANA back-end via the SAP Cloud Connector.
Neo and Cloud Foundry Accounts are supported in the SCP.
The apps can be deployed in both the SAP Cloud Foundry and SAP Neo environments without code modifications or user exits.
The base functionality and the individual apps must be deployed in the same xSuite version. In addition, the xSuite version of the back-end must match the version in the Foundry/Neo environment.
Configuration
The settings.json file now contains the cloud parameter, which defines whether the apps are used in the Cloud Foundry or Neo environment.
Destination
Within the subaccounts, it is assumed by default that a destination with the name xSuiteCube-gateway exists for the gateway used.
If a different destination name is used, code adjustments are required.
Caution
Previously, the default destination name in the Neo environment was xffiori.
Cloud Foundry
A separate mtar archive file is provided for deployment to a Cloud Foundry environment. This file contains the program code for all applications and other configuration files for Cloud Foundry.
Neo
For deployment to the SAP Neo environment, individual ZIP archive files are provided for the individual xSuite Apps as well as for the xSuite base functionality. These files must be imported individually in the Web IDE.
OCI catalogs in the cloud
OCI catalogs can now also be accessed in the cloud (Foundry and Neo) without further modifications. Forwarding and all resulting downstream processes are routed correctly via the cloud.
OCI without iFrame
By default, OCI catalogs are opened in an iFrame. Some OCI catalogs cannot be opened in an iFrame because the operator actively prevents this. In this case, it is necessary to navigate all the way to the OCI catalog, by which the user will exit the xSuite app. Only when the shopping cart is accepted is the user navigated back to the xSuite App.
Caution
In these cases, do not use the Back button in the browser to return to the xSuite app from the OCI catalog. If you use the Back button in the browser anyway, the data you have entered may be lost.
In the settings.json file, the OCI catalogs that should not be opened in an iFrame can be noted in the dispdoc > oci > noIframe parameter. The parameter value consists of a comma-separated list of OCI catalog domains (and the ports if they are stored in SAP).
Example
The settings parameter has the following value:
example.com,subdomain.domain.com,.de:80
In this case, the OCI catalogs with the domain example.com — including all subdomains — are not opened in an iFrame.
Also, the OCI catalog of the subdomain subdomain.domain.com does not open in an iFrame. However, if there is also an OCI catalog at www.domain.com or at subdomain2.domain.com, it will open in an iFrame.
In addition, all OCI catalogs under the top-level domain .de where port 80 is explicitly specified will not open in an iFrame.
OCI parameter "UserEmail"
The value of the OCI URL parameter UserEmail is always replaced by the e-mail address of the current xSuite user. The value stored in the transaction SM34 in the view cluster VC_TMW03 is therefore not used for this parameter.
Caution
If the user who is logged in does not have an xSuite user account or e-mail address stored, the UserEmail parameter will not be added to the URL.
Refactoring
settings.json Launchpad and gateway parameters / automatic determination
The xSuite Apps for SAP Fiori now automatically detect whether they are running inside or outside the Fiori Launchpad. Thus, the fiori parameter in the settings.json file is obsolete and has been removed.
In addition, the environment determines whether a gateway is used or must be used.
Only in the case of on-premises (not cloud) in standalone mode with SSO login is this not clearly defined. Therefore, the settings.json parameter use_nwgw is only evaluated by xSuite Apps in the case of on-premises in standalone mode with SSO login and must then also be set correctly.
In all other cases, this parameter is ignored.
Logging API
Errors and warnings are now no longer issued by the xSuite Apps directly via the console object in the browser console.
Instead, the logging API of the SAPUI5 framework is used. The messages are thus available in the logging API.
However, depending on the settings, the API will still output the messages in the browser console.
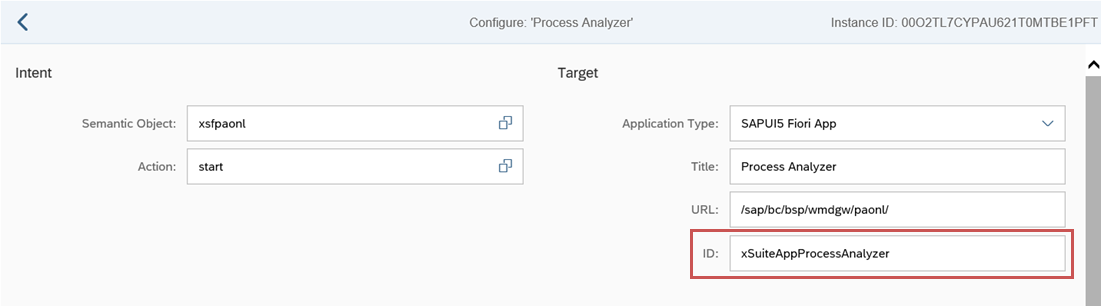
The Process Analyzer
The ID of the Process Analyzer was changed from xSuiteProcessAnalyzer to xSuiteAppProcessAnalyzer, bringing it in correspondence to the scheme of the other xSuite applications.
As a result of this change in ID, old tiles will no longer work for this application. Therefore, in the transaction /UI2/FLPD_CUST, the mapping for the semantic object xsfpaonl must be adjusted.
Calendar type (CalendarType)
The (primary) calendar type within the xSuite apps is now always "Gregorian". All other calendar types (e.g. "Persian" or "Japanese") are supported only as secondary calendar types.
As in the past, if a secondary calendar type is to be displayed, it can be specified in the settings.json file in the secondaryCalendarType parameter.
"My Inbox" App
The SAP Fiori app "My Inbox" is not supported in the current release.
xSuite currently does not plan to integrate the xSuite Business Solutions into the app.
Launchpad setting "Large interaction elements"
The xSuite Apps now include the Launchpad setting Large interaction elements (ContentDensity), provided that the apps run within the Fiori Launchpad.
Limitations in the names of RFC destinations
The following limitations exist for the names of the RFC destinations that can be used together with the xSuite Apps for SAP Fiori.
These limitations already existed in the previous versions of the xSuite Apps.
The following names are generally not allowed:
_(Underscore)##_default_
The following names cannot be used without user exits and should therefore not be used:
exampleRFC
The following characters cannot be used without extensive user exits and should therefore not be used:
/(Slash)>(Greater-than sign)
Search and filter function in timelines
Timelines such as comments in the Text area or the xSuite Log area in work items now have a search and filter function.
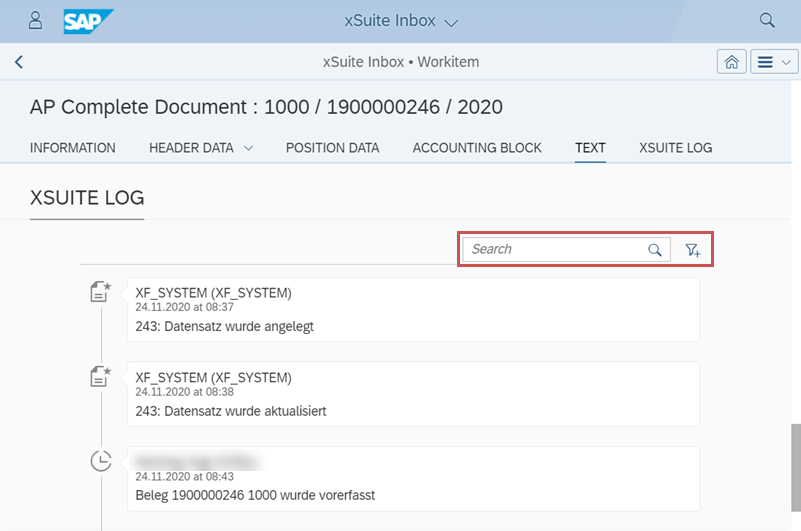 |
When a search term is entered in the Search field, only the timeline elements that contain the text entered in the search will be displayed. All other elements will be hidden.
Depending on the type of timeline and the data it contains, either the user and/or the period can be selected using the  Filter By button to select either
 User and/or Time Range.
In the User filter dialog, all users included in the timeline are listed. One or more users can be selected from this list.
After filtering, only timeline items of the selected users will be displayed. All other elements will be hidden.
A time period can be specified in the Time Range filter dialog.
After filtering, only timeline items from this period will be displayed. All other elements will be hidden.
Navigation in feeder creation
The navigation and the display of the buttons when creating a feeder have been optimized.
The Cancel button and the Refresh button that could be used to empty the feeder form have been replaced with the  Clear button.
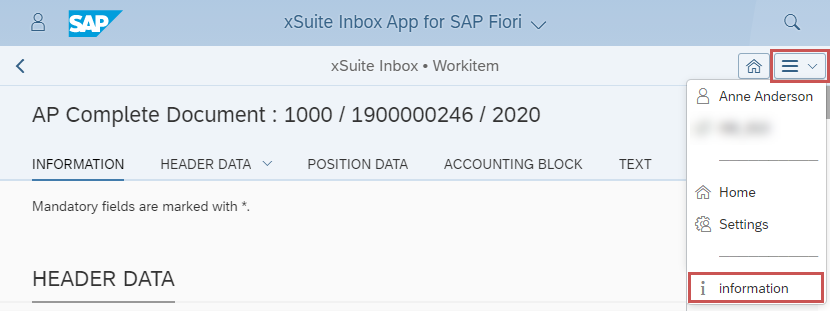
Information on the xSuite App
You can call up information on the xSuite App via the menu item Information. This information can be helpful if you have a support request.
 |