Product News 2025
December 2025
The xSuite Helix release “Golden Gate” includes far-reaching improvements, significantly increases backend performance, and optimizes the user experience in all areas of the xSuite Helix platform.
New Function
Simplified creation of custom workflows with direct assignment or creation of a Solution
Changes and Enhancements
Optimized alignment of xSuite AI results (LLM) with classic extraction results for faster and more accurate processing
Improved compatibility for seamless integration of external AI components such as Hypatos
Numerous improvements to the xSuite-Helix base technology for stable performance under high system load and more efficient workflow and archiving processes
November 2025
With the xSuite Helix release “Ferocious Ferret”, we have enhanced and further developed various components. One of the focal points of this release was the transfer of reference locations at line item level to downstream systems (e.g., xSuite Cube).
New Functions
Migration from Archive V1 to Archive V2 in xSuite Helix
Efficient preprocessing of e-invoices adapted to electronic invoices
Additional workflow-specific information for users
Migration option in xSuite Helix – Archive V1 to V2
There is now a migration option from Archive V1 to Archive V2.
This migration is carried out on request by the xSuite operations team on the xSuite Helix platform. The actual migration process runs in the background and does not affect your day-to-day business.
After migration, the URLs for accessing the archive (e.g., the HTTP script in the ArchiveLink parameters of the archives and in the proxy settings in the xSuite Cloud Proxy) must be adjusted. The xSuite operations team will switch the customer tenant to Helix Archive V2 after receiving feedback from the customer. After that, the Archive V2 tiles will be visible in the xSuite Helix dashboard. Newly stored archive documents are migrated to the new archive as a “delta migration.”
Once the migration is complete, xSuite provides you with a complete migration log.
Specific preprocessing of electronic invoices
E-invoices (electronic invoices) already contain essential information required for the invoice verification workflow. This means that technically complex processes such as OCR or information extraction are not necessary, or only to a limited extent, depending on customer-specific requirements.
However, xSuite Helix adds master data to electronic invoices such as vendor numbers or tax codes. This is the only way to ensure that documents are correctly pre-entered in the target system without additional manual effort.
When a document is created in the xSuite Helix workflow (e.g., via eDNA), the upstream system can assign a flag (Is_eInvoice) to the document. This flag indicates that the document is an electronic invoice.
Additional workflow-specific information for users
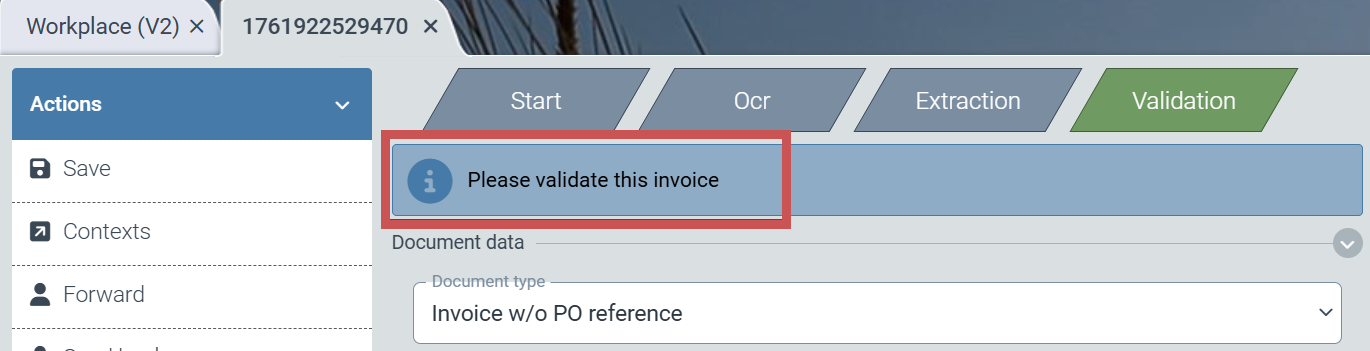
Additional information can now be displayed to the user for each workflow step. Brief instructions or notes on how to proceed with the work item are intended to make it easier for the user to complete the task. Additional notes could include, for example, Approval or Mathematical verification of amounts over 10,000 euros.
If the administrator wants to provide a note to colleagues who edit work items, they can insert localized text into the Text of task column within the role assignment table as an administrator with access to the configuration area.
 |
After opening the work item, the user sees the note in the upper part of the workspace.
 |
Changes and Enhancements
Transfer of various reference information from the extraction process to subsequent systems
Transfer of reference information to downstream systems
Using various extraction methods, xSuite Helix obtains a wide range of information about the sources of extracted text from the original document. This reference information can now be transferred together with the work item to downstream systems of xSuite Helix (e.g., xSuite Cube). The scope of reference information extends to the item level. This means that color highlighting of references at the item level is now also visible in systems outside of xSuite Helix.
September 2025
With the xSuite Helix release of “Elusive Emerald”, we have enhanced various components. In particular, we have improved basic technologies such as validation and highlighting of extracted information.
New Function
Import and export options for master data
Import and export options for master data
Under General/Core → Data editor, you now have the option to export the entire data content of the respective data source and also import new or modified data records.
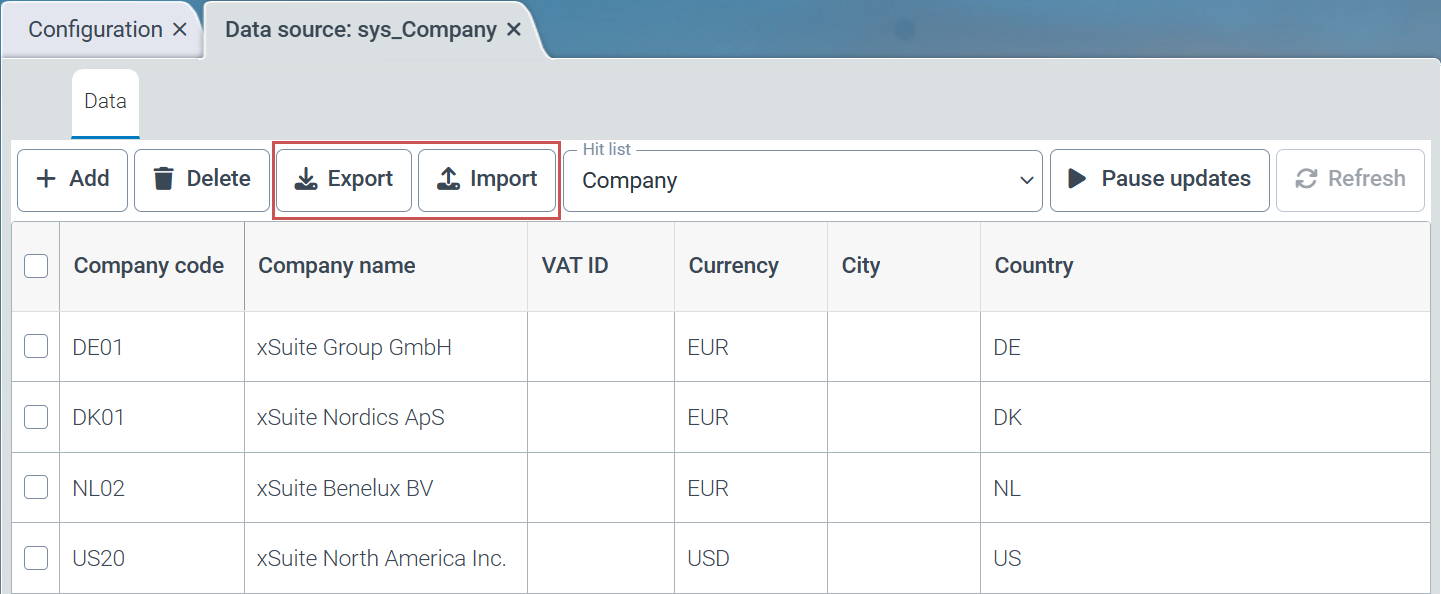 |
The export function exports the entire data set from the selected data source.
The import function offers the following options for importing data:
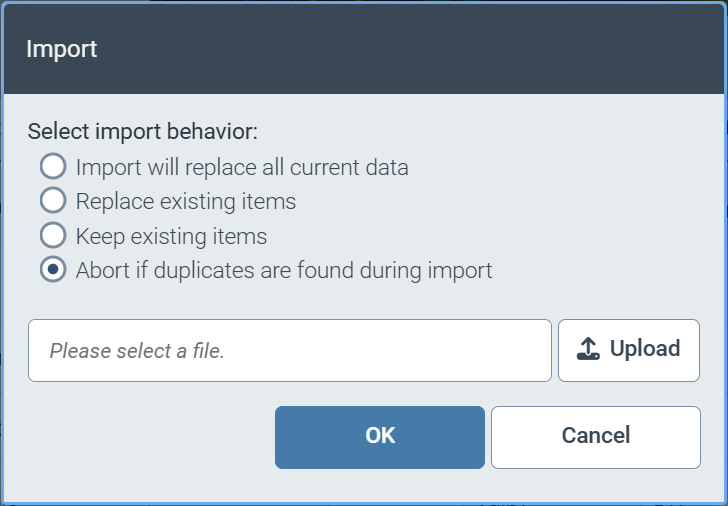 |
Deleting existing data records and completely replacing the contents of the import file
Overwriting existing data records and creating new data records
Adding new data records without overwriting existing data records
Canceling the import if a data record already exists in the data source
Changes and Enhancements
Moving online help to own server
Reduction of the retention period to 0 days for completed work items in the delivered workflow sys_CaptureValidateAgnostic
Simplification of time setting to full hours
F4 value help for automatically generated forms
Filtering the access determination table by target roles
Online help now on separate server
We have separated this online help from the xSuite Helix infrastructure and now host the xSuite Helix online help on a separate server. This separation reduces the load on the xSuite Helix infrastructure and improves the system security of the xSuite Helix platform.
Reduction of retention time in the "Agnostic" workflow
In the delivered workflow sys_CaptureValidateAgnostic, we have reduced the retention period for completed work items (status End) to 0 days. From now on, completed work items will be automatically deleted the following day by default.
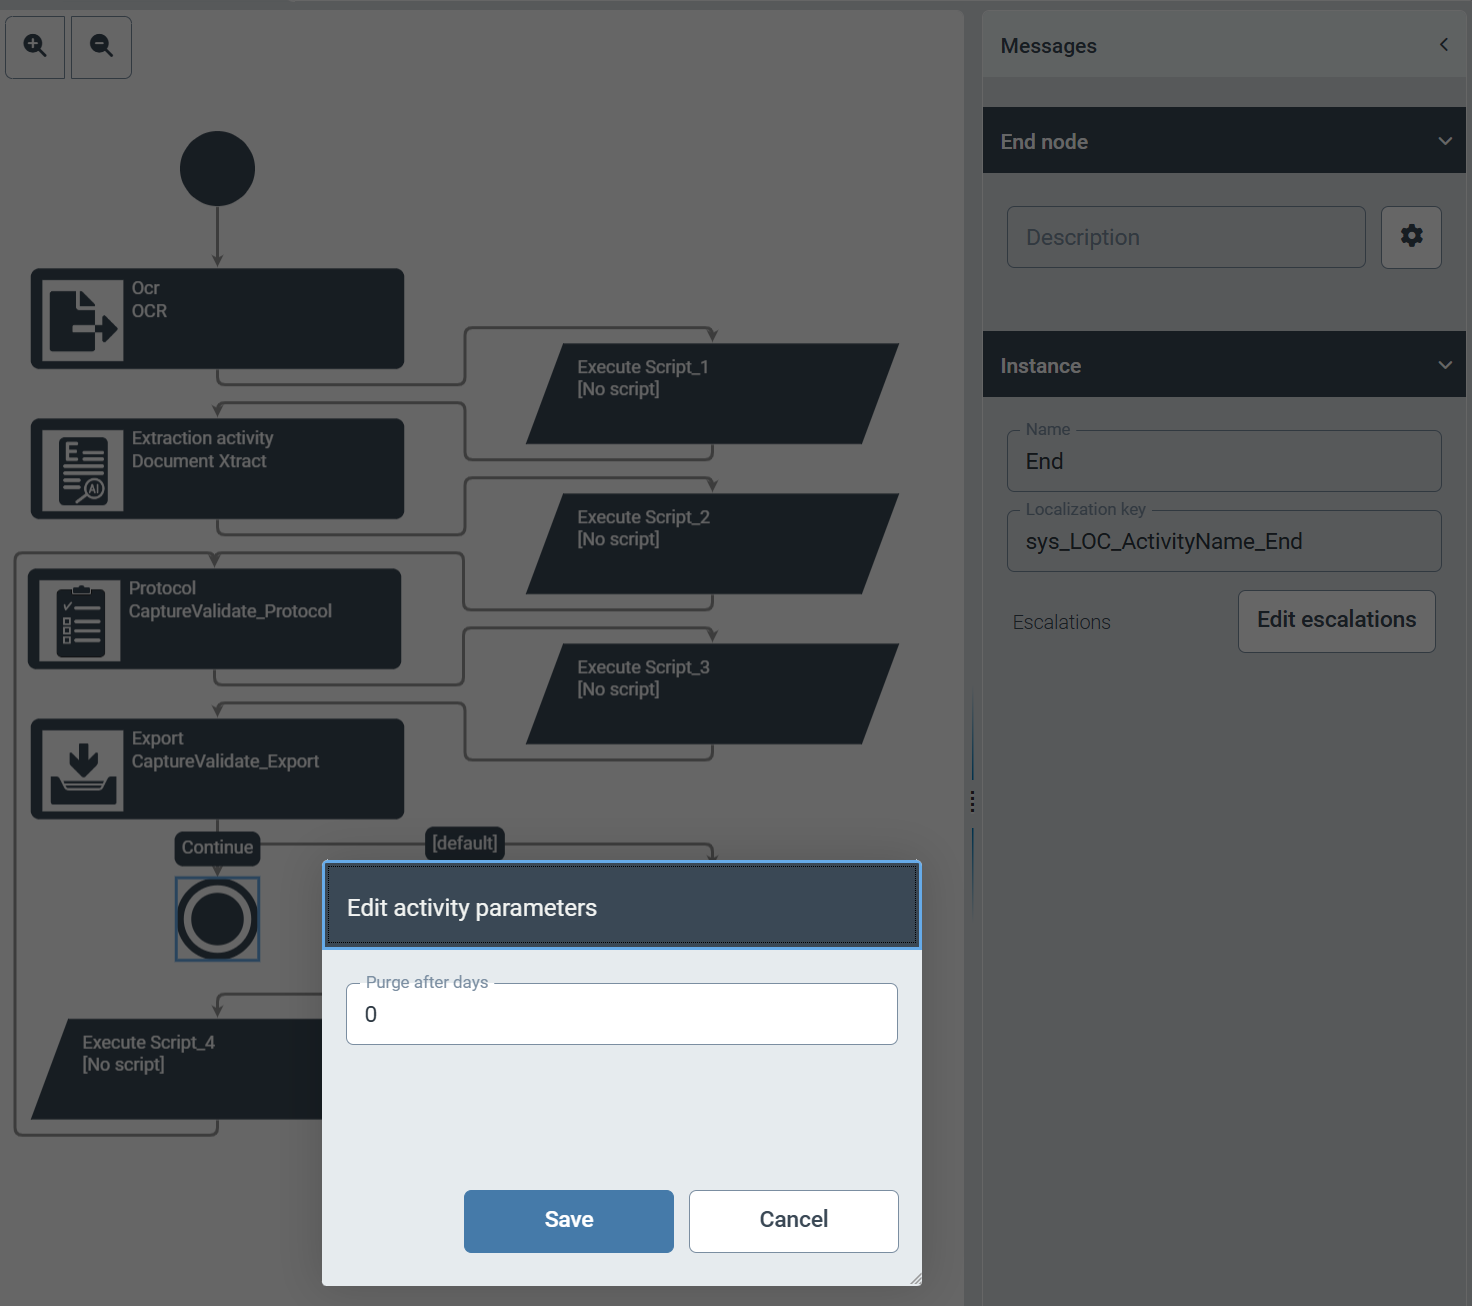 |
Tip
If you need a longer retention period for completed work items in your workflow, you can adjust the retention period via the parameter setting of the End node in the Workflows area via .
.
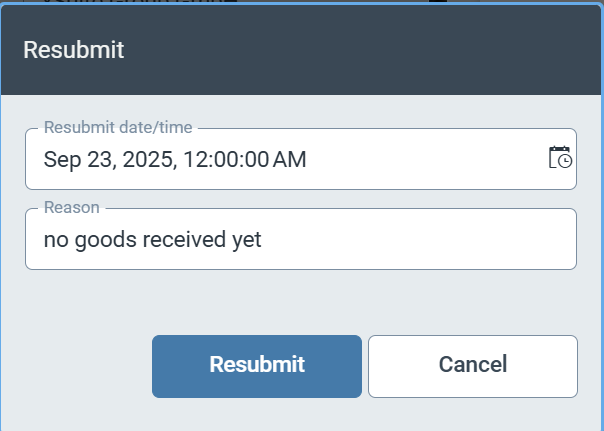
Simplified specification of the resubmission time
To make it easier for workflow users to work with xSuite Helix, we have limited the time options for resubmitting a work item to full hours.
 |
F4 value help for automatically generated forms
For fields with master data references, we have implemented an F4 value help function directly in the fields of all automatically generated forms.
Filtering the access determination table by target roles
The filter criteria for the Target role column in the access determination table can now be restricted by entering a filter expression. The use of the wildcard * at the beginning and end of the expression is also permitted for filter expressions.
August 2025
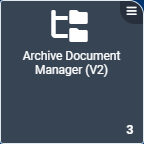
With the xSuite Helix release of “Daring Dodo”, we have improved many components. With the new tile Archive Document Manager (V2), we have integrated functionalities for the archive administration (V2) more closely into the user interface. This makes it easier for archive administrators to access archive documents and settings.
The changes also support workflow users in their validation work. In the validation steps, users can highlight the respective reference in the original document displayed next to it by clicking on a data field in the user interface. References from LLM-supported document extraction are now also highlighted.
New Functions
Easy access to Archive V2 administration via new dashboard tile
Linking data fields with references in the xSuite Viewer
Administration of Archive V2
We have integrated the following functions for archive administration (V2) into the new Archive Document Manager (V2) tile:
Search for non-indexed documents (e.g., from an SAP connection via ArchiveLink or CMIS)
Resetting the indexing status of documents
Setting and removing the post-indexing status of SAP ArchiveLink documents
Changing the date for post-indexing SAP ArchiveLink documents
(Bulk) deletion of archive documents
Setting and deleting legal holds
The new Archive Document Manager (V2) tile is available to administrators who have a tenant with Archive V2 access.
The tile must first be added to the app catalog of the dashboard using the  button in the title bar. To do this, activate the Dashboard checkbox for the tile.
After rearranging the tiles, you can save the dashboard as follows:
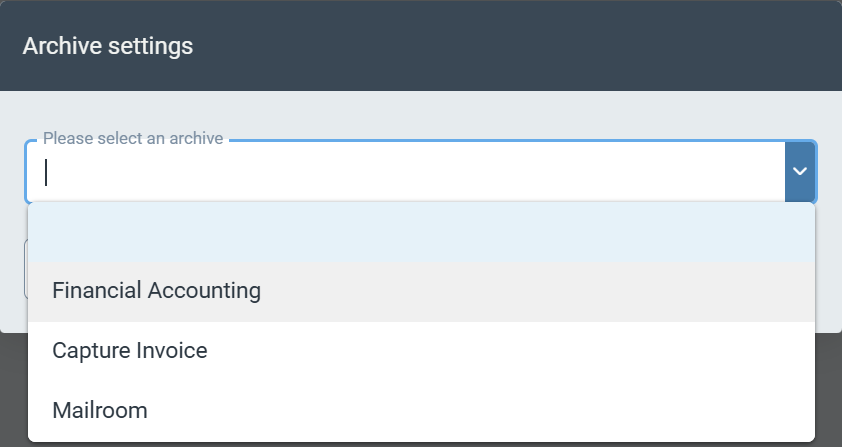
After clicking on the tile, you must select the archive in which your documents are located. You can also select the archive in the upper part of Archive Document Manager V2.
 |
In the upper part of Archive Document Manager V2, you can also define search queries (filters) for different technical field contents.
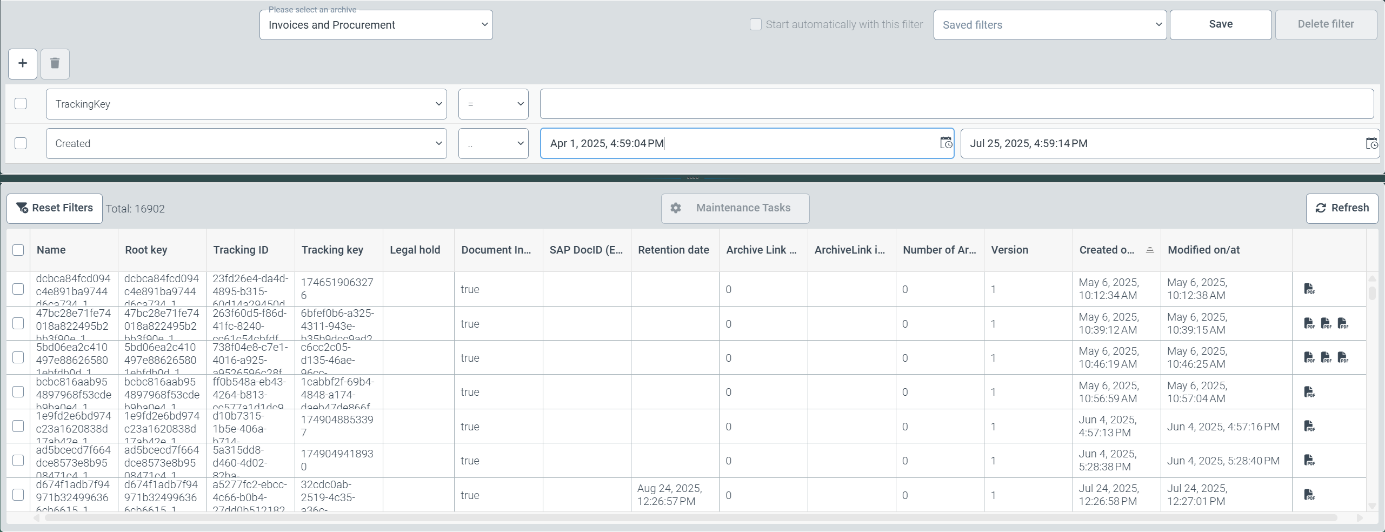 |
The following technical fields are available as search filters in a drop-down list:
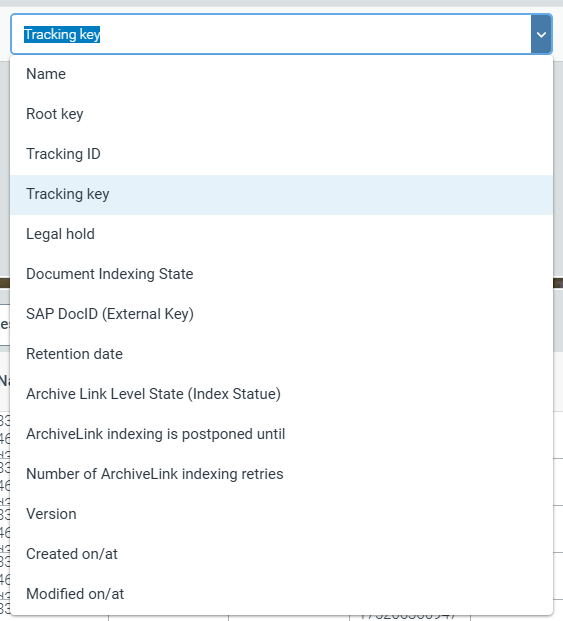 |
Document key and root key
Tracking ID and Tracking key
Legal hold
Document is indexed (full text)
SAP document ID
Retention date
Indexing status for ArchiveLink documents
Next indexing run for ArchiveLink documents
Counter for indexing retries of ArchiveLink documents
Version number of a document
Storage date/time of a document
Date/time of modification of a document
The archive documents found based on the selected search criteria are listed as search results in the lower section of Archive Document Manager V2. The columns in the document list are named according to the technical fields from the drop-down list.
Notice
Dates and times are specified in UTC time and must be adjusted according to the desired time zone.
You can change the order in which the documents are displayed by clicking on the column headers.
You can save search queries and filter settings by clicking on the Save button and access them later via the Saved filters drop-down list.
Clicking on the Reset Filters button removes all filter criteria for the current search and displays every single document of an archive in the list.
The total number of documents after applying a search is displayed to the right of the Reset Filters button.
By clicking on the icon(s) in the last column of the document list, you can display the respective file attachments for the document.
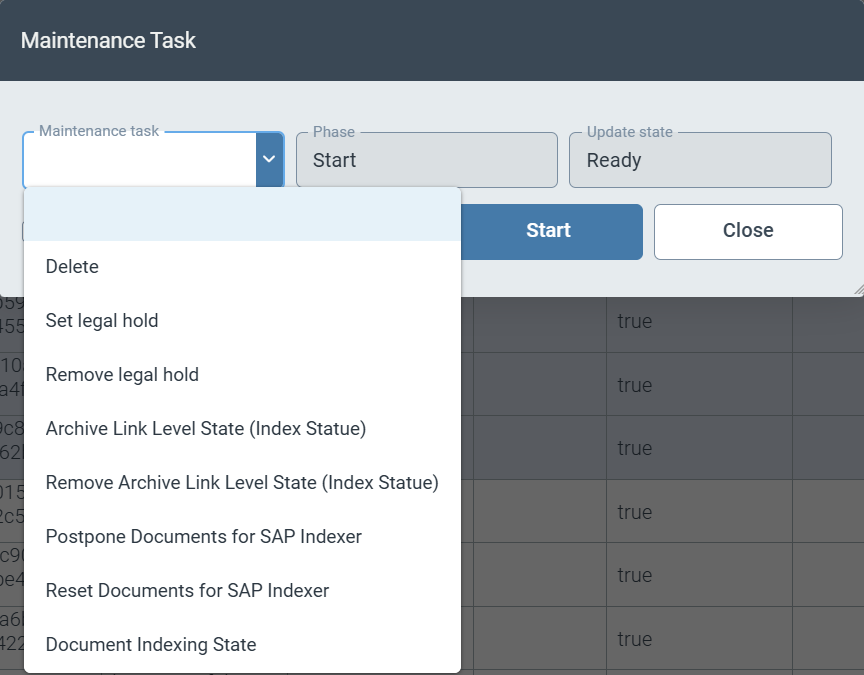
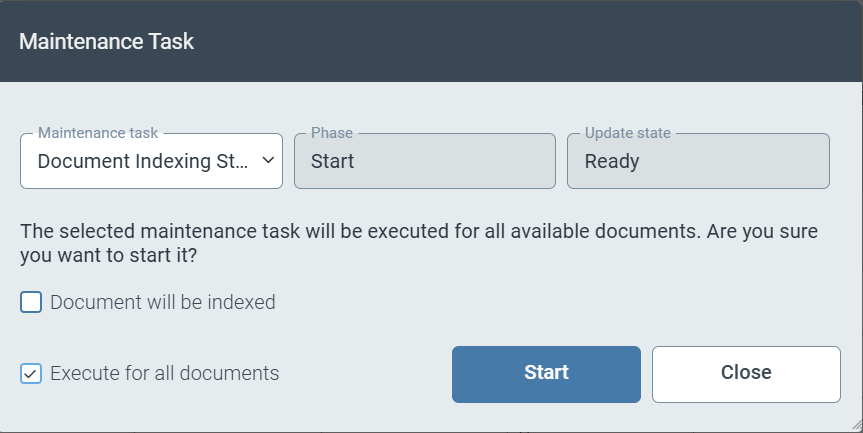
To delete documents or make changes to the technical fields, you must select the relevant documents using the checkbox in the first column. Use the Maintenance Tasks button to mark tasks for deletion or update the content of technical fields.
The following maintenance operations are currently available for the documents you have selected:
Delete
Set and remove legal hold
Set and remove the status for indexing ArchiveLink documents
Postpone of the next execution date for indexing the ArchiveLink document (by the time period set in the content server configuration)
Complete reset of the indexing status of ArchiveLink documents
Set the flag for (full-text) indexing of documents
 |
For all maintenance tasks, you can specify that the maintenance process will take place for all archive documents by activating the Execute for all documents checkbox.
 |
Notice
The selection made using the checkboxes for the documents displayed in the document list only applies to the documents that are visibly selected in the list. The number of documents displayed is limited for technical reasons.
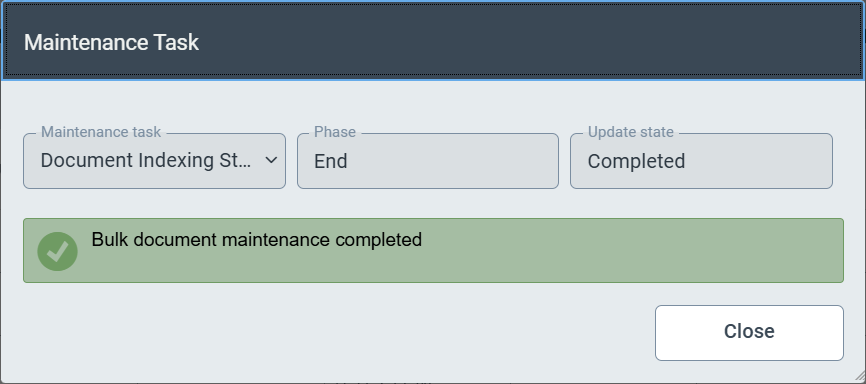
Clicking on the Start button instructs xSuite Helix to execute the maintenance task. Depending on the scope of the task and system load, execution may take a few seconds. Successful transfer of the task to the xSuite Helix backend system is confirmed with a success message:
 |
Linking data fields with references in the viewer
Visible document information in index fields can now contain additional information in the background. As the first piece of additional information, the coordinates of the locations found in the documents are stored by xSuite Helix for these fields and transferred into the workflow.
Users can see this functional enhancement in all xSuite Helix workflow steps that contain editable fields.
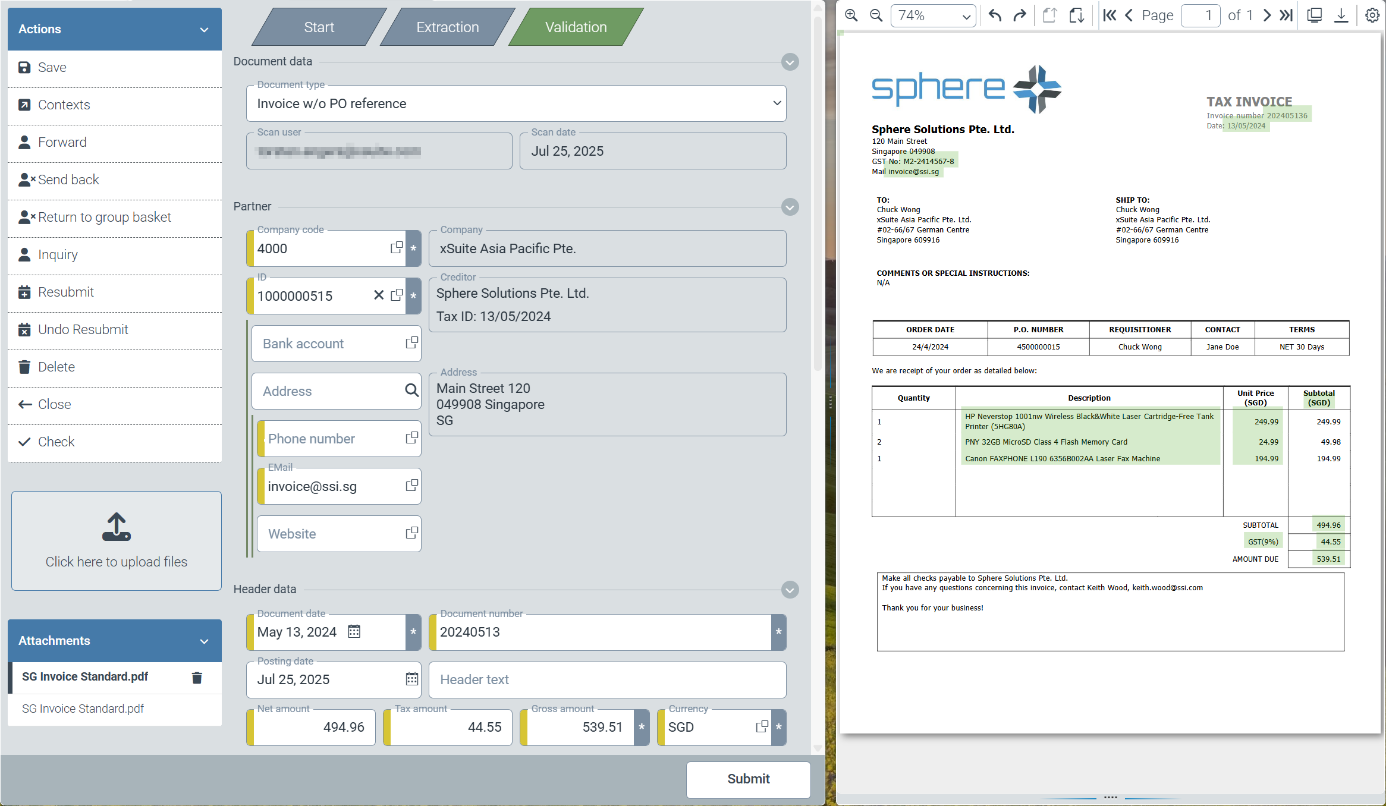 |
Editable fields with additional contextual information are highlighted in the field information area at the edge of the respective data field.
By clicking on the Contexts button in the Actions area, you can display all fields with additional context information for a document.
 |
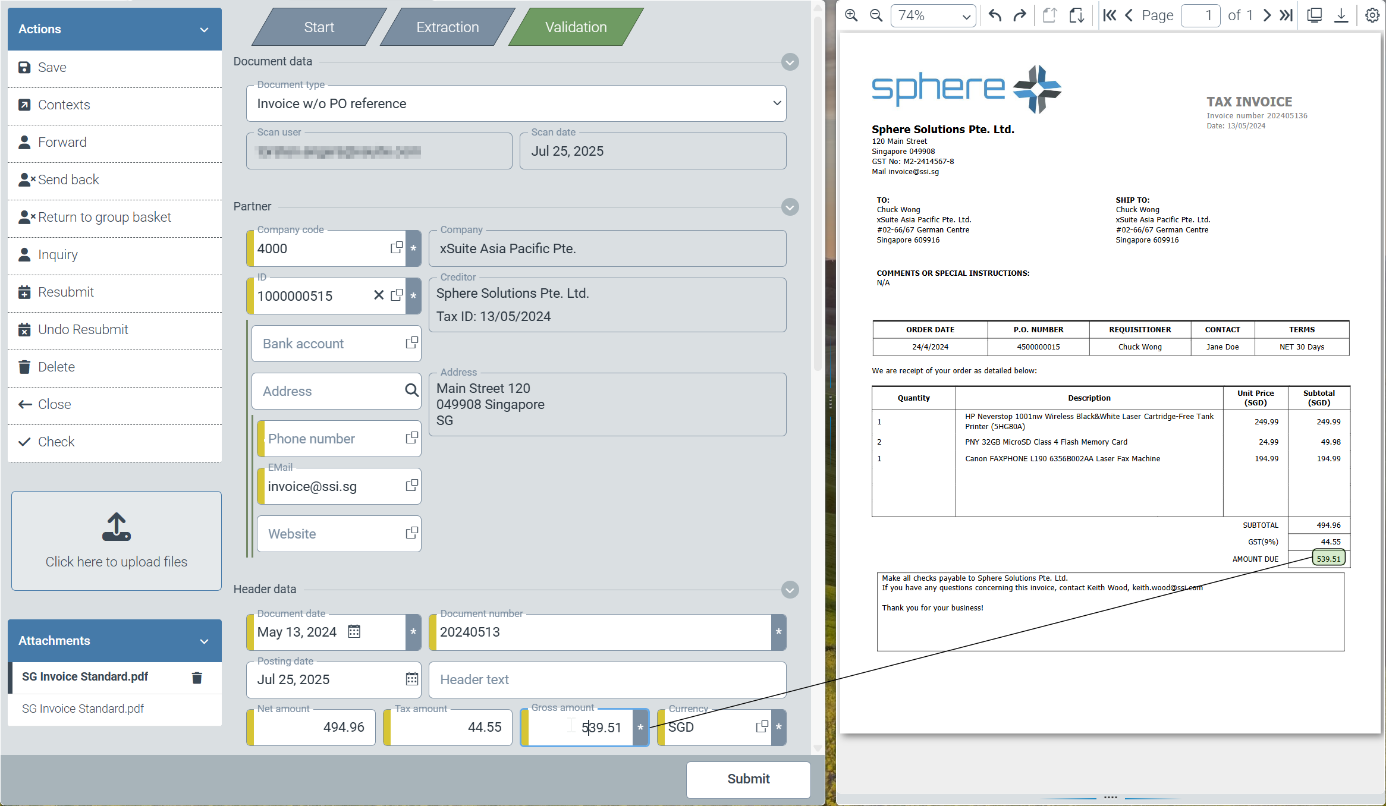
We have made it easier for users to find specific field contents in the original document. By clicking on a specific field, you will now see a thin line between the selected data field and the source information in the original document.
 |
Changes
Project-specific anchor words for IBAN numbers
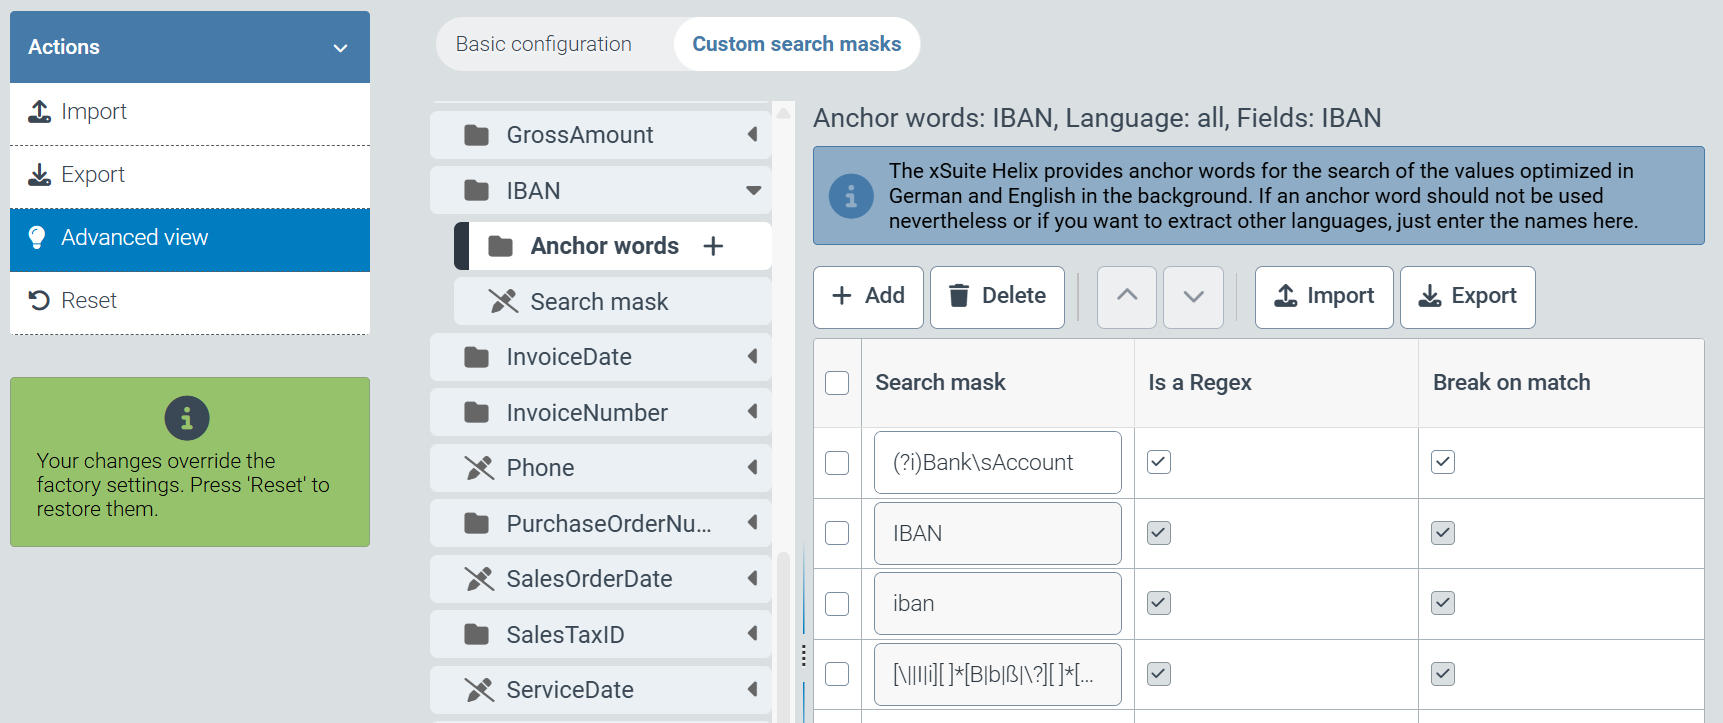
Project-specific anchor words for IBAN numbers
When configuring extraction projects, you can now configure anchor words of IBAN information on a project-specific basis.
To enter your own anchor words or corresponding regular expressions, open the extraction project sys_DataExtractionProject_Invoice or sys_DataExtractionProject_Invoice_US via the tile Configuration → Capture setion→ Extraction.
You can store additional expressions via the Custom search masks tab in the Header data → IBAN → Anchor Words section. Expressions already stored in the system can be displayed via the Advanced view option in the Actions section.
 |
June 2025
The “Committed Crocodile” release of xSuite Helix contains improvements for many xSuite Helix components. In particular, it is now possible to integrate external AI components from technology partners into the extraction process of incoming customer orders.
The CMIS interface used to connect SAP S/4HANA systems can now also be used to connect Archive V2.
Furthermore, a new editor is available with this release, which simplifies the editing of data source content.
New Functions
Use of extraction services from technology partners for document reading of customer orders
Storage of documents via the CMIS interface in the archive V2
Changes
Access to subschema content via scripting in the workflow
Immediate deletion of work items on completion of the agnostic workflow
Additional regular expressions to better support country-specific spellings of VAT numbers
Simplified scheduling of the resubmission of workflow tasks
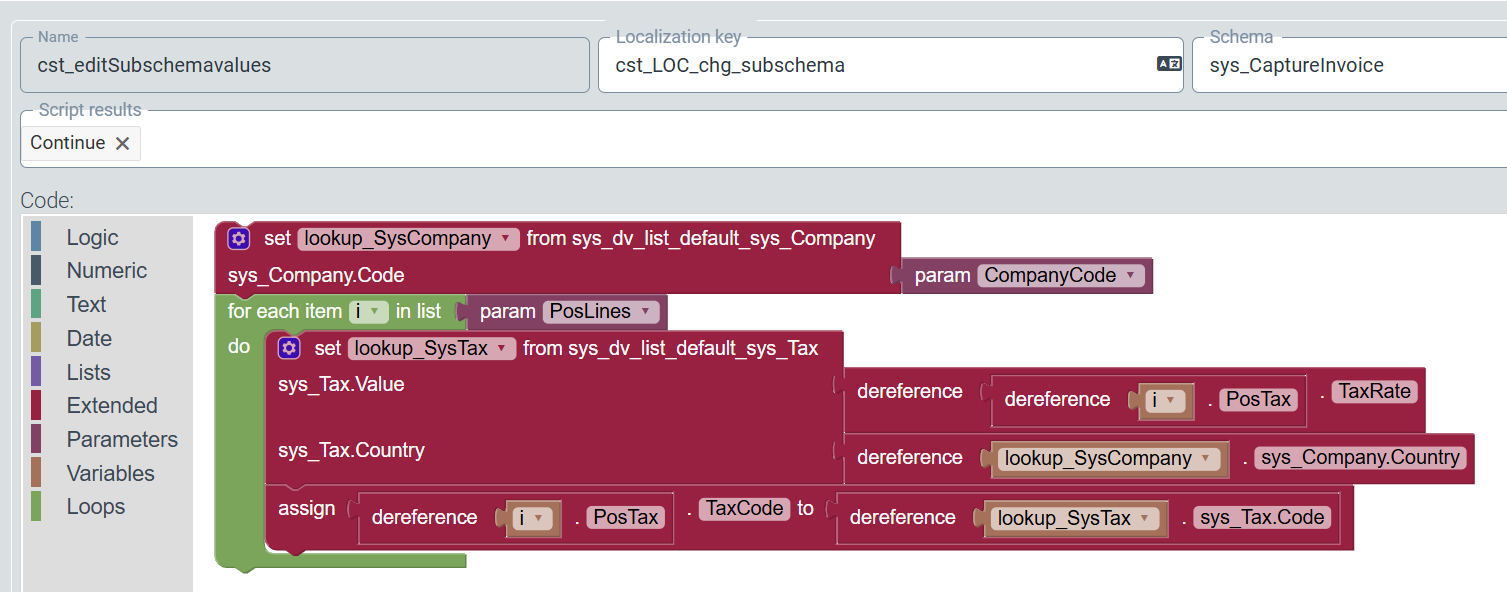
Access to contents of subschemas via scripting in the workflow
“Blockly scripting” is available under Configuration → Workflow (V2) → Scripts. The blockly scripting has been extended so that the content of subschemas can now also be read and changed. The display of program loops has been implemented.
In the following example, the country code of the company code of a work item is determined first. All item lines of a document are then processed in a program loop. The respective tax code is calculated for each item on the basis of the tax rate and the country code from the data source sys_Tax. This tax code is saved in the item line.
 |
Immediate deletion of work items upon completing the agnostic workflow
In the supplied workflow sys_CaptureValidateAgnostic (“Capture Validation Agnostic”), work items are now deleted immediately upon completion of the workflow (“END” phase).
This immediate deletion does not restrict operation. Work items in the “Export” step can be retained by the connected external system for any length of time.
However, if a retention period is required after the workflow has ended, the retention time can be increased at any time in the Workflow Designer via the parameters of the "end" node.
Additional regular expressions for VAT numbers
In many cases in Belgium, the Netherlands and Spain, additional characters are introduced in the details of VAT numbers to improve legibility. Additional regular expressions enable the recognition of vendors on the basis of VAT numbers.
Simplified scheduling of the resubmission of workflow tasks
To set up a resubmission for a process within a workflow, entering a full hour for the resubmission time and an explanatory text is now all that is required.
April and May 2025
With the current release, “Busy Beaver”, of xSuite Helix, AI services have been integrated even more into xSuite Helix workflow processes. The first version of a microservice was introduced for this purpose. The microservice provides the data extracted by xSuite AI for validation based on master data matching or other rules.
Furthermore, the file format of the xSuite Helix workflow protocol was changed from PDF to HTML for performance reasons.
New Functions
Create new entries in the role determination table while table filters are active
Identifying vendors by recognized order numbers
Creating new entries in the role determination table
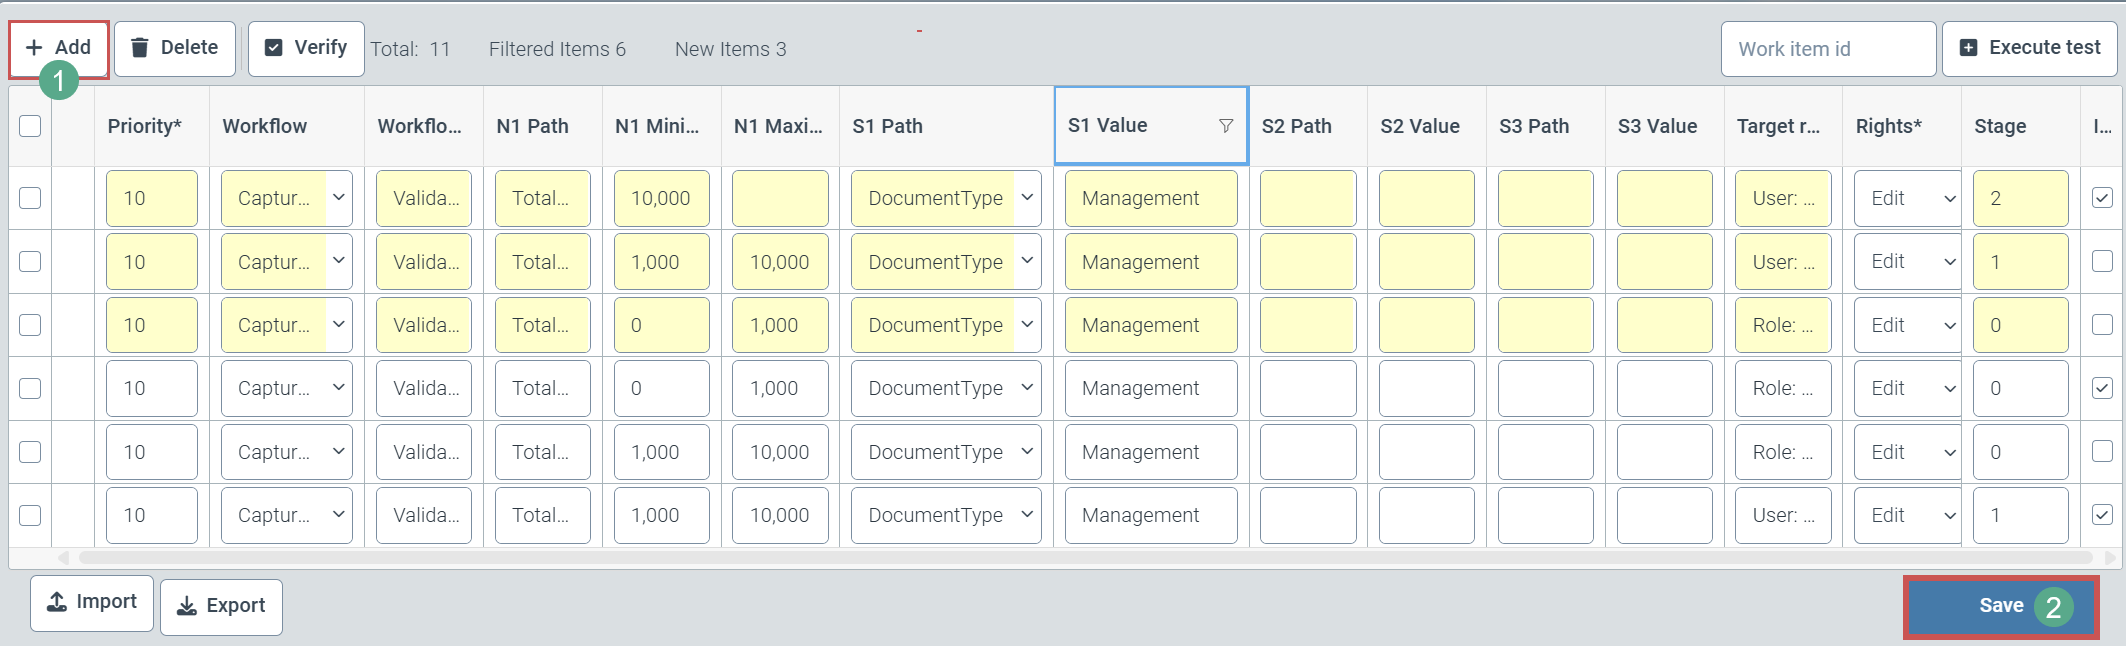
Additional rows can now be added to the role determination table while filter criteria are already activated in the role determination table.
Newly added rows are highlighted in yellow (1) until they are finally saved. The defined filter criteria are automatically adopted as field content in the corresponding field. This is why, for example, Management appears prefilled in the corresponding column for which the Management filter was already set when the new row was added.
An icon with an exclamation mark (2) in front of the row indicates that mandatory fields in this table row have not yet been filled out. The user must confirm completed rows by clicking the Apply button (3).

Additional table rows can then be added using the Add button (1).
Only by clicking on the Save button (2) can the user finally save all table row-related additions and corrections.
Determining vendor IDs from order numbers
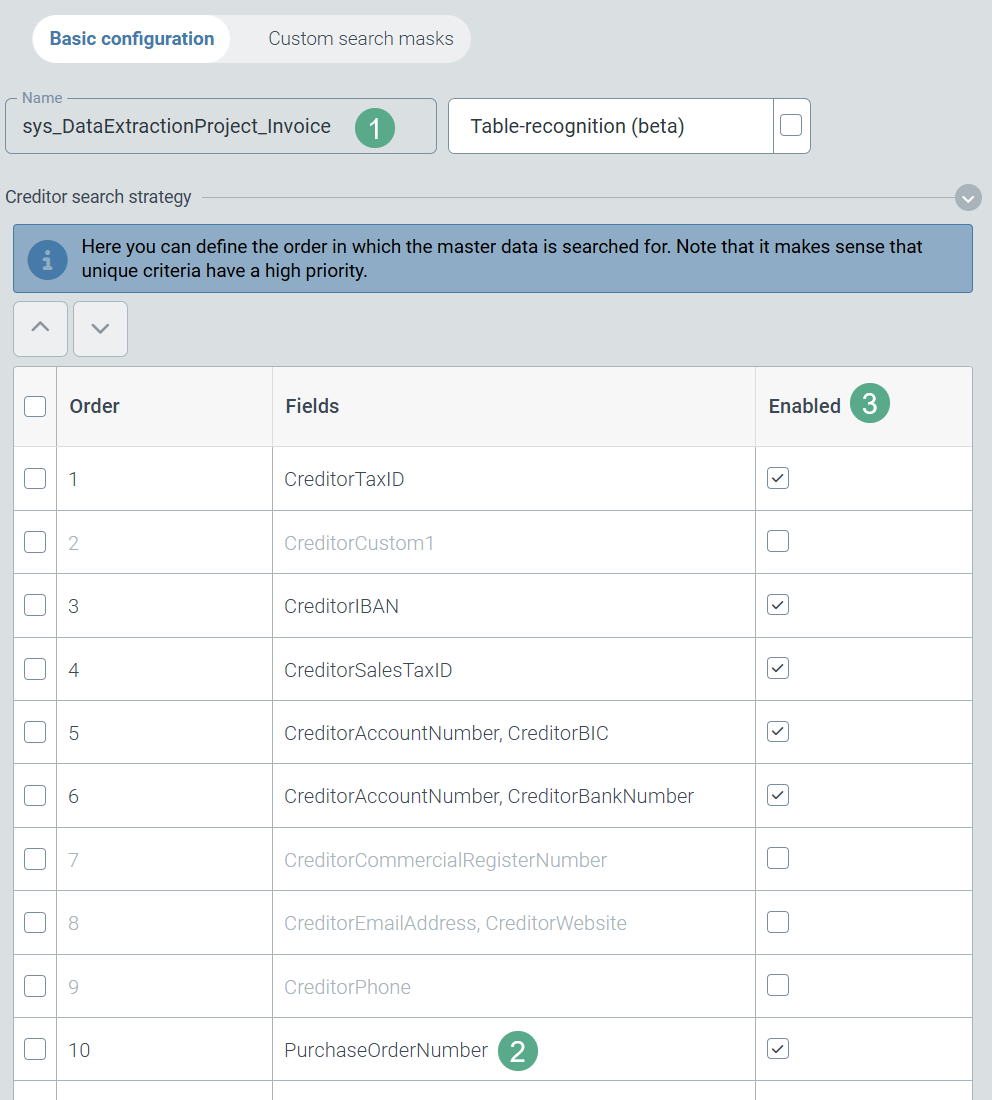
xSuite AI extraction can determine the vendor number from order numbers found on an invoice. To do this, the Supplier entry is read from the master data of the orders (data source: sys_Order).
The priority of this additional search strategy (PurchaseOrderNumber (2)) can be changed in the configuration of the respective capture extraction project (sys_DataExtractionProject_Invoice or sys_DataExtractionProject_Invoice_US (1)) with regard to other strategies.
 |
Notice
By default, this new search strategy is active and assigned the lowest priority.
In special project situations, the PurchaseOrderNumber search strategy (2) can also be deactivated for the extraction project in the Enabled column (3). The search for the vendor ID then follows the previous search pattern consisting of the activated search strategies with their respective priorities.
Changes
New service for validating xSuite AI reading results
File format change for the xSuite Helix workflow protocol
Colored background for buttons that indicate user reactions in individual workflow steps
New service for validating reading results from xSuite AI
A new microservice for validating extraction results has been integrated into the xSuite Helix platform. In the current release (“Busy Beaver”), this microservice checks order numbers that were supplied exclusively by xSuite AI and compares them with the order numbers that were stored in xSuite Helix by the ERP system.
Order numbers that are not included in the list of open order numbers are deleted. If there are no more order numbers as a result of this process, the invoice type of the order is automatically changed to invoice without PO reference.
Changing the file format for the xSuite Helix workflow protocol
The technical file format of the xSuite Helix workflow log was changed from PDF to HTML. In projects that transfer this log with the extraction results to an ERP system, the change of format must be taken into account for the configuration of xSuite Interface 5 and for the configuration of the ERP system.
Colored background for buttons that indicate user reactions
Buttons receive the following background color depending on their defined status within a workflow activity:
Status | Background color |
|---|---|
Default | white |
Accept | green |
Reject | red |
Attention | white |
Notice
The colored background is only visible in the editing view of the work item.
March 2025
xSuite Helix Release Notes describe customer-relevant product features that have been added or changed.
The “Astute Alpaca” release of xSuite Helix is particularly characterized by the possibility of using a text-based AI to extract document content.
An AI technology was introduced at the end of last year in the form of document segmentation. This technology has already proven its efficiency in productive environments on several occasions. Document segmentation supports document extraction by using graphical AI to determine the position of relevant document content.
This release for the first time offers the optional use of a text-based AI, a Large Language Model, for extracting document content.
The use of a Large Language Model in order to identify header and item data in invoice documents is now possible.
Document extraction has been significantly improved at the level of implicit training.
New Functions
Selection option for AI-based extraction of header and item data by using a large language model
Option to store workflow processes directly in an archive of version Archive V2
AI-based extraction of invoice documents
For customers with an Invoice Premium package, the user can optionally switch the document extraction of xSuite Helix to the use of a text-based AI, a Large Language Model. xSuite Group GmbH can activate xSuite Helix clients centrally for the use of text-based AI (1).
 |
For each workflow, the user can now switch individually between the usual document extraction and AI-supported document extraction. To do this, the user opens the configuration of the respective workflow (Configuration tile → Workflow (V2) node → Workflows). The user can then select the Extraction node in the workflow (1).
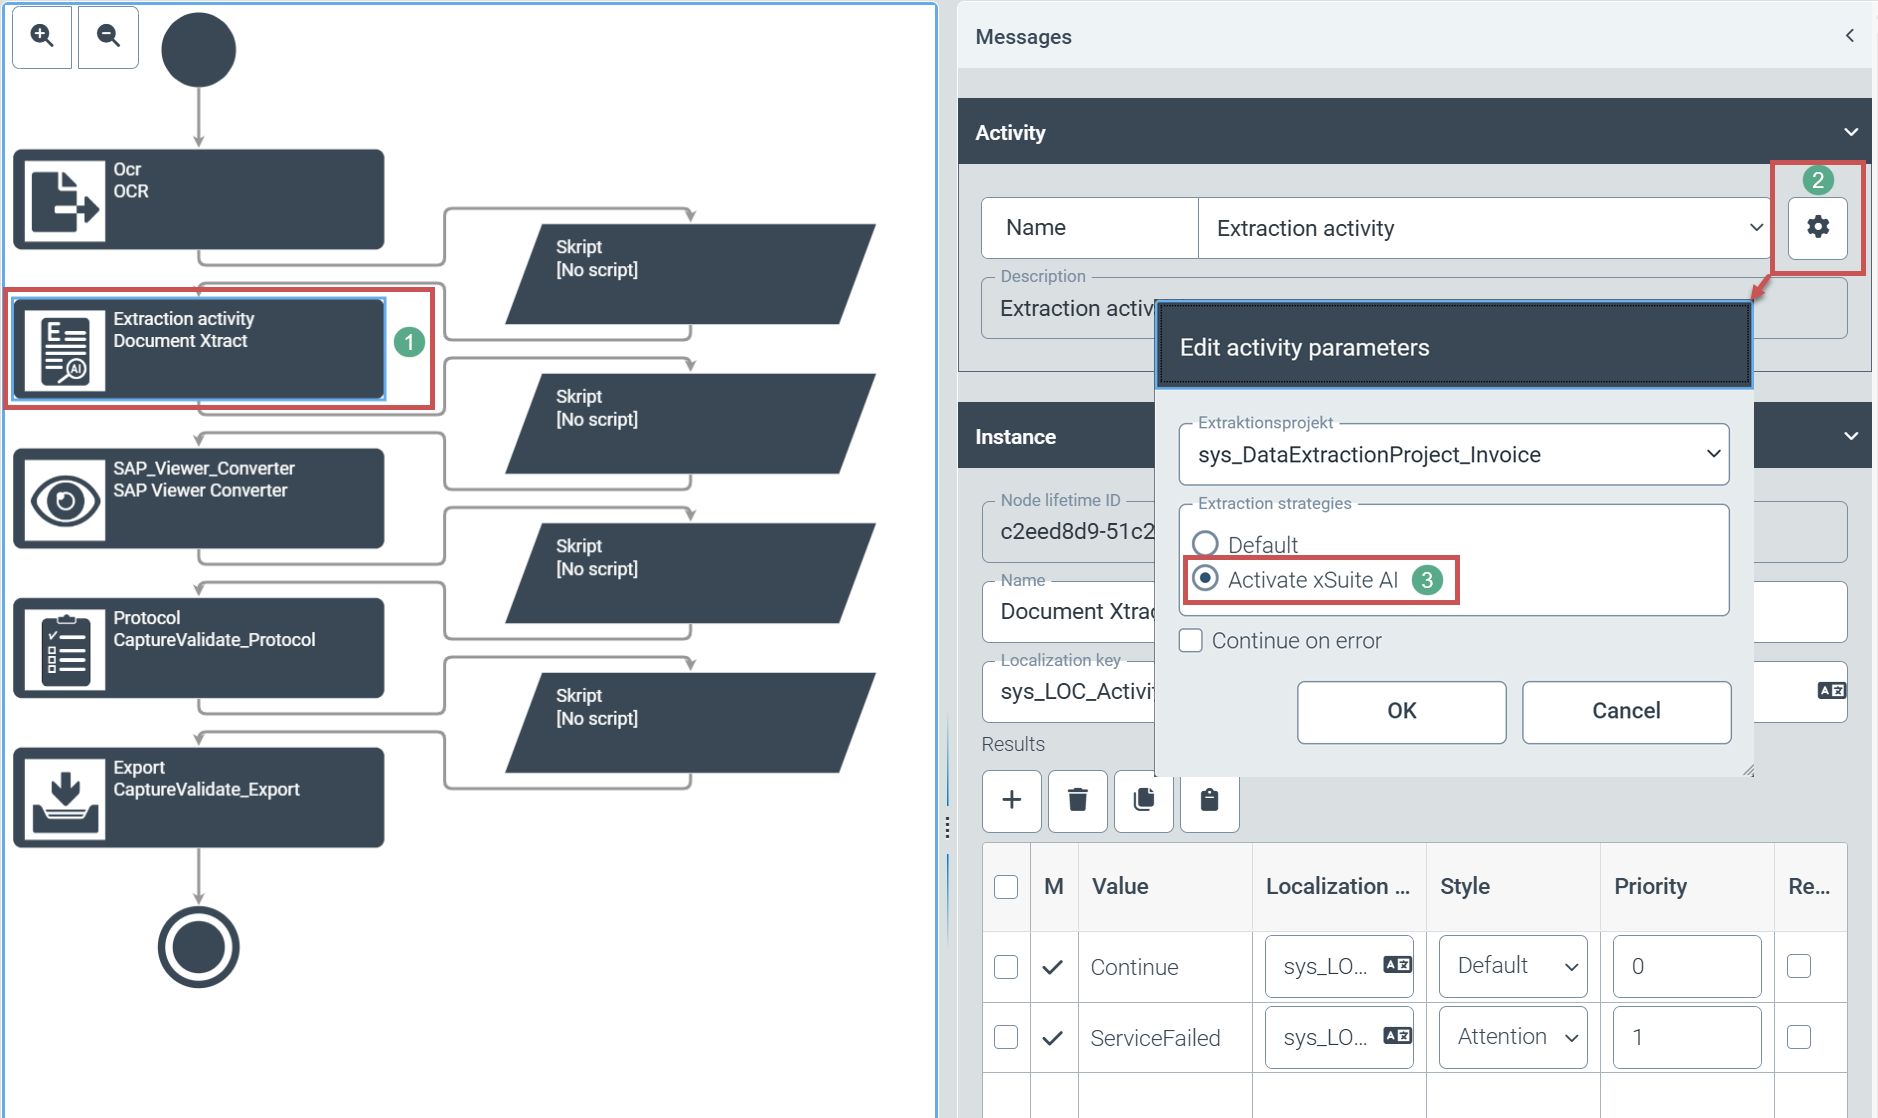 |
The user opens the parameter settings of the extraction node via the gear icon (2). The user can select AI-supported segmentation in the parameter settings by clicking on the Activate xSuite AI option (3).
Notice
The text-based AI, xSuite AI, always provides header and position data for a document. Regardless of the document extraction option selected, the user cannot deactivate the extraction of position data in xSuite Helix.
Direct archiving of workflow processes
The user can store field contents of work items (schemas) and file attachments in the new archive (Archive V2) directly from a workflow in xSuite Helix. The new workflow activity Archive is available for this purpose.
The user can only archive work items, including the associated schemas and various file attachments and comments, from within his workflow tenant. The user cannot archive workflow processes from within his own workflow tenant for another workflow tenant.
Prerequisites:
The respective xSuite Helix tenant must have a valid xSuite Archive license.
The xSuite Helix tenant must be switched to Archive V2.
An archive must be created in advance in its entirety
Storing workflow processes:
The user creates a workflow in the customer namespace and also creates a new task at the desired point in the workflow. The user can afterwards select the newly created workflow task for archiving (1).
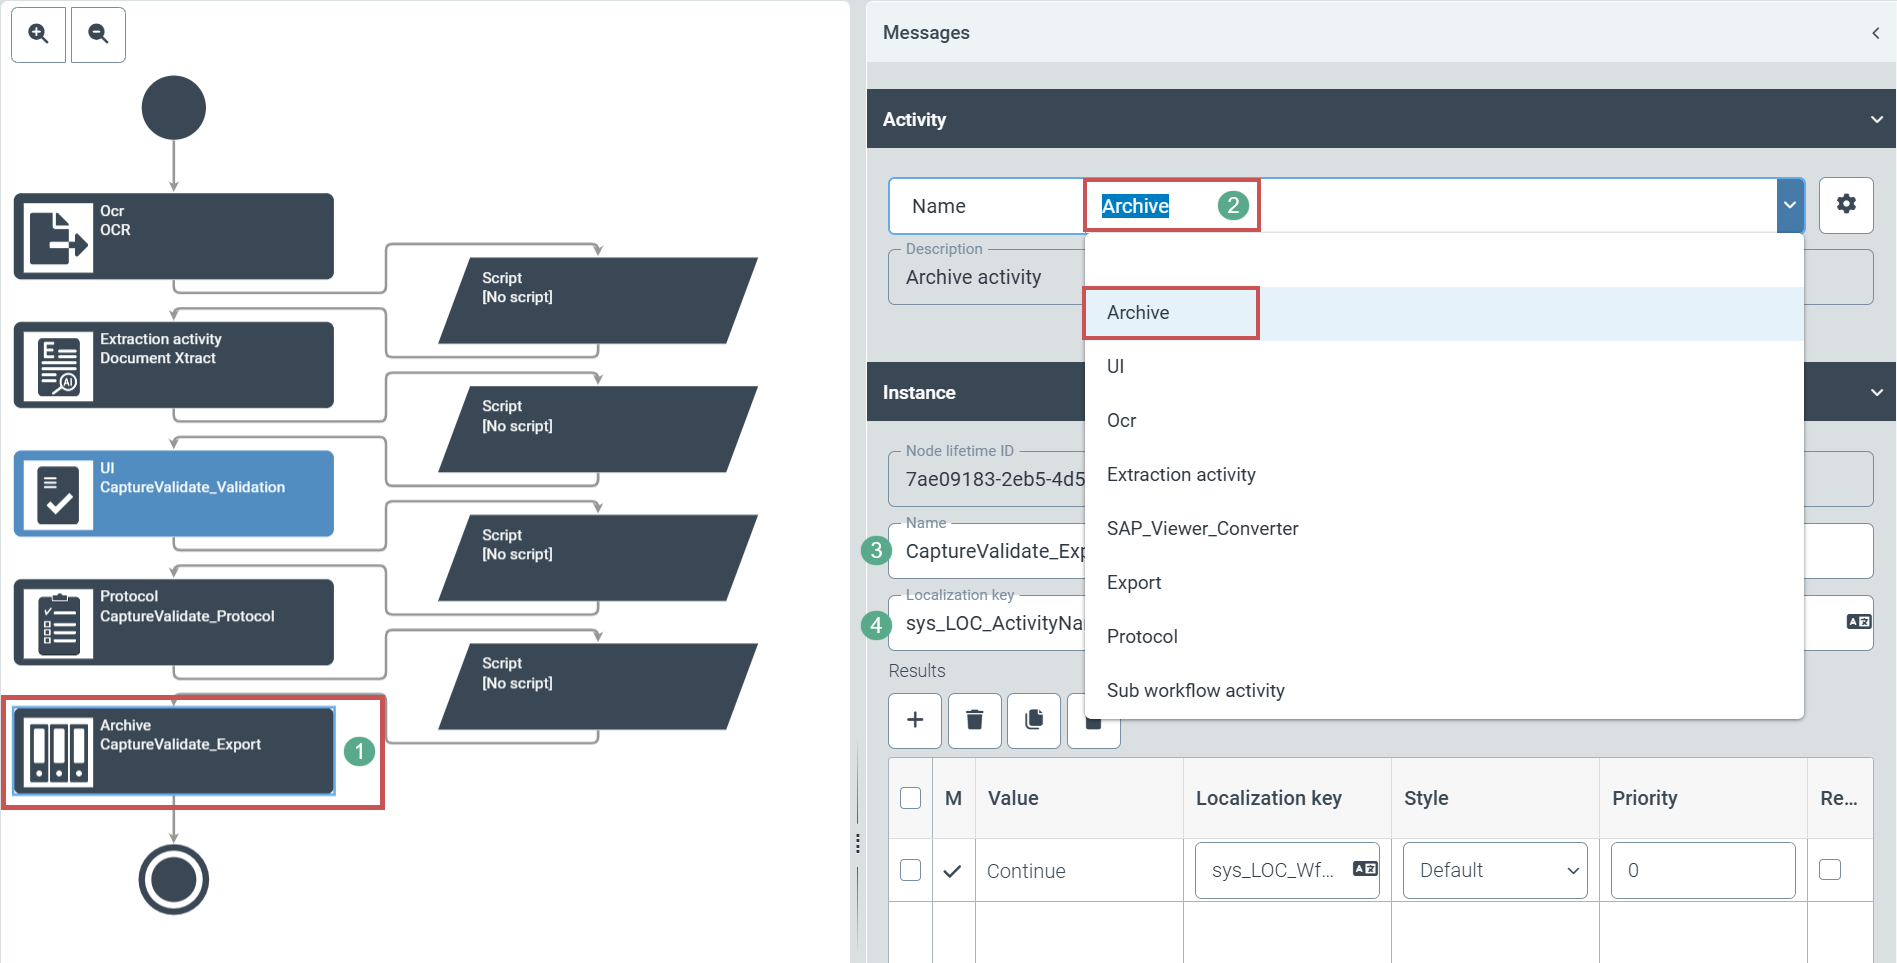 |
The user selects Archive (2) in the area "Activity".
In addition, xSuite Group GmbH recommends choosing a suitable name (3) and localization (4). Otherwise, only technical names will be visible in the relevant places later on.
The user defines the following archiving settings by clicking the gear icon (1):
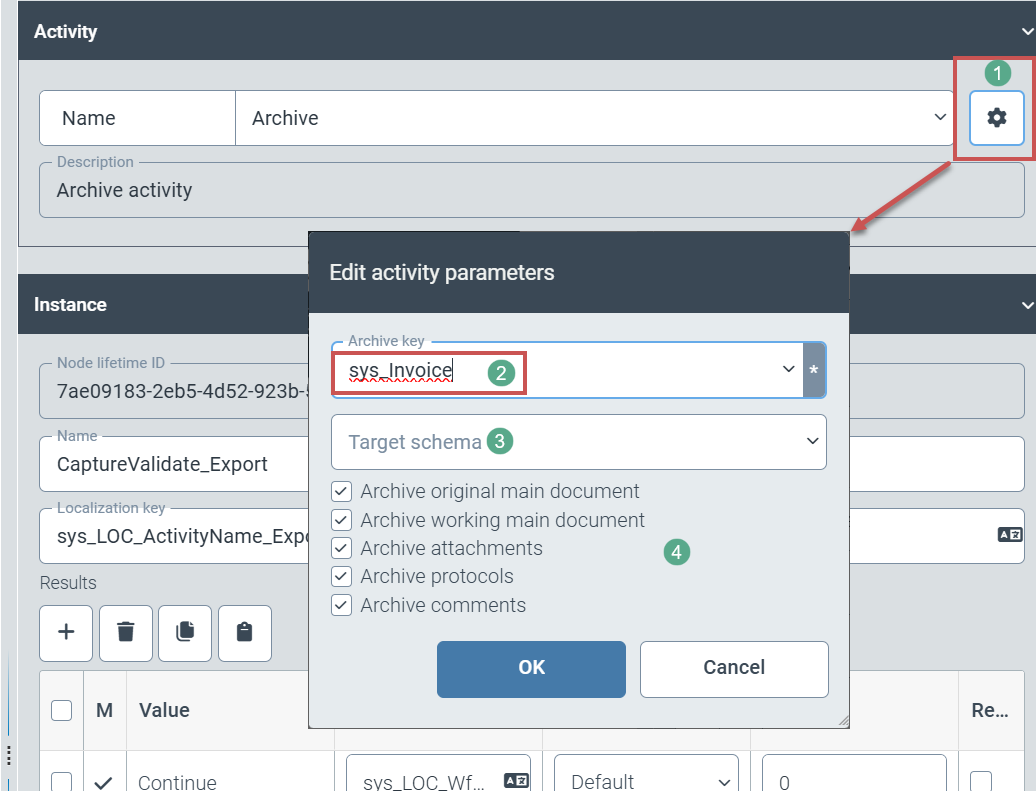 |
(Technical) name of the archive in which workflow processes are stored (2)
Optional: Selection of a different archive schema (3).
If the user selects a different archive schema, a data transformation between these schemas must be created via General/Core in the navigation structure.
Selection of workflow documents (main document, working copy of the main document, attachments, workflow log) and information (e.g. comments) for archiving (4)
Changes
Improved AI model for document segmentation
Extended role determination table with a third, freely definable criterion for each rule
Extended sorting and filtering options in the role determination table for individual rule columns
More precise recognition of documents of the same origin and improved differentiation of similar documents of different origins when retrieving training results
Accelerated transfer and processing of master data
Update of document segmentation
The graphical AI to support document extraction has received an update of the AI model. This model update improves the speed. In addition, the criteria for recognizing the fields during implicit training have been narrowed down more. This makes recognition more precise.
Additional criterion for role determination
A third, freely definable criterion has been added to the role determination table. This means that rules for determining agent roles can be defined even more project-specifically.
Additional sorting and filter functions in role determination
The user can now specify sort and filter definitions for all 3 freely definable criteria within the role determination area. The role determination criteria are visible as column pairs in the user interface. The user can now sort and filter the entries in these columns.
Improved identification of documents of the same origin
Documents of the same origin are recognized with greater accuracy when the training results are retrieved. The reason for this is the adaptation of mathematical rules for the recognition process.
Acceleration of master data transfer
A revised transfer and processing procedure has accelerated the processing of transferred master data. In addition, master data is now processed in a separate processing line. The decoupled processing of master data also speeds up master data transfer.
February 2025
Improvements
User interface of the new Archive V2
First of all, it should be noted at this point (see also: Oktober 2024 that only the previous archive technology Archive V1 or the new Archive V2 is permitted in each client of Helix. Simultaneous use or switching between the systems is not possible.
An internal Helix migration from archive data V1 to archive V2 will be offered in one of the upcoming Helix releases.
User interface
A new “Archive V2” tile is available on the Helix dashboard for working in the archive.
If this tile is not visible, it can be added to the dashboard via the Helix app catalog (tip: don't forget to save the dashboard afterwards!).
Clicking this button starts the ArchivV2 search and editing interface. Note: New documents can only be created using a separate tile (“Archive File Upload”).
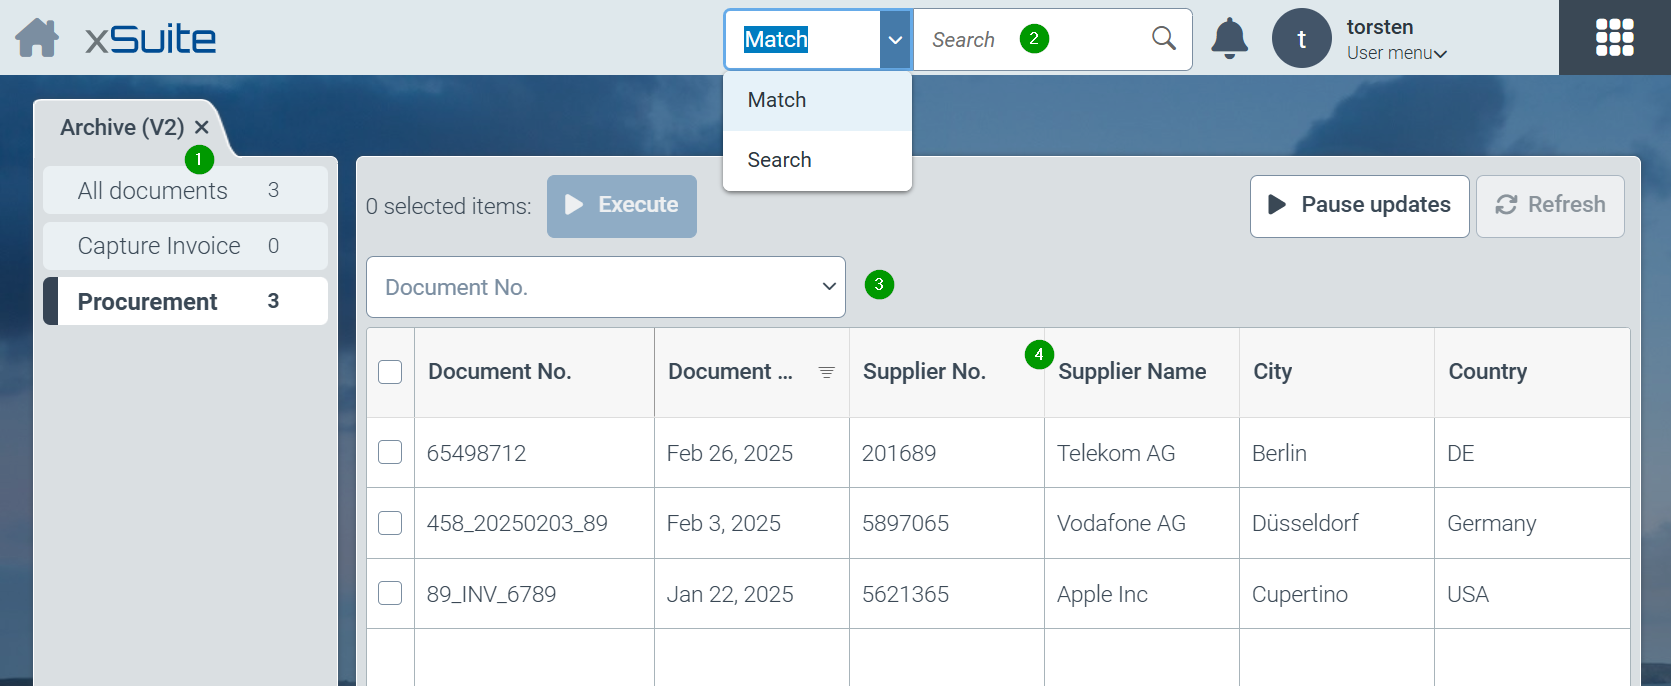
All defined searches of the system are offered in the left part of the screen (1). In most practical cases, at least one search option will be configured in the system for each archive. However, several archives can also be combined in one search or searches with restrictions can be defined for parts of an archive (e.g. only certain company codes). “All documents” summarizes the entire document pool from all archives.
The search option for full-text searches (2) is located at the top of the screen. Here you can switch between the exact search (“Match” selection) and simplified search (“Search” selection). For a description of the options, see also November and December 2024.
Another way to find documents quickly is the optionally configured “Quick search” (3) above the hit list. How to use and set up the quick search is described here: July to September 2024.
All documents resulting from searches or restrictions are displayed in a structured hit list (4). Each line of the hit list corresponds to an archive document found. The columns displayed in the hit list and the default sorting of the hits are determined by the administrative configuration of hit lists.
For each column of the hit list, a further specific search can be carried out for the respective field by clicking on the column header and thus an attributed restriction of the number of hits can be carried out. Users can also change the sorting of hits here. For date fields, searches can be carried out using date ranges.
Clicking on a hit opens the actual document in a separate tab. Several documents can be open at the same time
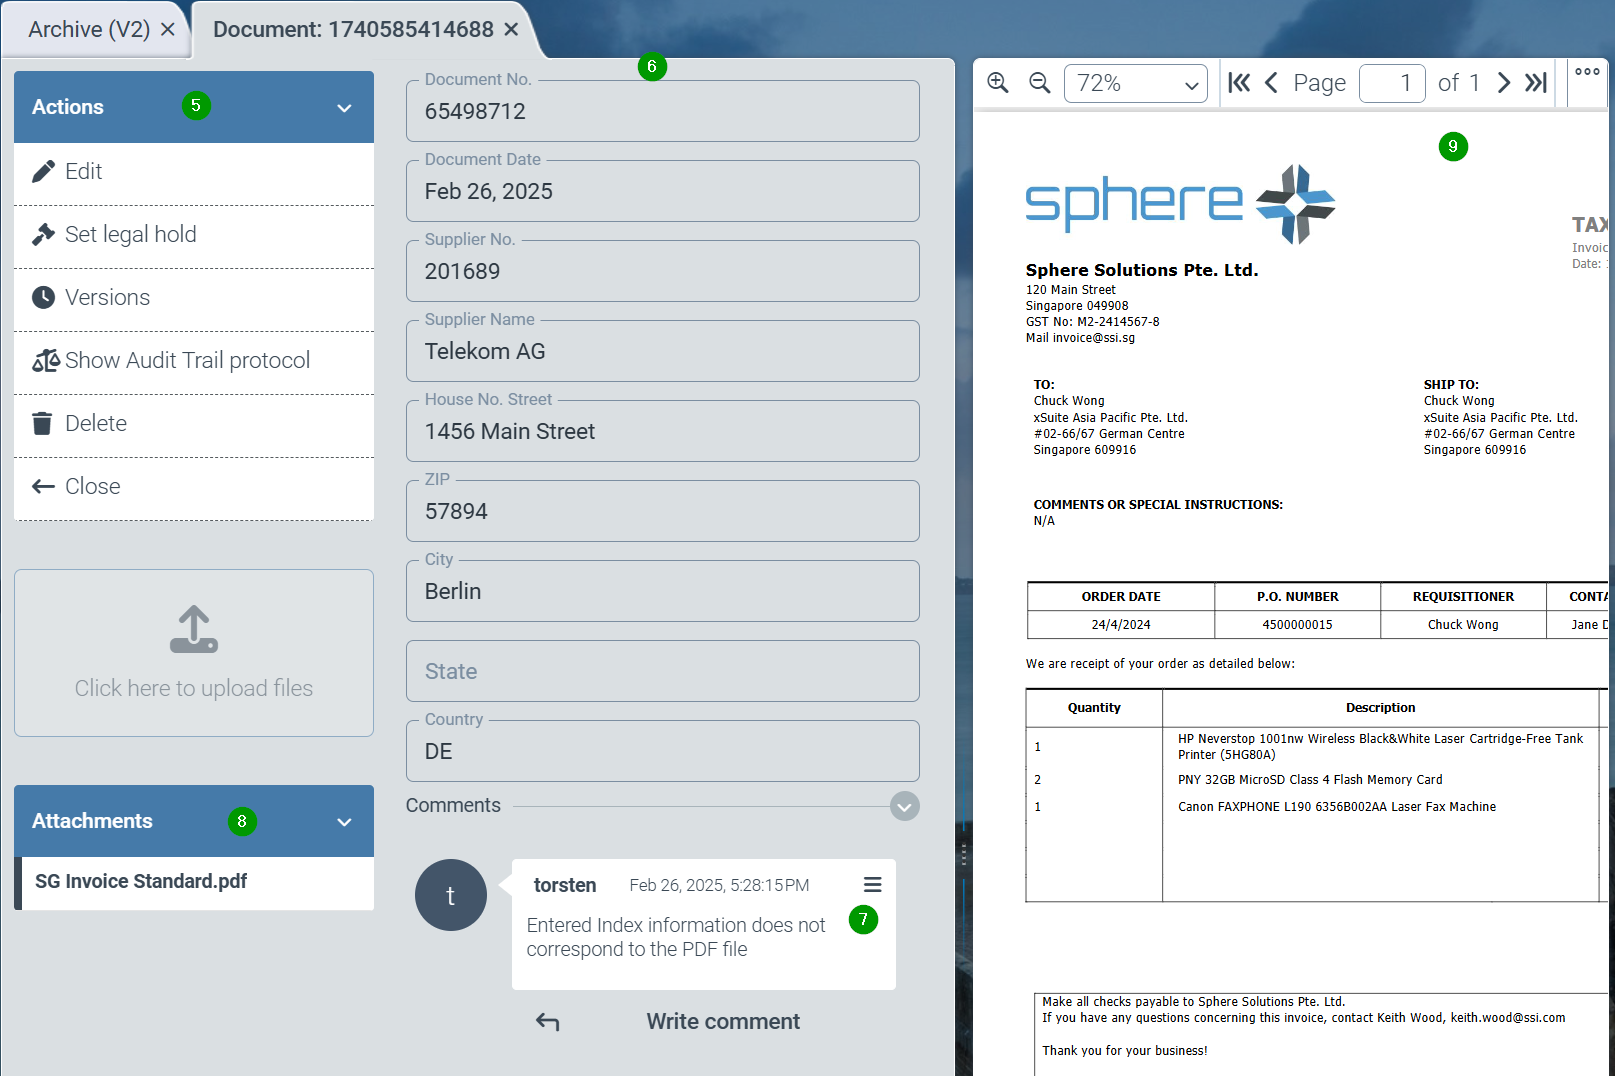
On the left-hand side of the screen is the function bar (5) with all possible activities that are possible for the document. These are:
Edit the document (creates a new version)
Set a “Legal hold” to protect the document from deletion or changes
Older versions of a document can be listed and called up
The change log (“audit trail”) of a document can be displayed for auditing purposes
A document or document version can be deleted if the user is authorized to delete documents, the archive allows deletion or the individual document allows deletion.
The attributes (6) of the respective document are displayed in the middle area of the screen (in one of the subsequent versions it will be possible to design your own forms for displaying the fields)
Comments (7) can be displayed or entered below the attributes. These comments are saved with the user name and time stamp.
All file attachments of the archive document are listed below the toolbar (8). Further file attachments can be added or deleted by editing the archive document.
Finally, the selected file attachment is displayed on the right-hand side of the screen (9). This viewer can also be “undocked” from the main screen to make it easier to read file attachments on a second monitor. Tip: by closing the undocked viewer window, the viewer is docked back into the main screen. The respective document can also be downloaded to the local PC via the viewer.
Creation of a new single document
New documents are created using the newly developed tile “Archive File Upload”.

If this tile is not visible, it can be added to the dashboard via the Helix app catalog (tip: don't forget to save the dashboard afterwards!).
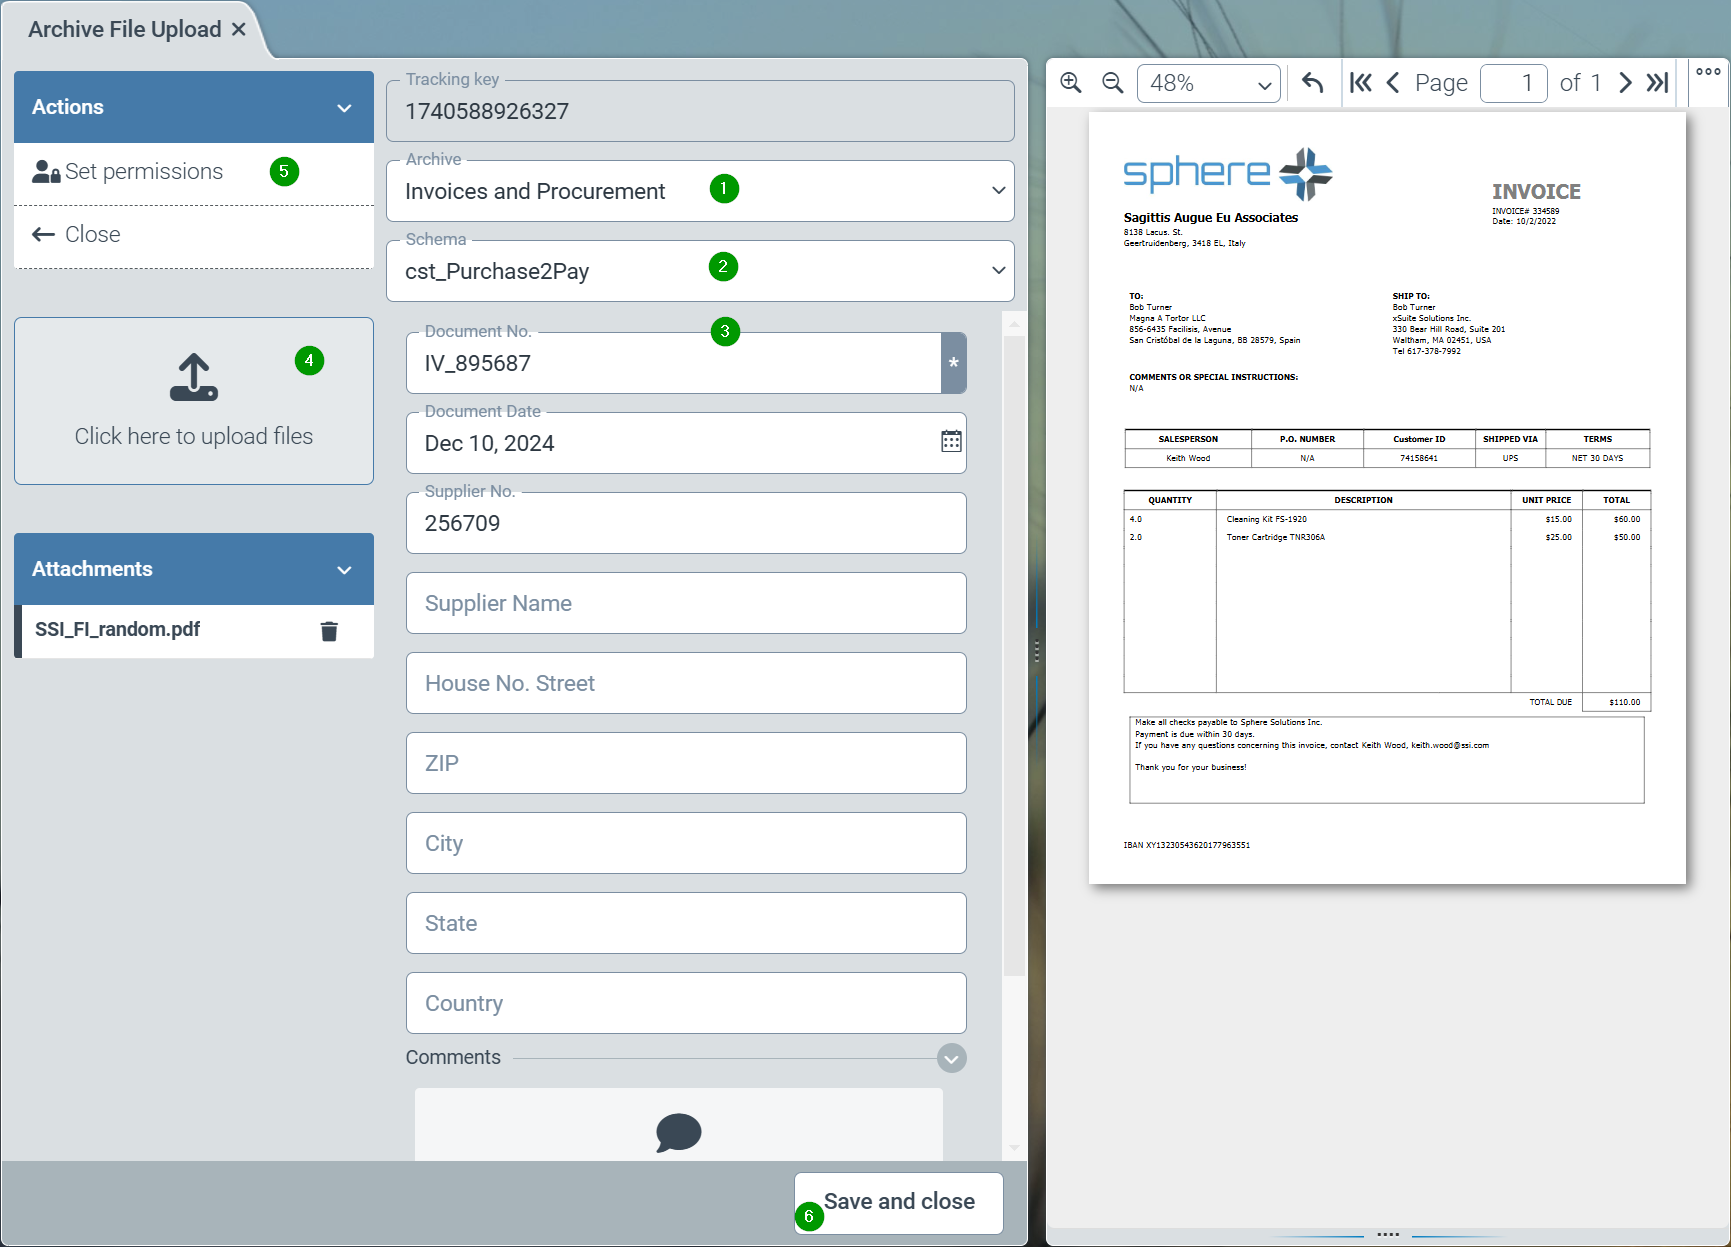
After starting this application, the archive for storing the data must first be selected (1). The desired filing structure - the “archive schema” - must then be selected (2). Finally, the required index fields for the archive document can be entered (3). One or more file attachments for the document can be uploaded via the upload area (4). Finally, specific user authorizations (ACL) can (optionally) be specified for this document (5). The document is stored and indexed in the Helix archive via “Save and close” (6).
Note
Due to the asynchronous mode of operation, it may take a few seconds for a document to become available. The document is therefore only available in the archive client after a few seconds.
Configuration of the new Archive V2
The following structures are implemented in ArchivV2:
Individual archives can be created for the storage of documents, i.e. index data with file attachments. Uniform retention periods, uniform authorizations for access by defined user roles and, optionally, a search index that is separate from other archives apply within an archive.
Generally, all archived documents must be assigned to exactly one document schema. This schema defines the structure of the possible index fields. As in the Helix workflow, schemas can also contain sub-schemas. The fields of a schema can be included in an index for searches.
Note
Currently, fields in subschemas cannot be included in a search index.
Searches are made possible by defining hit lists with “search definitions”. In principle, the search definitions are used to limit the search within the entire document stock of the overall system. Searches on specific archive fields are displayed for archive users by limiting the search to hit list columns. A hit list definition therefore specifies both the columns displayed in a hit list and the fields that are available for an attributed search.
The creation of a new archive therefore requires the configuration of the following 3 components:
a.) Set up an archive
b.) (if not available) definition of at least one document schema
c.) Configuration of a hit list (with search definition)
Setup of a new archive
To create a new archive, please follow this link: Oktober 2024
Definition of a document schema
Document schemas can be defined and, if necessary, changed via the “Configuration” tile in the “General/Core” category in the Schemas (1) menu item. See also November and December 2024 section "Creating and editing customer-specific schema".
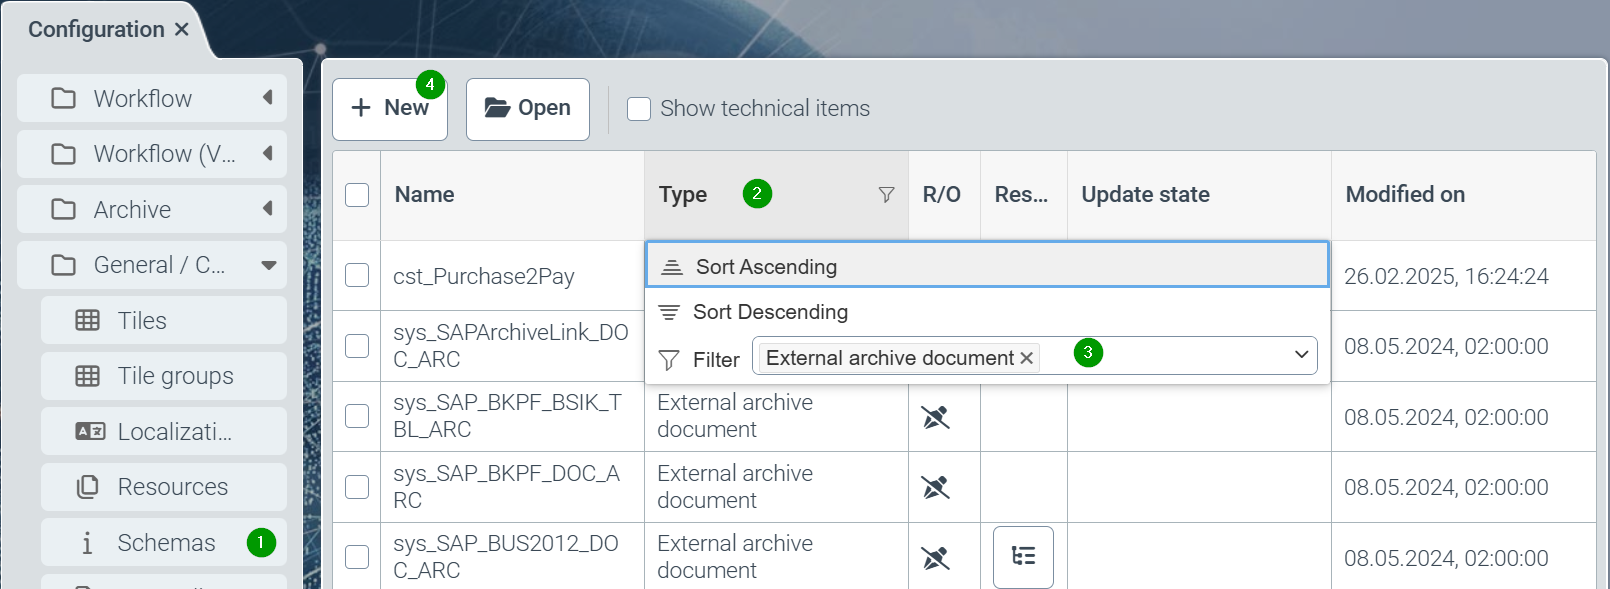
All available schemas of the system are displayed, but filtered to types (2) for the Helix workflow (master data and business objects). Therefore, the filter should first be changed to the schema type “external archive document” (3).
The “New” button (4) or clicking on a schema takes you to the editor for schemas:
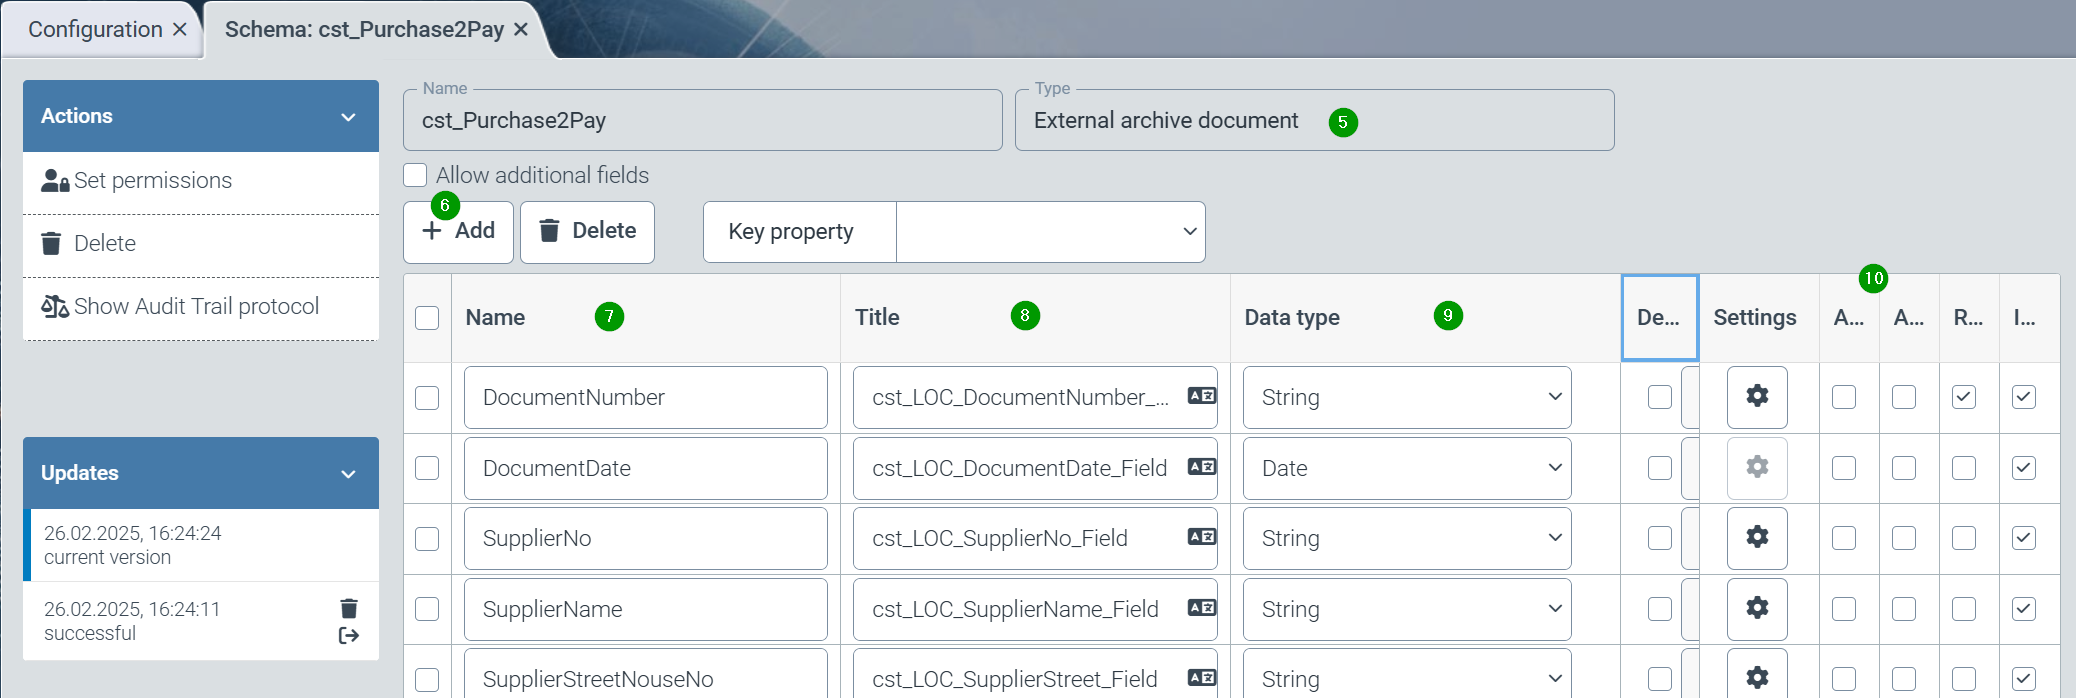
When creating a new schema, the type “external archive document” (5) must be selected for archive schemas.
The desired index fields can be added using the “Add” button (6). A meaningful, technical name (7), a localization for users (8), a data type (9) and the technical parameters of the field (10) should be specified for each field.
Finally, the “Set authorizations” function must be used to specify the helix roles that are authorized to use the schema.
Implementation of a hit list
Hit lists with search definitions are defined via the “Configuration” tile in the “Archive” category in the menu item “Hit lists on archives” (1) and can also be changed if necessary
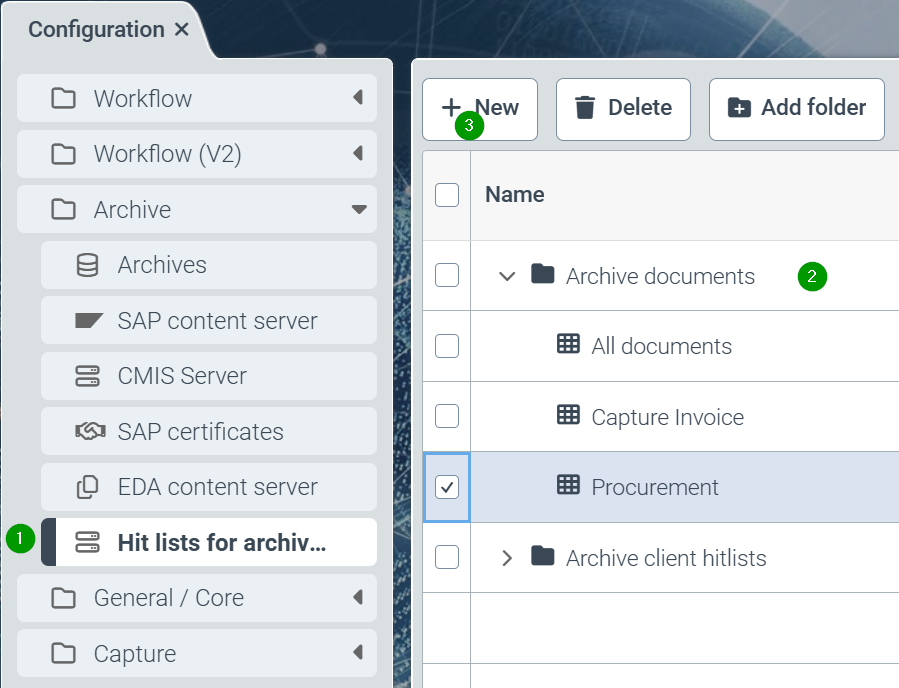
A new hit list is created using the “New” button (3). This newly created hit list must be filed in the Archive documents folder (2). If necessary, newly created hit lists can be moved to this folder using drag & drop. Hit lists in this folder are taken into account in the interface. Hit lists in the “Archive-client search lists” folder are available for external access via the Helix API (e.g. xSuite interface).
The hit list should be given a meaningful name for display in the archive interface via localization (4). The list of index fields that are to appear in the hit list can be extended using the “Edit fields” button.
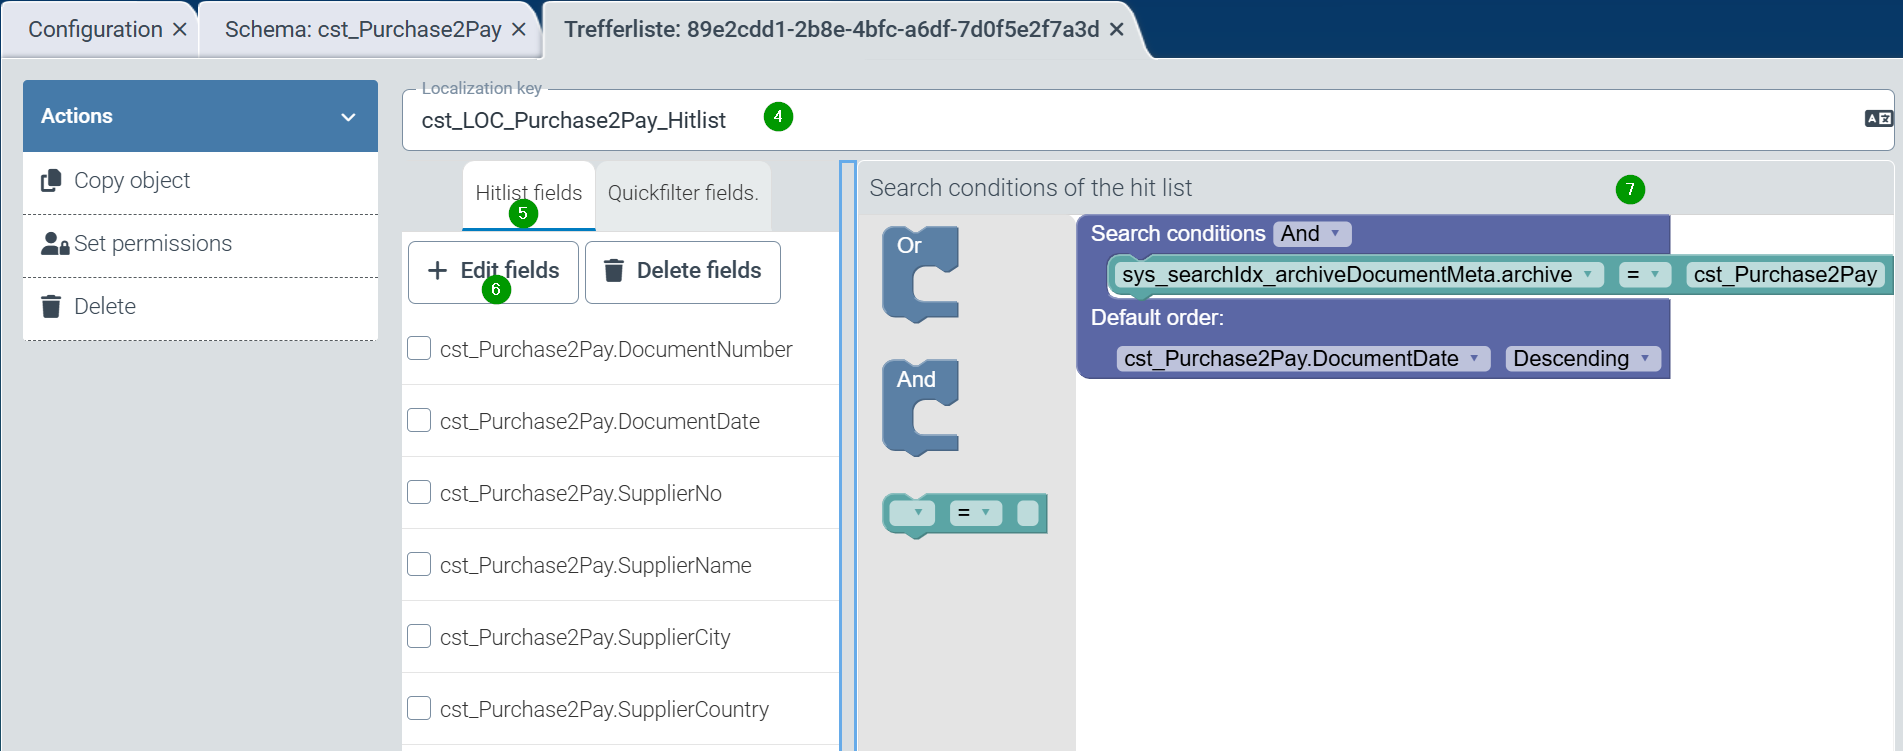
In the search restriction (7), the search index for archives (“sys_searchindex_archiveDocumentMeta.archive”) should always be restricted to the archive to be searched as the default restriction. Further restrictions (e.g. for company codes) can also be specified. Furthermore, a definition for a standard sorting of the hit list is often desirable.
January 2025
Improvements
The following customer-specific searches can now be configured for additional fields in the extraction projects for incoming invoices:
Bank Account Number - Anchor words
Bank Number - Anchor words and search mask
BIC/Swift - Anchor words
Commercial register number - Anchor words and search mask
Sales tax ID - Anchor words
Tax ID - Anchor words
For the extraction workflow node, you can now toggle in the settings (cog) that the workflow should be continued without extraction if an error occurs (“Continue on error”).
This can be used, for example, if PDF documents are expected that technically do not comply with the PDF specification and therefore cause errors.
In the role determination table, the columns for string values can now be filtered and sorted separately by field name and field value.
Fixes
Problems when updating the master data display in workflow steps with user interaction if a vendor has been changed several times.
Problems with anchor words when extracting gross amounts.
Problems with the evaluation of role determination rules with low priorities in tables with many rule entries.
Problems with the extraction of the tax rate in specific circumstances.
The status text for the rejection of a workflow item was lost in subsequent steps.
Error when filling several control item lines “Expected Number but got String”.
Error message from the document extraction: “Failed to find best matching fingerprint”.