Product News 2024
This page lists all product news in 2024.
November and December 2024
What's new?
Expansion and standardization of search options in the workflow
In many cases, special searches in data give rise to detailed problems, which then result in unexpected sets of hits.
With this release, Helix offers (initially for searches in hit lists of the workflow) 2 different types of searches or finding results as follows:
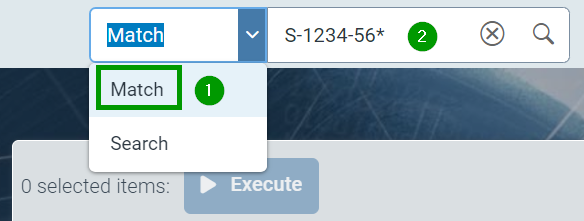
Exact filtering of the hits displayed (select “Match” )
This exact “search” filters all data of the displayed hits that match the specified search terms in any column.
This mode distinguishes between upper and lower case!
All elements that match the search term exactly are displayed. The use of wildcard symbols is also possible.
Filtering and sorting by column is also supported.
Special characters such as “-” are interpreted as characters, not as operators. However, spaces are interpreted as logical “or”; i.e. if several terms separated by spaces are entered, an attempt is made to find one of the terms entered.
Example: a “match” filter for S-1234-56* finds an invoice number S-1234-56-789.
The exact filtering of a hit list is activated above the hit list by selecting the “Match” selection point (1). The actual search term is entered in the free field next to it (2).
Simplified search within the hit list (“Search” selection)
This mode performs a full-text search. The behavior is compatible with the previous search within hits.
No distinction is made between upper and lower case. Partial matches are also found if partial expressions are separated by spaces.
The list of results is weighted. Better matches are displayed higher up in the list.
The sorting cannot be changed in this mode. The results list cannot be further filtered using column filters.
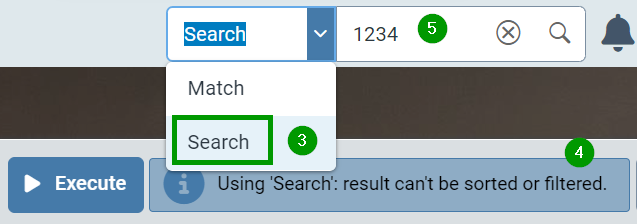
Example: A search for 1234 also returns an invoice number S-1234-56-789.
The simplified search of a hit list is activated above the hit list by selecting the “Search” selection item (3). You are informed that there is no option for further sorting and filtering (4). The actual search expression is entered in the free field next to it (5).
Creating and editing customer-specific schema
With this release of Helix, it is possible to create customer-specific schema for use as data sources, as data structures for your own workflows or future archives.
The following schema types can be created and used in Helix:
Schema type
Purpose
Impact
Business object
Structure of work items in workflows
Exclusively information on data structuring and checking in the workflow
Master data
Storage of (master) data
Physical creation of data sources and full-text indexes
Virtual
Substructure for business object
Exclusively information for data structuring and checking in the workflow
External archive document
Structure of documents in Helix Archive V2
Structure information for data in the archive
Warning
The creation of customer-specific schema should only be carried out by trained consultants
Warning
The structure of your own schema must be carefully planned in advance. Subsequent changes are only possible if no key fields are affected and no existing transaction data has to be deleted.
Creating and changing schema requires a user with the “sys_SchemaAdmin” authorization role.
New customer-specific schemas are created via the configuration tile. Here you navigate to the “General / Core” category in the configuration tree on the left. Finally, click on the Schemas (1) selection point.
All schemes already created in the system are displayed.
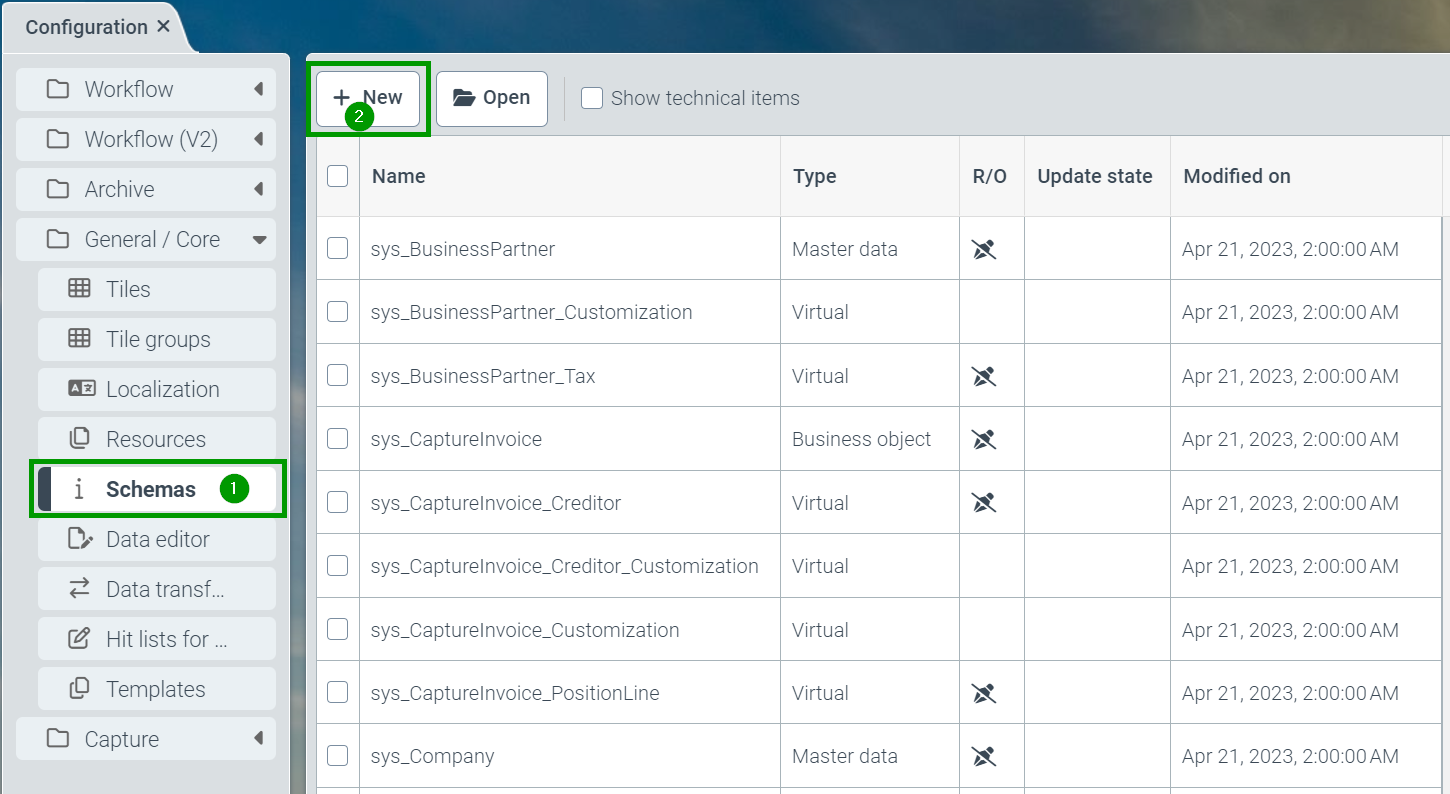
A new scheme can be created using the “New” button (2).
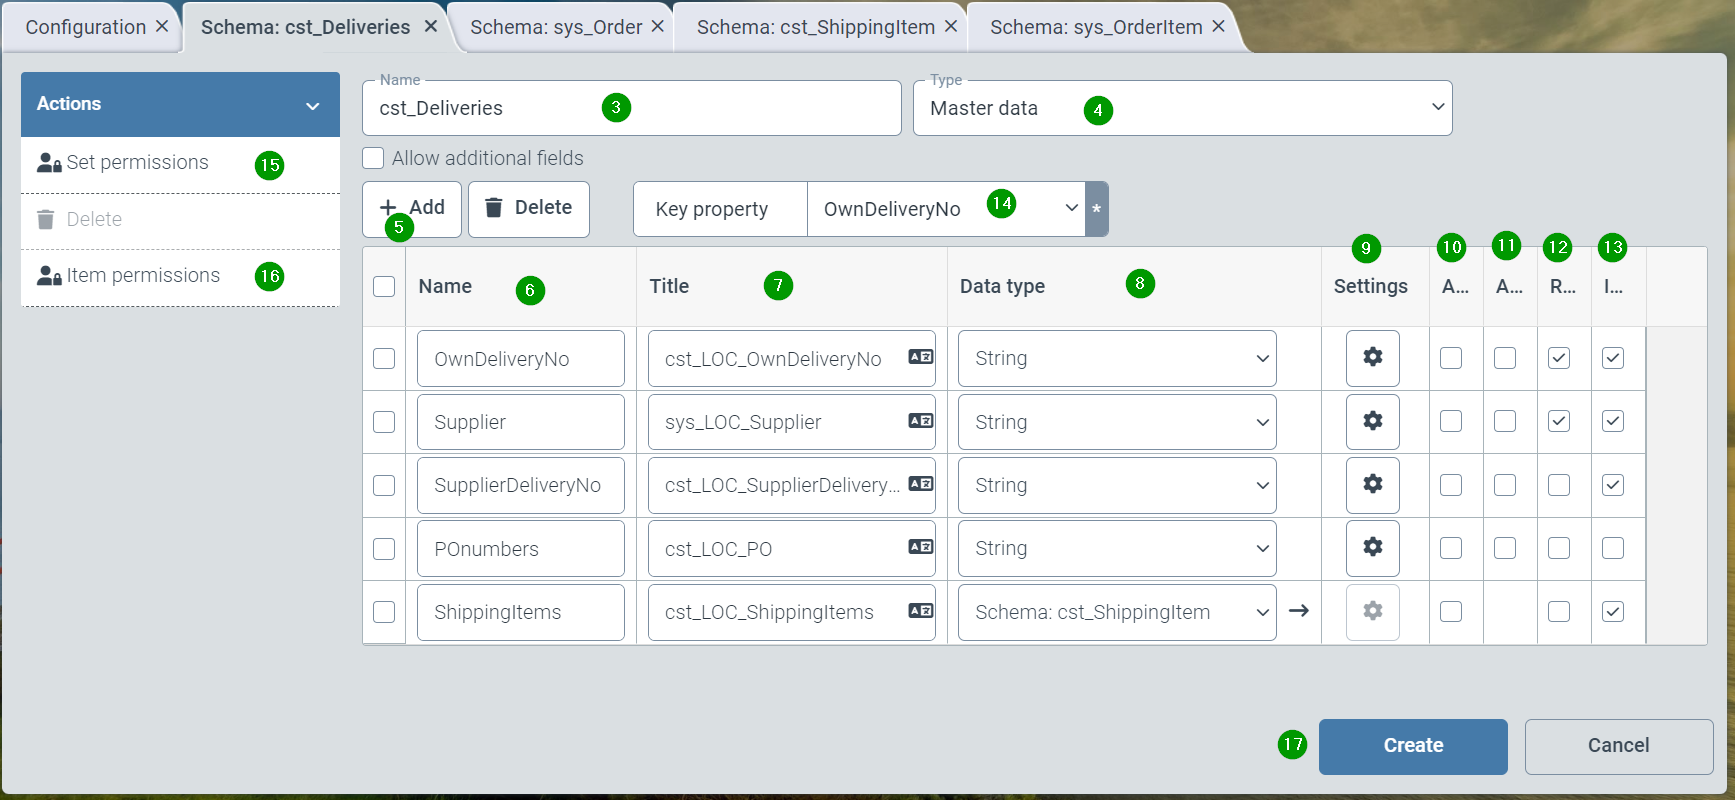
First, a name (starting with “cst_”) must be entered (3). Then a type (see table above) must be selected (4), e.g. “Master data”.
The “Create” button (5) can be used to create additional fields in the schema. The following properties are assigned for each field:
“Field name” (6): technical name of the field or substructure
“Localization” (7): Localization name with stored translations - is displayed to users under this name.
“Data type” (8): with selection options such as string, numeric, date, etc. However, known sub-schemas - type “virtual” can also be selected.
Under “Settings” (9), field lengths can be restricted or content validations can be stored.
A checkbox next to “Array” (10) allows a field to appear multiple times within a data record (e.g. multiple container numbers).
A checkbox next to “Allow null values” (11) allows the field not to be filled.
A checkbox next to “Mandatory field” (12) prevents the field content from remaining empty.
Activating the “Indexed” checkbox causes the field to be included in the full text indexing. In most cases, this is desirable for performance reasons.
It is then important (mandatory for master data) that one of the fields from “Key field” is selected (14).
Under “Set authorizations” (15), authorizations for changing the schema can be assigned.
Under “Element authorizations”, authorizations for displaying or changing data content can be assigned.
Under “Create”, the schema is finally created within the helix and, if applicable, its databases and is then available for use.
Changes to a customer-specific schema
Changes can be made to a customer-specific schema provided that no existing data has to be deleted and no dependent objects (such as workflows or work items) contain incompatible structures or data.
When changes are made, an update service is commissioned which first checks the desired changes and then updates the databases and structures accordingly. This service starts once a minute. It is therefore possible that there may be short waiting times of up to 1 minute before the update starts.
A button for “Update” (18) is therefore displayed when already created schemas are displayed.
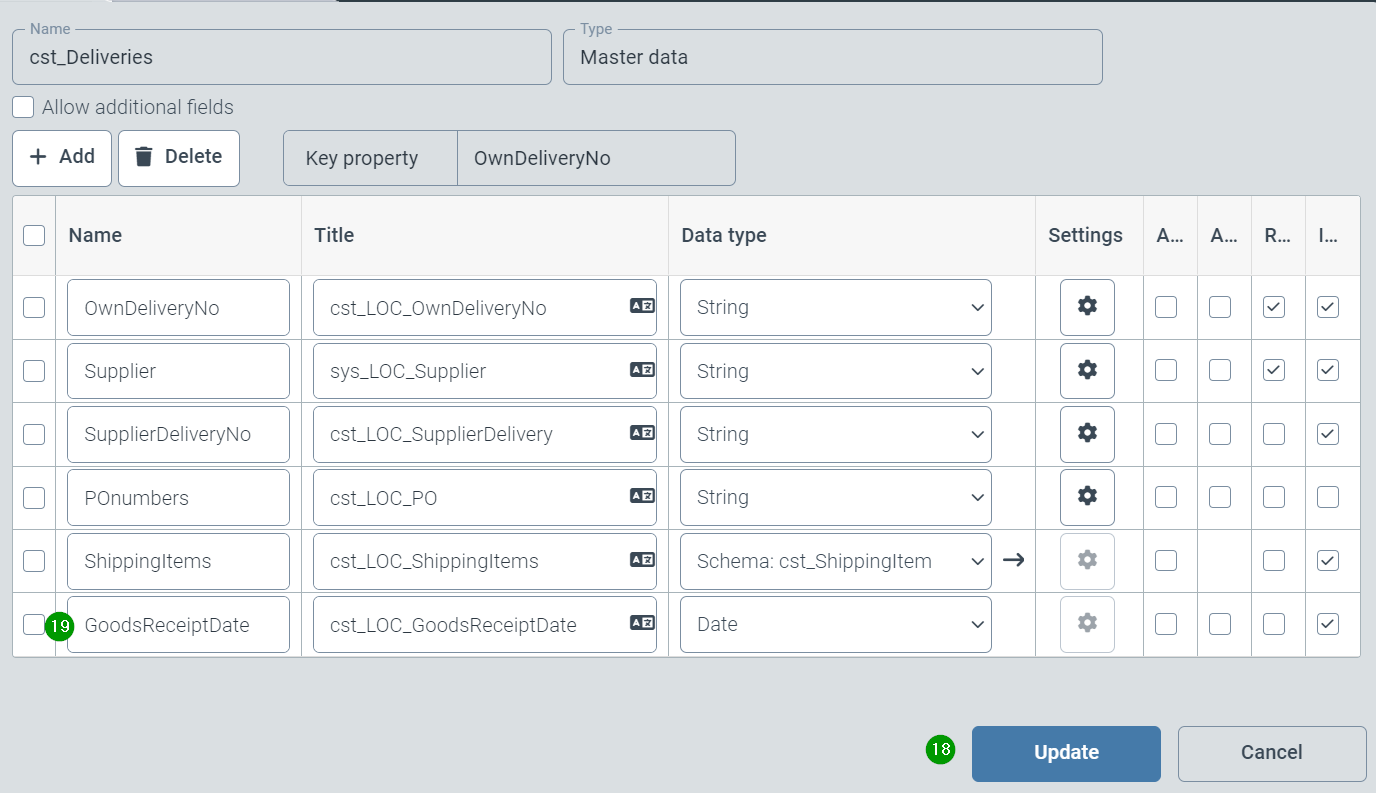
New fields or structures can be added at this point (19), or others can be changed or deleted - subject to the conditions described above.
After clicking on the “Update” button (18), the planned update is described in a second window and any existing data or structures (20) are named.
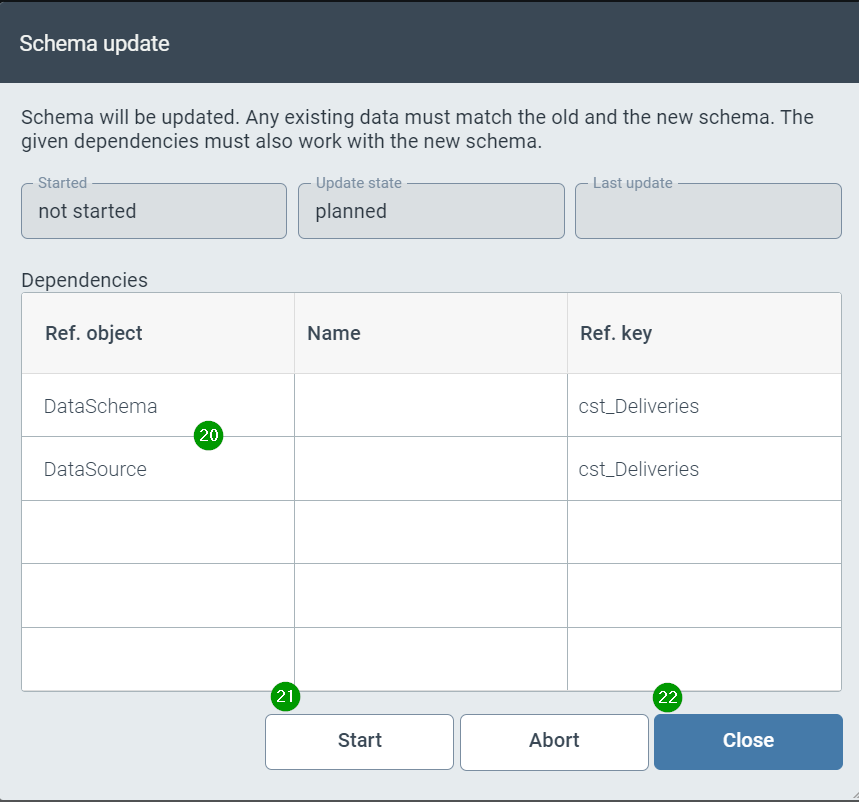
Click on “Start” (21) to start the update and migrate the corresponding data structures if there are no reasons not to migrate. Close (22) also exits the dialog after an update.
After successful migration, a migration history with the 5 most recent changes is displayed (23). Older versions can be deleted (24) or reactivated (25). After reactivation, an update must be carried out.

Bug fixes
Viewer: Highlighting the business partner when double-clicking the business partner number did not work.
Document reading: the field contents were only read out on the first 3 pages.
Reading has been extended to the first 6 pages and last 3 pages of a document.
Archive: Certain faulty PDF documents could not be stored in the archive.
Problems have been resolved for the specific PDF documents.
Workflow (V2): Error messages occurred when filling previously uninitialized field contents via the xSuite interface.
Data editor: Error messages occurred when displaying data sources with a large number of data elements.
Data extraction with (AI) segmentation: In some cases, the results of the document segmentation were not transferred to the document extraction.
Editing customization sub-schemas: it was not possible to save changed customization schemas.
Master data transfer from SAP: The master data transfer from SAP was aborted with an error message (message “403 forbidden”).
Oktober 2024
What's new?
AI supports (optional) extraction of field content
The extraction of invoice fields within the workflow (V2) is supported with the help of AI.
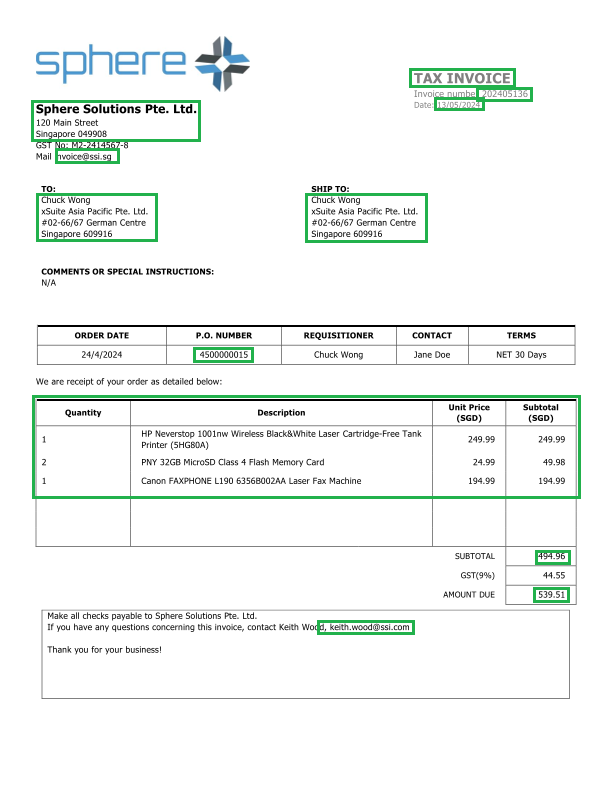
An AI model (R-CNN) trained by xSuite is used to first graphically locate invoice fields. As shown in the following image, the location of the fields (so-called segmentation) generates a narrowly defined rectangle around the respective individual information of a document.
The contents are then read within these individual rectangles and assigned to the respective invoice fields.
The following invoice contents, among others, were trained in the AI model:
Invoice title (e.g. invoice, credit note)
Sender
Recipient
Shipping address
Phone / Email addresses
Invoice number (Reference)
Invoice date
Tax numbers
Bank account details
PO numbers
Net amount
Tax amount
Gross amount
Notice
Note on data privacy:
The AI model runs within the Helix platform. The invoice data does not leave the data center of the respective Helix node.
.
Activation of document segmentation
The use of AI-supported document segmentation is optional. This means that this technology must generally be activated manually for each workflow (opt-in principle).
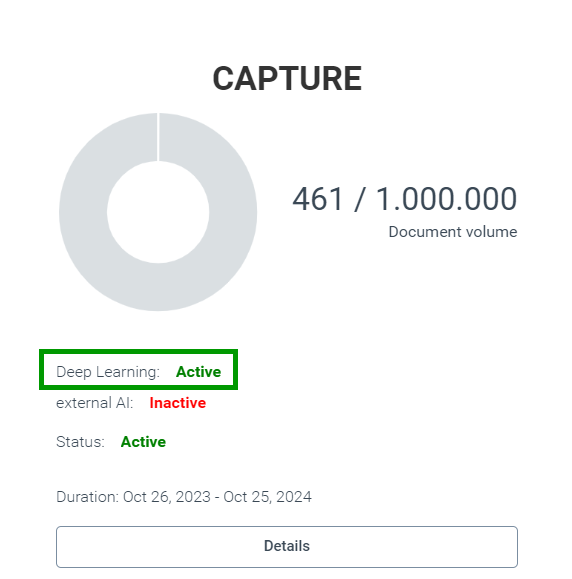
The AI can be activated for the workflow system V2 of a client on request by xSuite Operating. The activation status is visible in the “Subscription tile” under “Capture”.
The use of AI can be activated separately for each workflow as follows:
To do this, the configuration of the respective workflow is called up (Configuration tile → Workflow (V2) node → Workflows). The Extraction node is then selected in the workflow (1).
The parameterization of the extraction node is then called up via the cog symbol (2). AI-supported segmentation is activated by selecting the “Region-based extraction” extraction strategy (3).
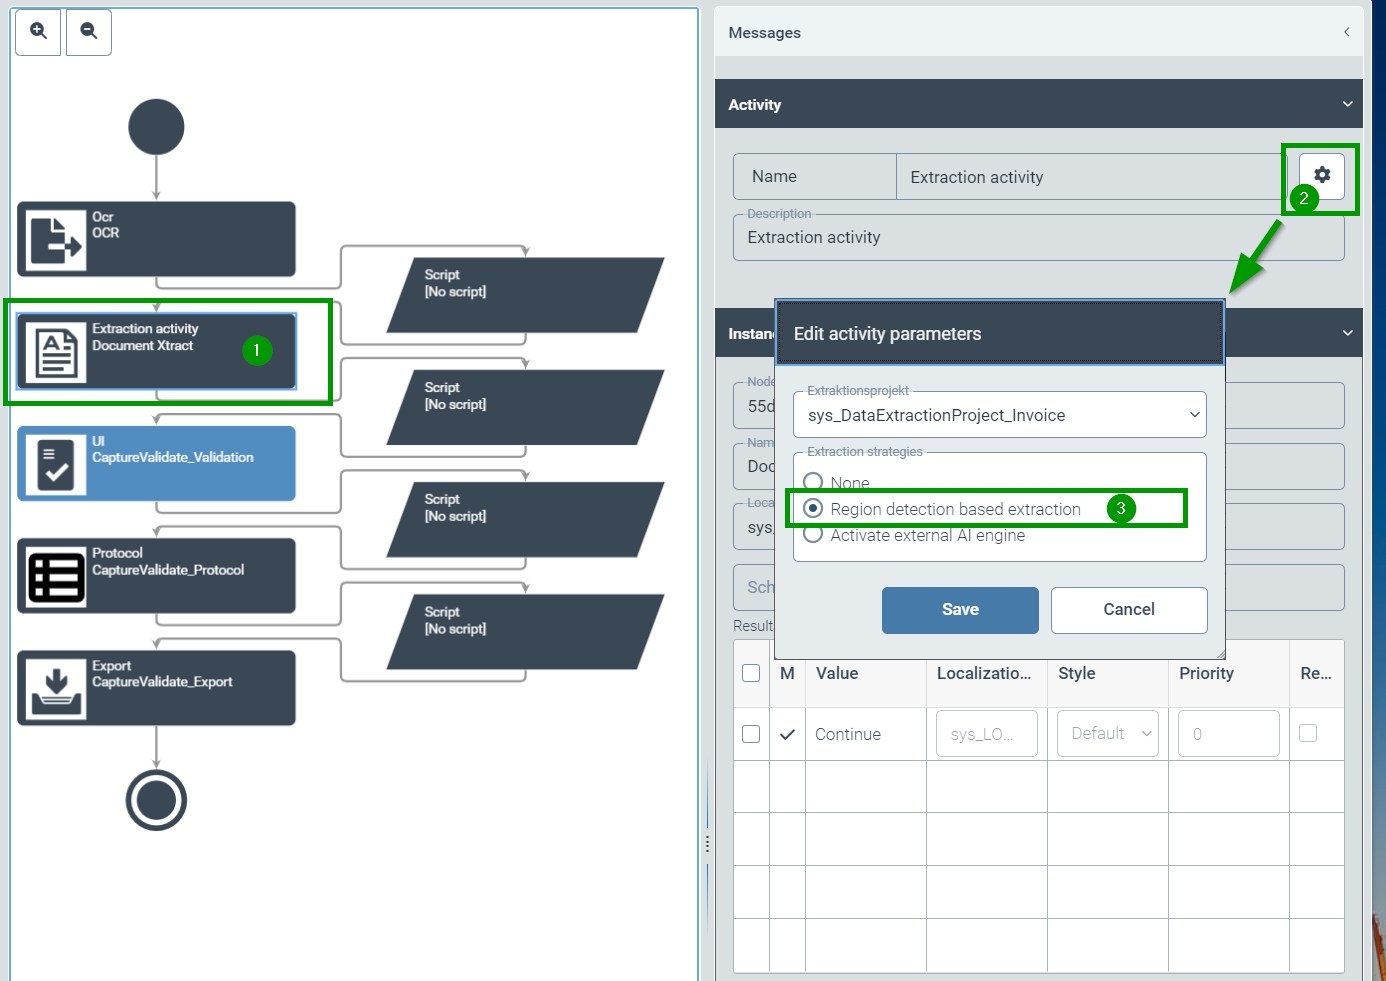
Once the setting has been saved, extraction is supported for all new documents.
New Helix Archive V2
After a long development period, xSuite starts rolling out the new version of Helix Archive. The archive is a completely new development.
The functionalities will be rolled out successively with the upcoming Helix releases. A complete ContentServer for SAP ArchiveLink will be implemented for this release.
In subsequent versions, a new client via the Helix interface, indexing of SAP documents, archiving of documents from non-SAP sources. Interface according to CMIS standards, search for metadata.
Prerequisites
For each Helix client, you can work exclusively with either the classic Helix archive or the new archive. Parallel operation of the two archive versions is not possible.
Data migration from the old to the new archive is being planned, but is not yet offered. Therefore, the decision for the new archive must currently be made before any customizing activities and before importing data.
Activation of archive V2
The new archive is used by the xSuite operating team by manually switching the version on informal request centrally for all Helix clients.
Customizing Archive V2 as ArchiveLink ContentServer
In Helix, customizing is carried out as usual via the configuration tile.
The following steps should then be carried out:
Creation of an archive
Archives are created as usual via the customizing sub-menu "Archives".
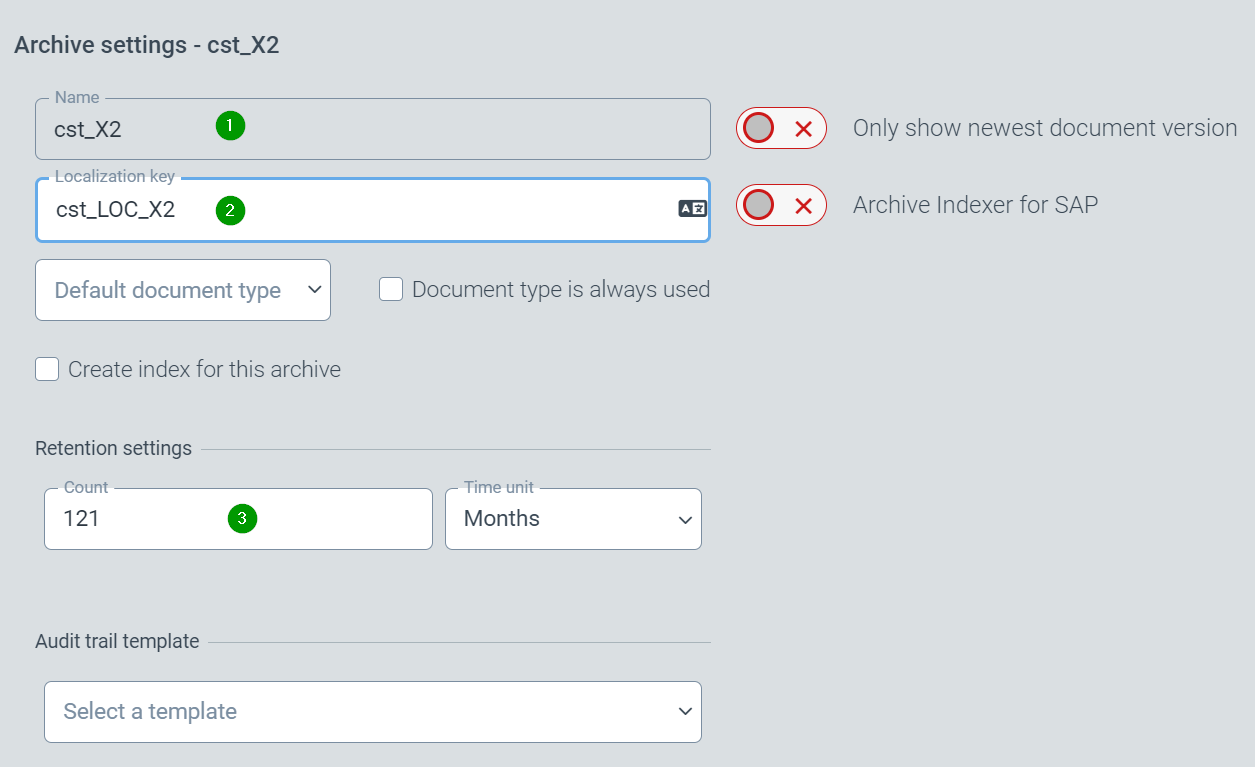
Any name (with prefix cst_) can be entered here (1).
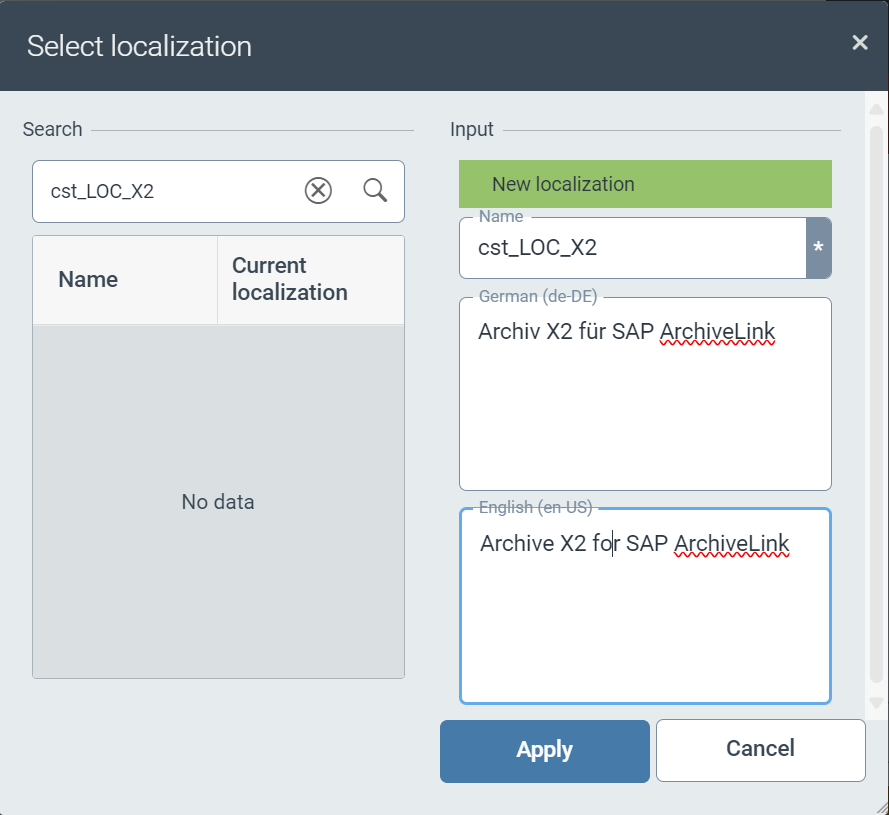
We then recommend maintaining a localization for the archive (2).
Finally, a retention period should be set in accordance with the statutory retention obligations (3).
The archive creation is completed with “Save”.
Link to SAP content repository
In contrast to the previous archive release, the created archive can now be assigned to an SAP content repository. The assignment is therefore no longer based implicitly on the selection of a corresponding archive name, as was previously the case.
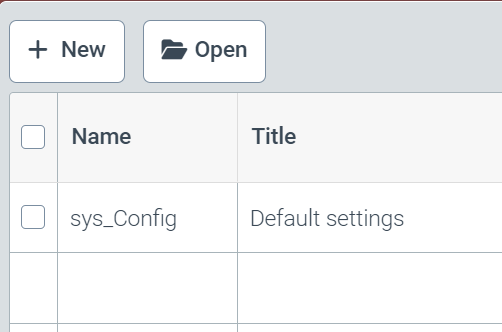
This assignment is made via the menu item “Archive → SAP Content Server”. The sys_Config configuration is offered here by default. Different configurations can also be created here, e.g. to assign the same repositories from the test and production systems to different archives.
By selecting the desired configuration, different global settings for the archive can be made as before (4).

In the lower part of the dialog, a link must then be created between the SAP repository name and the previously created Helix archive (5).
This configuration is also completed via “Save”.
Customizing xSuite Cloud Proxy/Gateway
The xSuite Cloud Proxy is used for the central processing of communication between the company network and the xSuite Cloud on the Internet. This extends communication via the ArchiveLink standard to include the necessary security context for internet systems.
The xSuite Cloud Proxy is implemented via a suitably configured instance of xSuite Interface. Both xSuite Interface 4.73 and xSuite Interface 5.x can be used in the SAP ArchiveLink context.
For the installation and configuration of the interface, please refer to the corresponding installation and administration manuals for xSuite Interface.
Specifically for use as an xSuite Cloud Proxy for Helix Archive V2, only a small adjustment needs to be made to the configuration line for forwarding the communication. The adjustment is made in the relevant section for ArchiveLink communication.
The ToURL key must be adapted so that the API V2 of Helix Archive is controlled with the complete HTTP script of the ArchiveLink communication (see next section). The line must now read as follows:
ToURL=%ToURL%/api/v2$1
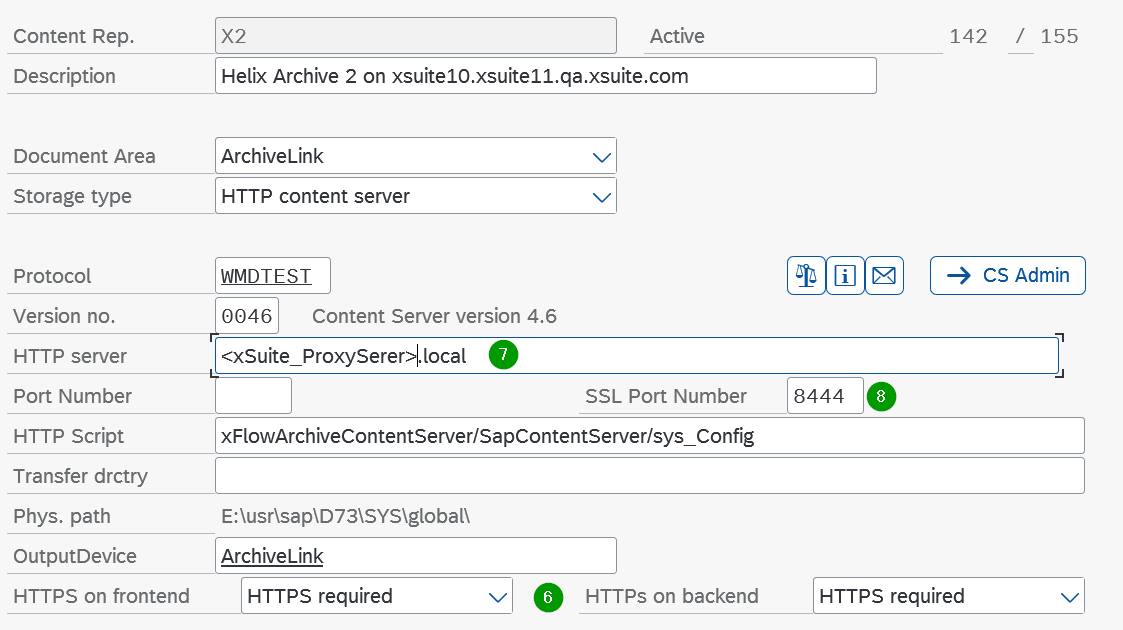
Customizing in SAP
In SAP, a repository is created as usual using transaction OAC0.
We generally recommend the use of HTTPS-encrypted communication (6) in the direction of the xSuite proxy server (7) via a suitable port (8).
In contrast to the previous archive, the HTTP script here is
xFlowArchiveContentServer/SapContentServer/<Name_Configuration> to be inserted.
Important
Please pay very careful attention to capitalization in this script!
For standard configurations, this would be: xFlowArchiveContentServer/SapContentServer/sys_Config
The archive connection can then be checked using the “Test connection” button. The xSuite Cloud Proxy service must already be correctly installed and running.
Transfer ArchiveLink certificate and activate manually
First, an (ArchiveLink) certificate must be sent from the SAP system to the Helix server as usual. To achieve this, the communication path via the xSuite proxy must exist.
The certificate must then be activated in Helix via the configuration tile, menu item Archive → SAP certificates.
After selecting the corresponding archive (single click),
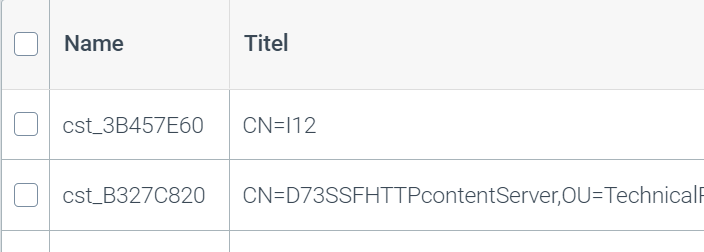
the certificate can be set to “active” in the subsequent dialog (9)
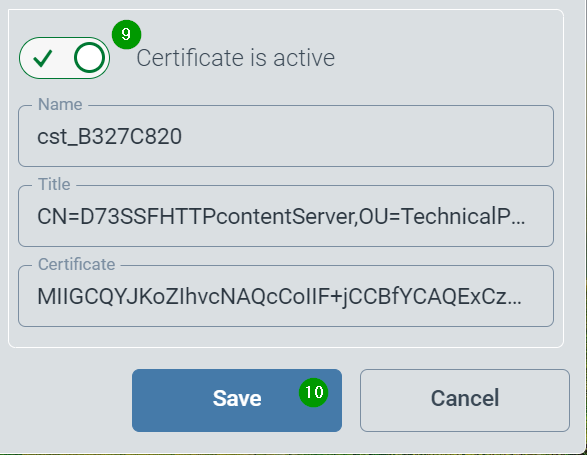
Activation must be completed with “Save” (10).
The installation for ArchiveLink is now complete.
July to September 2024
What's new?
Quick filter in workflow hit lists
The hit lists of the workflow engine (V2) can now be intelligently searched very quickly and easily using the feature Quick Filter.
If a quick filter is configured for a hit list (see below), the first filter criterion is offered above the hit table (1). The desired expression can be entered here.
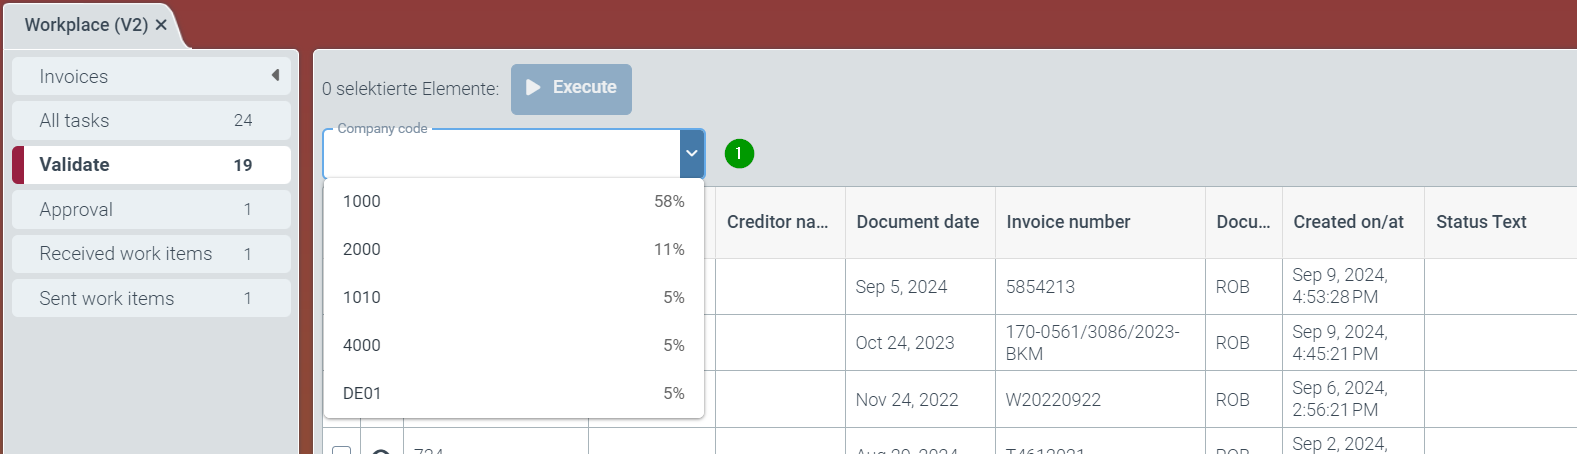
In addition, the 10 most frequent contents are offered as a selection list. The number behind the respective term indicates its frequency in all hits.
After entering or selecting a filter term, the displayed hit list is updated and the next set filter criterion is offered. This allows the hit list to be narrowed down even further.
The quick filter offers up to 3 filter levels to narrow down the respective hit list.
The use of a quick filter is indicated by the display of a filter symbol (2) above the respective column of the hit list.
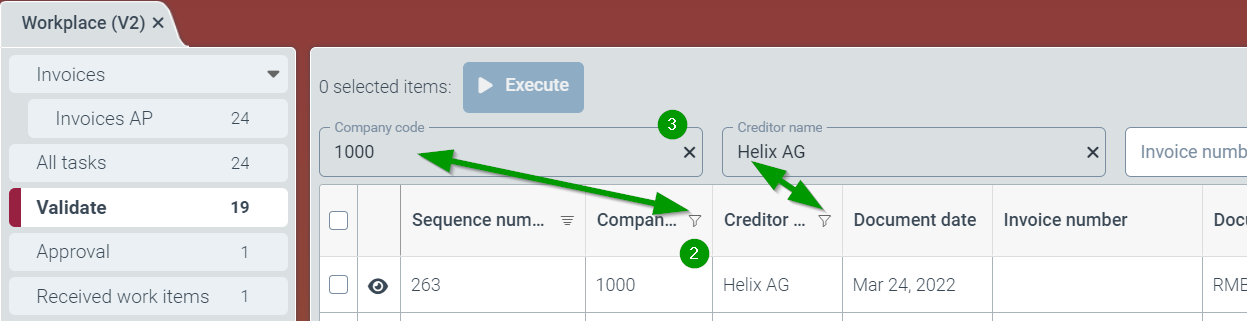
Quick filters can be removed individually by simply clicking on the remove symbol (“x”) (3). Removing a quick filter always removes all subsequent or dependent searches as well.
.
Customizing a quick filter
In general, all fields of a specific hit list can be configured with the field type “String” as a search criterion. The sequence (filter priority) of the filters is linked to the sequence of the columns in a hit list.
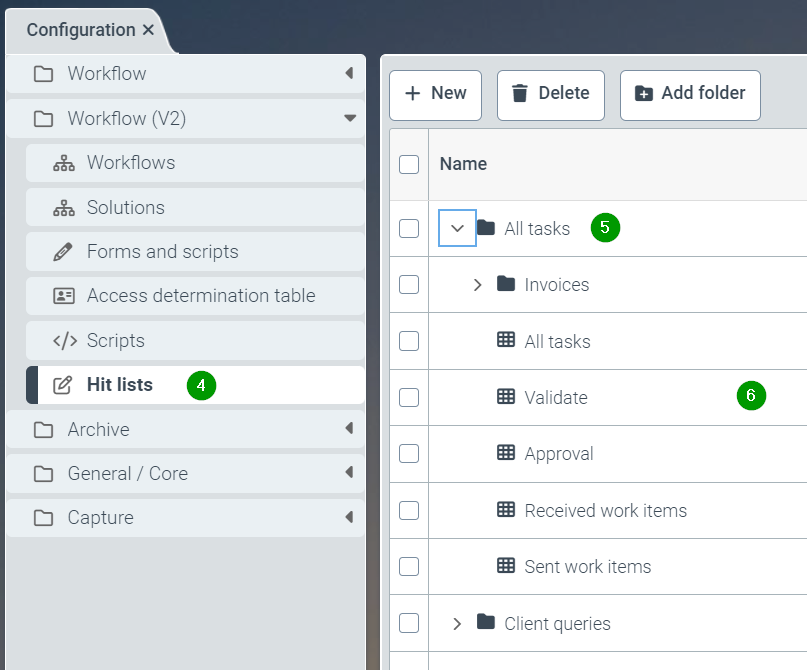
The configuration can be found on the Helix tile for Configuration → Group: Workflow (V2) → Node: Hit lists (4).
.
The editor for configuring the hit list is opened with the display of the hit list columns (7). The order of the columns can be changed here by dragging and dropping the fields (8).
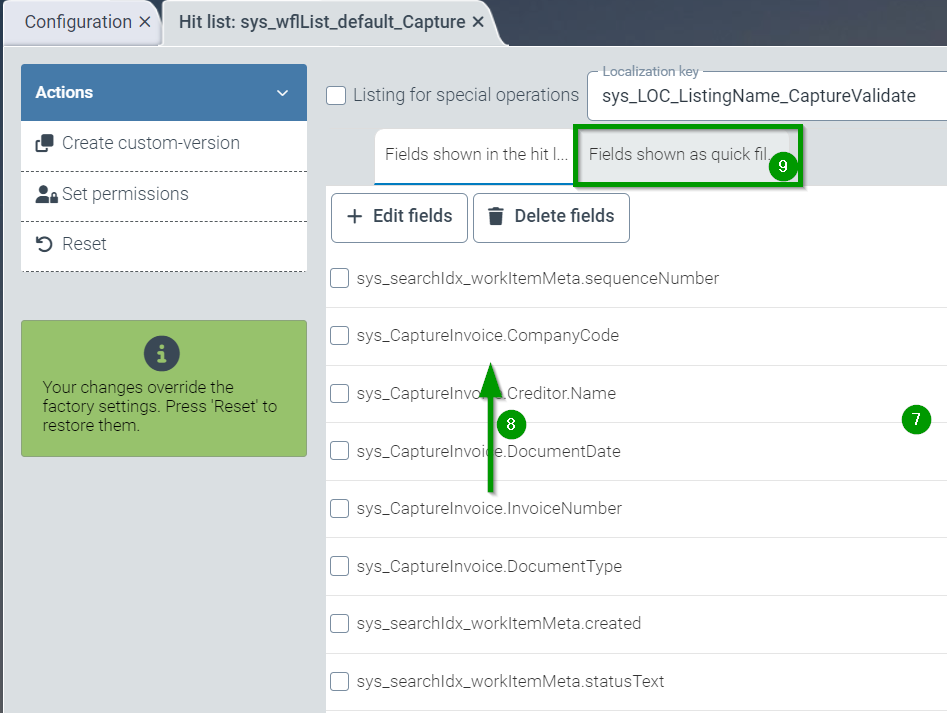
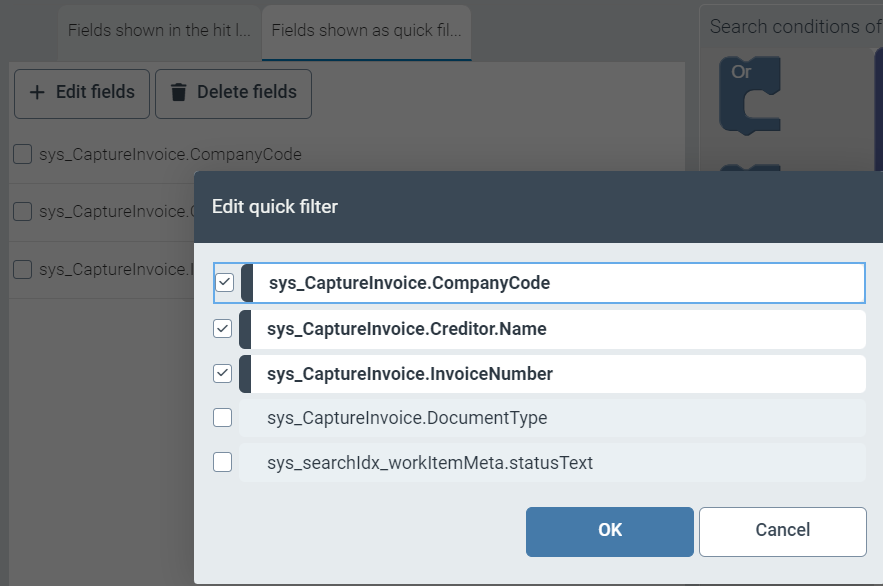
The quick filter is configured via the tab “Fields shown as quick filters" (9).
The “Edit fields” button (10) can be used to add or remove up to 3 fields from a quick search.
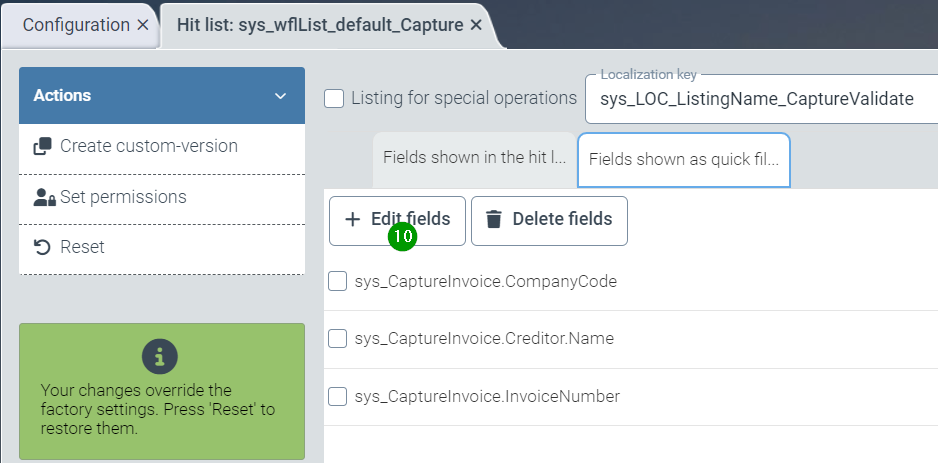
Configured fields in the hit list for the quick filter are selected or deselected in the configuration dialog.
To complete the work, the new configuration must be saved using the “Save” button (bottom right)!
Notifications
Helix now offers a service for notifying users when certain events occur.
Notifications can be sent either within the Helix interface via the bell symbol (1) or by receiving an e-mail.
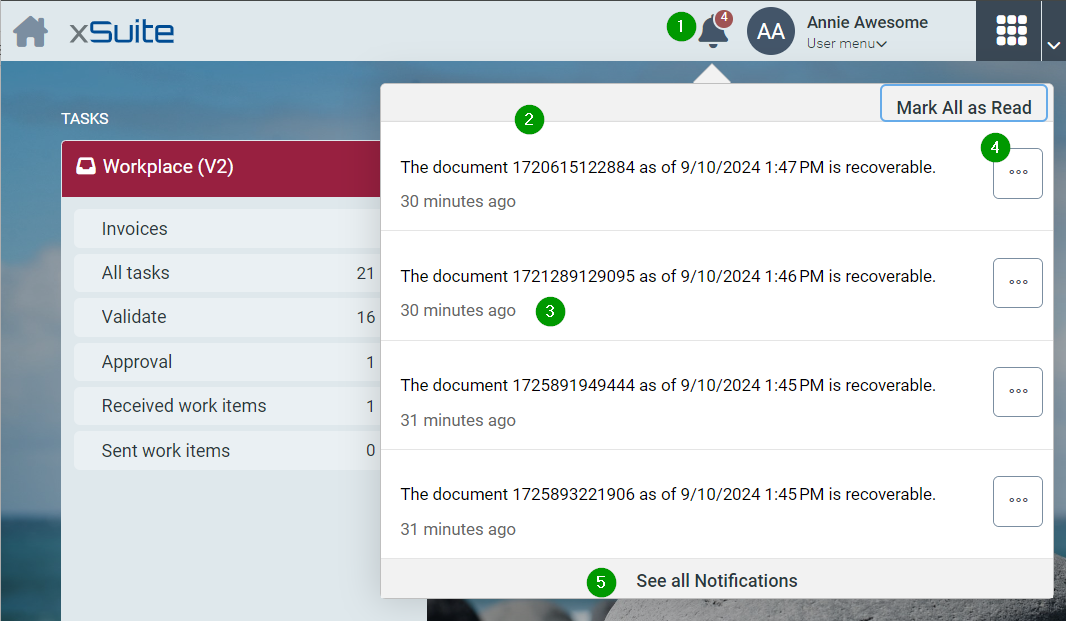
The number of unread notifications is displayed as a small number behind the bell symbol. Unread notifications are displayed by clicking on the icon (2).
Click on the message (3) to open the associated process (e.g. document in workflow, accidentally closed processing of archive documents) for processing.
The individual message can be marked as read via the “...” symbol (4) and thus hidden. In addition, all displayed messages can be hidden as read using “Mark all as read”.
Click on “Show all notifications” (5) to open the list of all unprocessed notifications (6). All messages, their read status (7), the notification title (8) and text (9), as well as the time of the notification (10) are displayed.
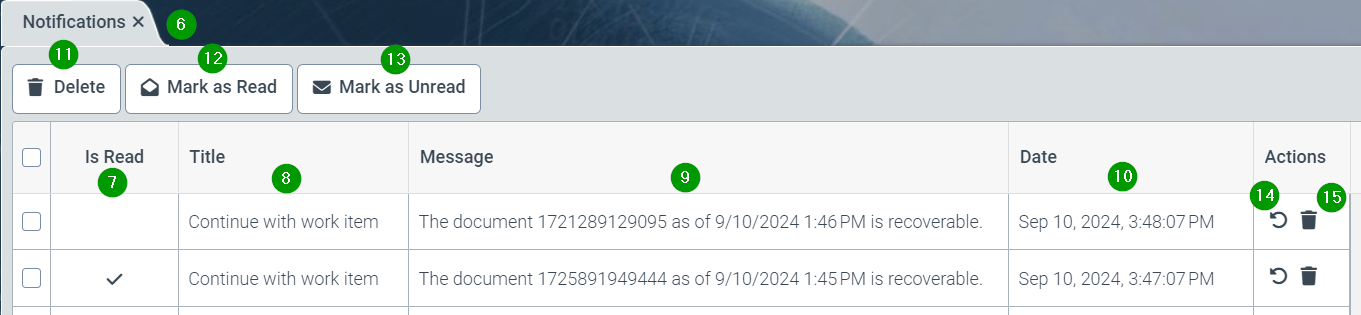
Marked messages can be completely deleted here (11), marked as read (12) or unread (13). The tasks for individual messages can be executed (14) or the message can be deleted without processing (14).
In addition to the notification in the Helix platform, it is also possible to notify users by e-mail.
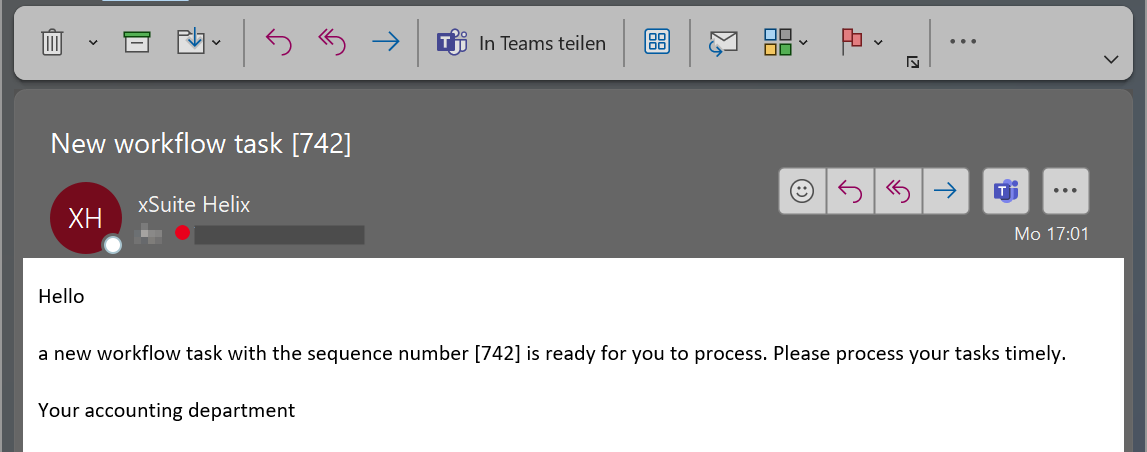
E-mails are always sent from the sender “xSuite Helix (xsuite.helix@xsuite.com)” to the e-mail address stored in the Helix user master data.
.
Customizing notifications
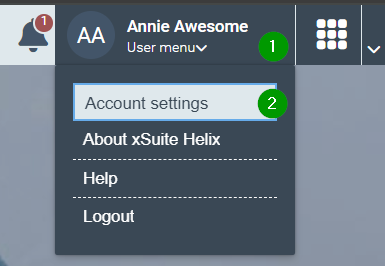
Notifications are initially deactivated for users (opt-in procedure). Notifications are activated via the account settings of the respective user. To do this, the user calls up the account settings (2) via the user menu (1) at the top right under their name.
In the notifications area (3), you can subscribe to notifications within Helix or by e-mail for the user.
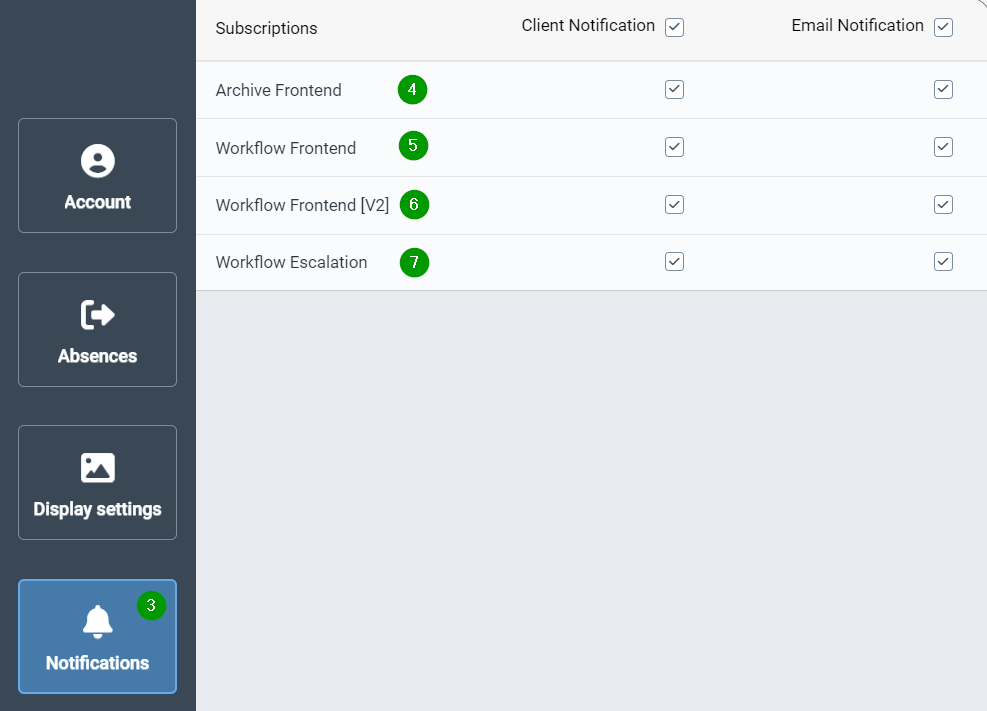
Notifications can be activated for the following cases:
Processing of an archive document terminated unexpectedly (4).
Editing a work item in workflow V1 / V2 was terminated unexpectedly (5 / 6).
Escalation of a work item after the escalation time has expired (7).
Important
It is strongly recommended to always activate the “Client notification” in Helix when activating the e-mail notifications (4)-(6).
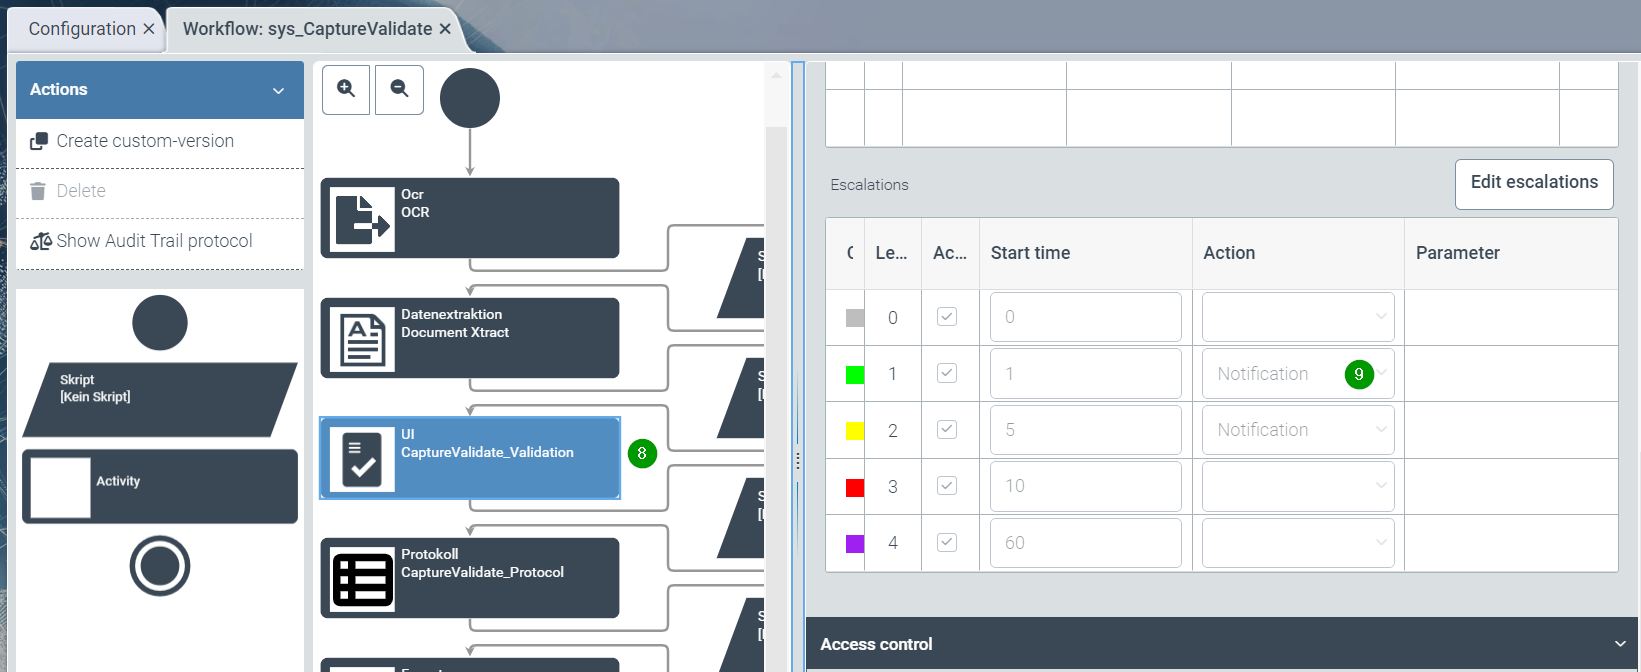
Notifications for escalation (e.g. information about a new task in the workflow), require the activation of an escalation level (e.g. level 1) for notifications (9) in the configuration of the workflow in the corresponding workflow node (8).
June 2024
What's new?
There is an additional standard document reading workflow for incoming invoices (name "sys_CaptureValidateAgnostic" for workflow V2).
This workflow makes the extraction results available for transfer to any downstream system. The downstream system has the option of rejecting the transfer of the data by setting any return result (not equal to 'continue'). The workflow is then continued in a validation dialogue. After the values have been adjusted in this step, another attempt is made to transfer the data to the downstream system.
Work items can be requested from the successor system in the "Export" step of this workflow via the predefined hit list "sys_wflList_agnostic_default".
The format of IBAN numbers is checked more strictly.
IBAN numbers entered manually in master data for BusinessPartner must begin with 2 letters and 2 consecutive digits and must not contain any spaces.
IBAN numbers maintained in master data for BusinessPartner must not be empty. The IBAN field must be completely removed in such cases.
The minimum version of xSuite Interface 5 for the connection to Helix is now Interface 5.0.8.
Bug fixes
Error in extraction if several telephone numbers appeared vertically at the same height, separated only by a tab:
... exceeds maximum length of 30. Path 'Creditor.PhoneNumber'.
May 2024
What's new?
In each workflow node, work items can now pass through up to 5 staggered escalation levels:
Level 0 (gray colour symbol) is reached immediately upon entering a node; this level is always permanently activated for each node.
Level 1 (green), level 2 (yellow), level 3 (red) and level 4 (purple) can optionally be configured for each node (usually for user dialogs). For this purpose, a configuration table is provided for each workflow node in the Instance section of the workflow configuration.
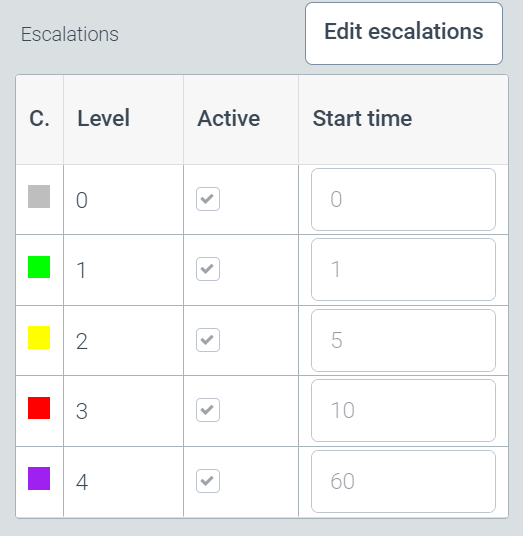
The table entries can be adjusted using the Edit escalations button. A level is only active if it is checked in the Active column.
The start time specifies the number of minutes after the previous escalation level. In the previous example, the escalation levels are run through as follows in the event of inactivity: Level 0 occurs immediately, level 1 after 1 minute, level 2 after a further 5 minutes (i.e. a total of 6 minutes), level 3 after a further 10 minutes (i.e. a total of 16 minutes), and so on.
Important
The entry of all escalation levels is calculated in advance when a work item enters a node. Changes to the escalation configuration only affect new work items in a node.
The current escalation level of a work item is displayed in the Escalation level column in the Work Item Manager. Work items can be sorted and filtered by escalation level in this column.
The internal configuration of archives is being converted to a new version (Archive Config V2). For this reason, the technical format of configuration files must also be adapted. Export files of archive configurations are no longer compatible with the newer format. An error message then appears when trying to import old configuration files.
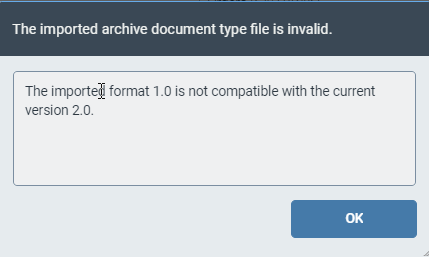
Recommendation: create new exports of configuration files in the original source system.
Bug fixes
Various problems with the derivation of control codes in header and position lines.
April 2024
What's New?
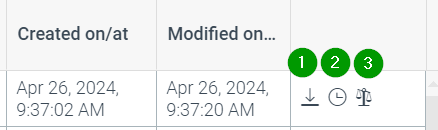
In the Work Item Manager, you can directly enter the
working documents (with embedded extraction result) can be downloaded (1)
The history of the process steps performed is displayed (2)
The changes to all field contents are displayed as an audit trail. (3)
Support (i.e. extraction) of the Swiss notation for currencies; i.e. currencies are recognised where a dot (".") is used as the decimal separator and an apostrophe (" ' ") is used as the thousands separator.
Bug fixes
Data editor: Filtering and sorting does not work on the "empty" hit list.
Workflow V2 editor : for result fields copy&paste does not work.
Work Item Manager: extended filter does not allow selection on single date
Problems with rights definition in role determination table
March 2024
Improvements
We have made small improvements to the data extraction and the implicit training of fields.
The name of the business partner (
BusinessPartner.FullName) can now contain up to 200 characters.We have updated Keycloak to version 23.0.7.
Fixes
Support ticket 1128: Unfortunately, the download function for archive documents in the viewer did not work. We have fixed this.
In Capture there were incorrect recognitions due to too many spaces.
We have eliminated small errors in the user interface and corrected typos.
February 2024
What's New?
New Archive Services for SAP ArchiveLink
We are taking our archive software architecture to a new level and are pleased to release the first module. SAP ArchiveLink is now available for all new customers on the optimized and performance-enhanced services. Existing customers will be migrated as soon as all functionalities are available.
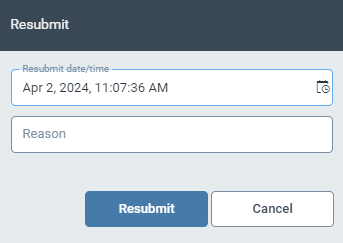
Resubmission for Work Items
If you are not yet able to complete the processing of a work item, it is now possible to hide it from the active worklist for a defined period of time. It will then reappear in your tasks as soon as the period has expired or you are actively working on it.
Improvements
Access determination table: It is now possible to export the table data as a JSON file and import it again to enable editing outside our system.
Access determination table: It is now possible to save up to a maximum of 10,000 entries in the table. Furthermore, roles with the same priority are now aggregated (previously a random entry was selected).
Keycloak has been updated to version 22.0.5.
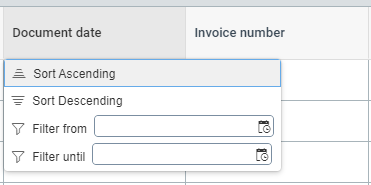
Table columns containing date values can now be filtered with a start and end date.
A workflow history can now be displayed for each element in the work item manager.
You can now view the change history for a workflow.
We have revised and simplified the configuration of authorizations within the access determination table.
Fixes
It was possible to maintain empty translations. This looks funny, but is unfortunately not very helpful, so you now have to be able to speak in all languages.
We have fixed some small bugs in the interface. Take that you little typos and missing busy indicators!
Support ticket 889: Some areas of PDF files could not be displayed. We have fixed this.
Support ticket 1012: It could happen that deleted work items were displayed in the active worklist. We have optimized the synchronization problem.
Unfortunately, it was not possible to reset work items if they were displayed by an active filter. This now works again.
Checks were listed twice in the work item history. We have corrected this.
In workflow scripts, the
substringfunction caused errors when saving the script. This now works again.Support ticket 1114: There was a delay when deleting work items that had already been completed. We have improved this situation.
Support ticket 1133: It was not possible to select numeric tax codes in the validation. This is annoying and we have fixed it.
Support ticket 1144: Tax codes and records were not copied when adding lines. This now works again. (Workflow engine 2.0).
January 2024
Improvements
Inactive or unused workflows can now be hidden in the Work Item Manager to improve the filter options.
The buttons of a approval activity are now green and red to make them easier to use.
Fixes
A browser refresh could force a new login. Now we really only refresh - no more.
Work items to be exported may have appeared in the active worklist. Now they disappear again.
For work items that were automatically checked by the system, there was no entry in the work item log. This is annoying and we have fixed it.