February 2025
Improvements
User interface of the new Archive V2
First of all, it should be noted at this point (see also: Oktober 2024 that only the previous archive technology Archive V1 or the new Archive V2 is permitted in each client of Helix. Simultaneous use or switching between the systems is not possible.
An internal Helix migration from archive data V1 to archive V2 will be offered in one of the upcoming Helix releases.
User interface
A new “Archive V2” tile is available on the Helix dashboard for working in the archive.
If this tile is not visible, it can be added to the dashboard via the Helix app catalog (tip: don't forget to save the dashboard afterwards!).
Clicking this button starts the ArchivV2 search and editing interface. Note: New documents can only be created using a separate tile (“Archive File Upload”).
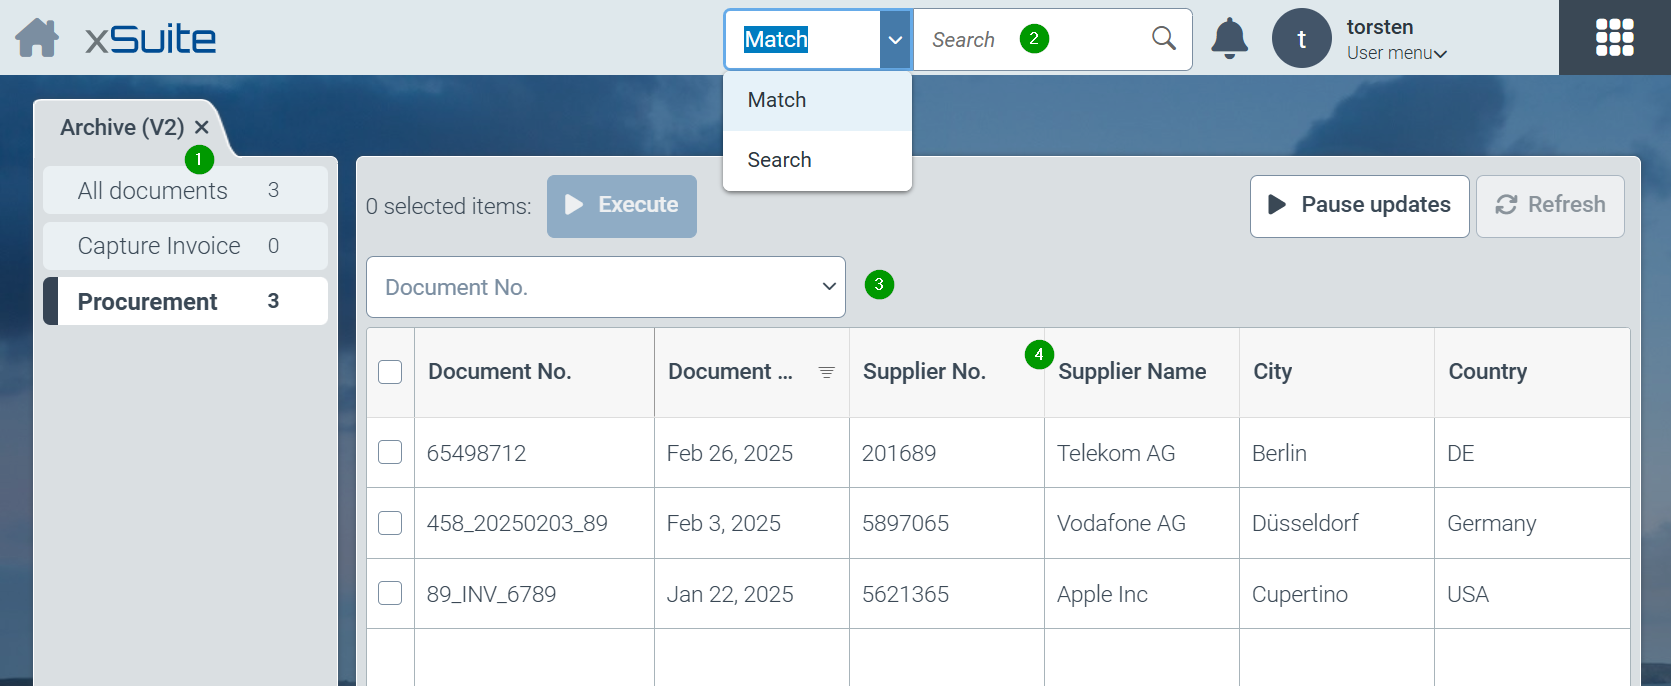
All defined searches of the system are offered in the left part of the screen (1). In most practical cases, at least one search option will be configured in the system for each archive. However, several archives can also be combined in one search or searches with restrictions can be defined for parts of an archive (e.g. only certain company codes). “All documents” summarizes the entire document pool from all archives.
The search option for full-text searches (2) is located at the top of the screen. Here you can switch between the exact search (“Match” selection) and simplified search (“Search” selection). For a description of the options, see also November and December 2024.
Another way to find documents quickly is the optionally configured “Quick search” (3) above the hit list. How to use and set up the quick search is described here: July to September 2024.
All documents resulting from searches or restrictions are displayed in a structured hit list (4). Each line of the hit list corresponds to an archive document found. The columns displayed in the hit list and the default sorting of the hits are determined by the administrative configuration of hit lists.
For each column of the hit list, a further specific search can be carried out for the respective field by clicking on the column header and thus an attributed restriction of the number of hits can be carried out. Users can also change the sorting of hits here. For date fields, searches can be carried out using date ranges.
Clicking on a hit opens the actual document in a separate tab. Several documents can be open at the same time
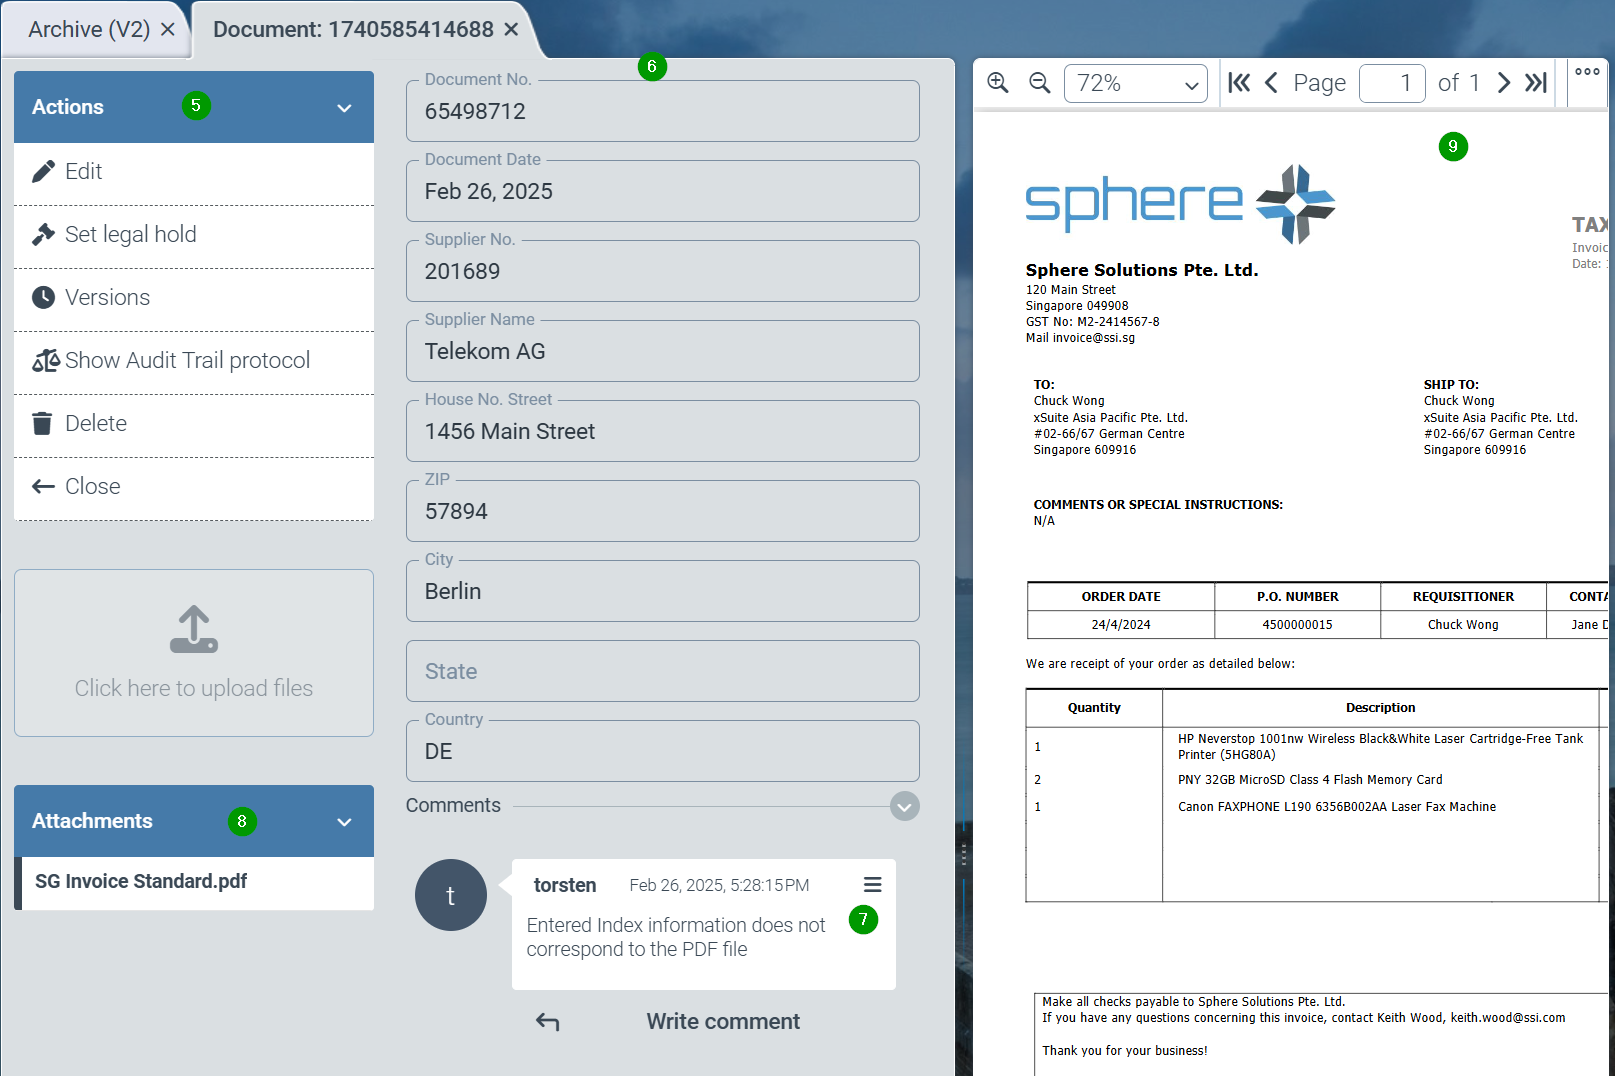
On the left-hand side of the screen is the function bar (5) with all possible activities that are possible for the document. These are:
Edit the document (creates a new version)
Set a “Legal hold” to protect the document from deletion or changes
Older versions of a document can be listed and called up
The change log (“audit trail”) of a document can be displayed for auditing purposes
A document or document version can be deleted if the user is authorized to delete documents, the archive allows deletion or the individual document allows deletion.
The attributes (6) of the respective document are displayed in the middle area of the screen (in one of the subsequent versions it will be possible to design your own forms for displaying the fields)
Comments (7) can be displayed or entered below the attributes. These comments are saved with the user name and time stamp.
All file attachments of the archive document are listed below the toolbar (8). Further file attachments can be added or deleted by editing the archive document.
Finally, the selected file attachment is displayed on the right-hand side of the screen (9). This viewer can also be “undocked” from the main screen to make it easier to read file attachments on a second monitor. Tip: by closing the undocked viewer window, the viewer is docked back into the main screen. The respective document can also be downloaded to the local PC via the viewer.
Creation of a new single document
New documents are created using the newly developed tile “Archive File Upload”.
If this tile is not visible, it can be added to the dashboard via the Helix app catalog (tip: don't forget to save the dashboard afterwards!).
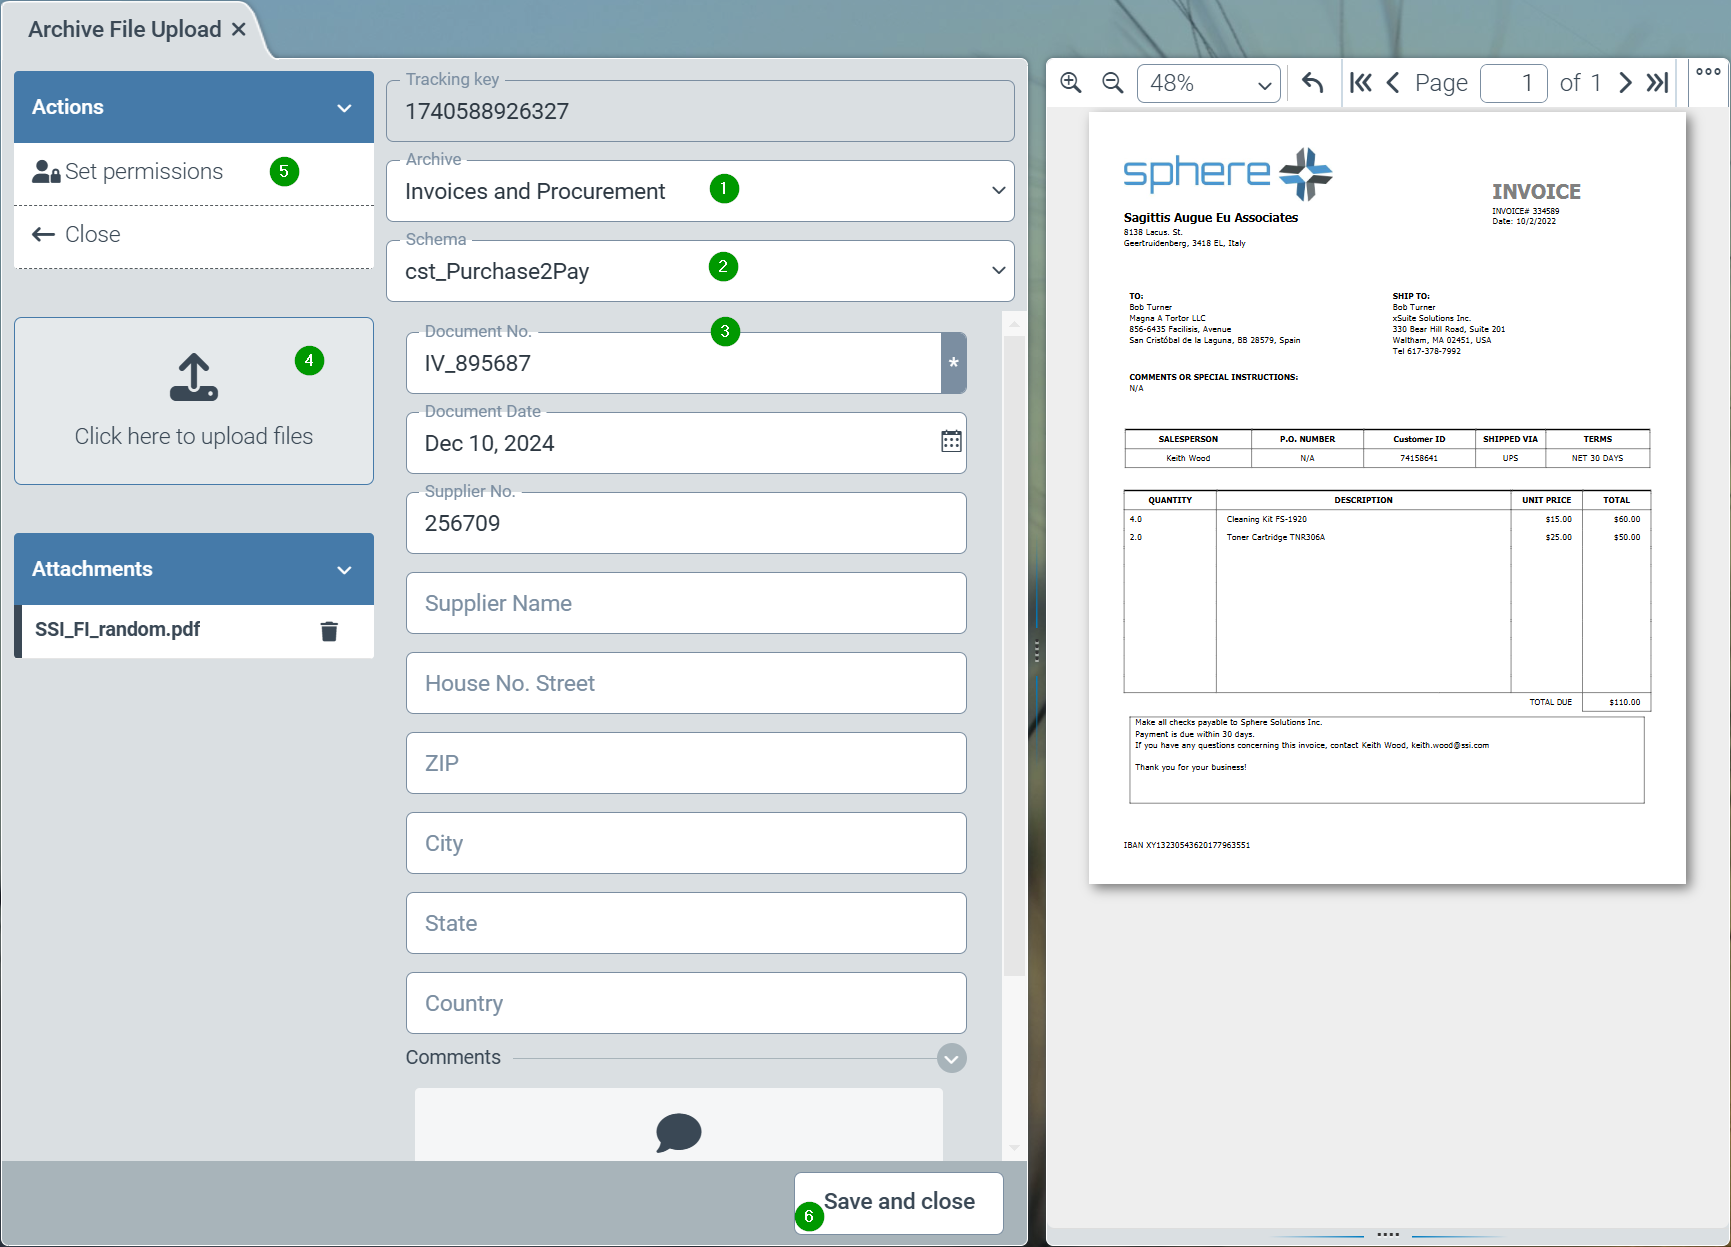
After starting this application, the archive for storing the data must first be selected (1). The desired filing structure - the “archive schema” - must then be selected (2). Finally, the required index fields for the archive document can be entered (3). One or more file attachments for the document can be uploaded via the upload area (4). Finally, specific user authorizations (ACL) can (optionally) be specified for this document (5). The document is stored and indexed in the Helix archive via “Save and close” (6).
Note
Due to the asynchronous mode of operation, it may take a few seconds for a document to become available. The document is therefore only available in the archive client after a few seconds.
Configuration of the new Archive V2
The following structures are implemented in ArchivV2:
Individual archives can be created for the storage of documents, i.e. index data with file attachments. Uniform retention periods, uniform authorizations for access by defined user roles and, optionally, a search index that is separate from other archives apply within an archive.
Generally, all archived documents must be assigned to exactly one document schema. This schema defines the structure of the possible index fields. As in the Helix workflow, schemas can also contain sub-schemas. The fields of a schema can be included in an index for searches.
Note
Currently, fields in subschemas cannot be included in a search index.
Searches are made possible by defining hit lists with “search definitions”. In principle, the search definitions are used to limit the search within the entire document stock of the overall system. Searches on specific archive fields are displayed for archive users by limiting the search to hit list columns. A hit list definition therefore specifies both the columns displayed in a hit list and the fields that are available for an attributed search.
The creation of a new archive therefore requires the configuration of the following 3 components:
a.) Set up an archive
b.) (if not available) definition of at least one document schema
c.) Configuration of a hit list (with search definition)
Setup of a new archive
To create a new archive, please follow this link: Oktober 2024
Definition of a document schema
Document schemas can be defined and, if necessary, changed via the “Configuration” tile in the “General/Core” category in the Schemas (1) menu item. See also November and December 2024 section "Creating and editing customer-specific schema".
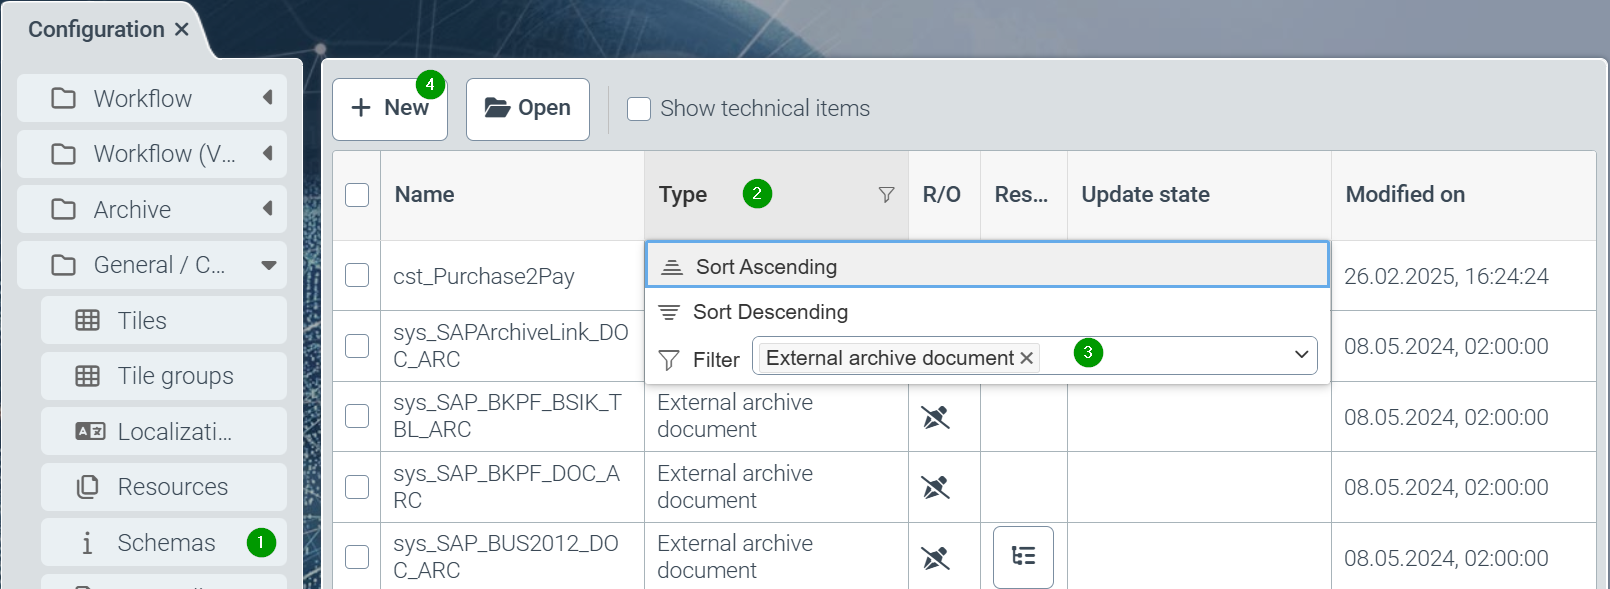
All available schemas of the system are displayed, but filtered to types (2) for the Helix workflow (master data and business objects). Therefore, the filter should first be changed to the schema type “external archive document” (3).
The “New” button (4) or clicking on a schema takes you to the editor for schemas:
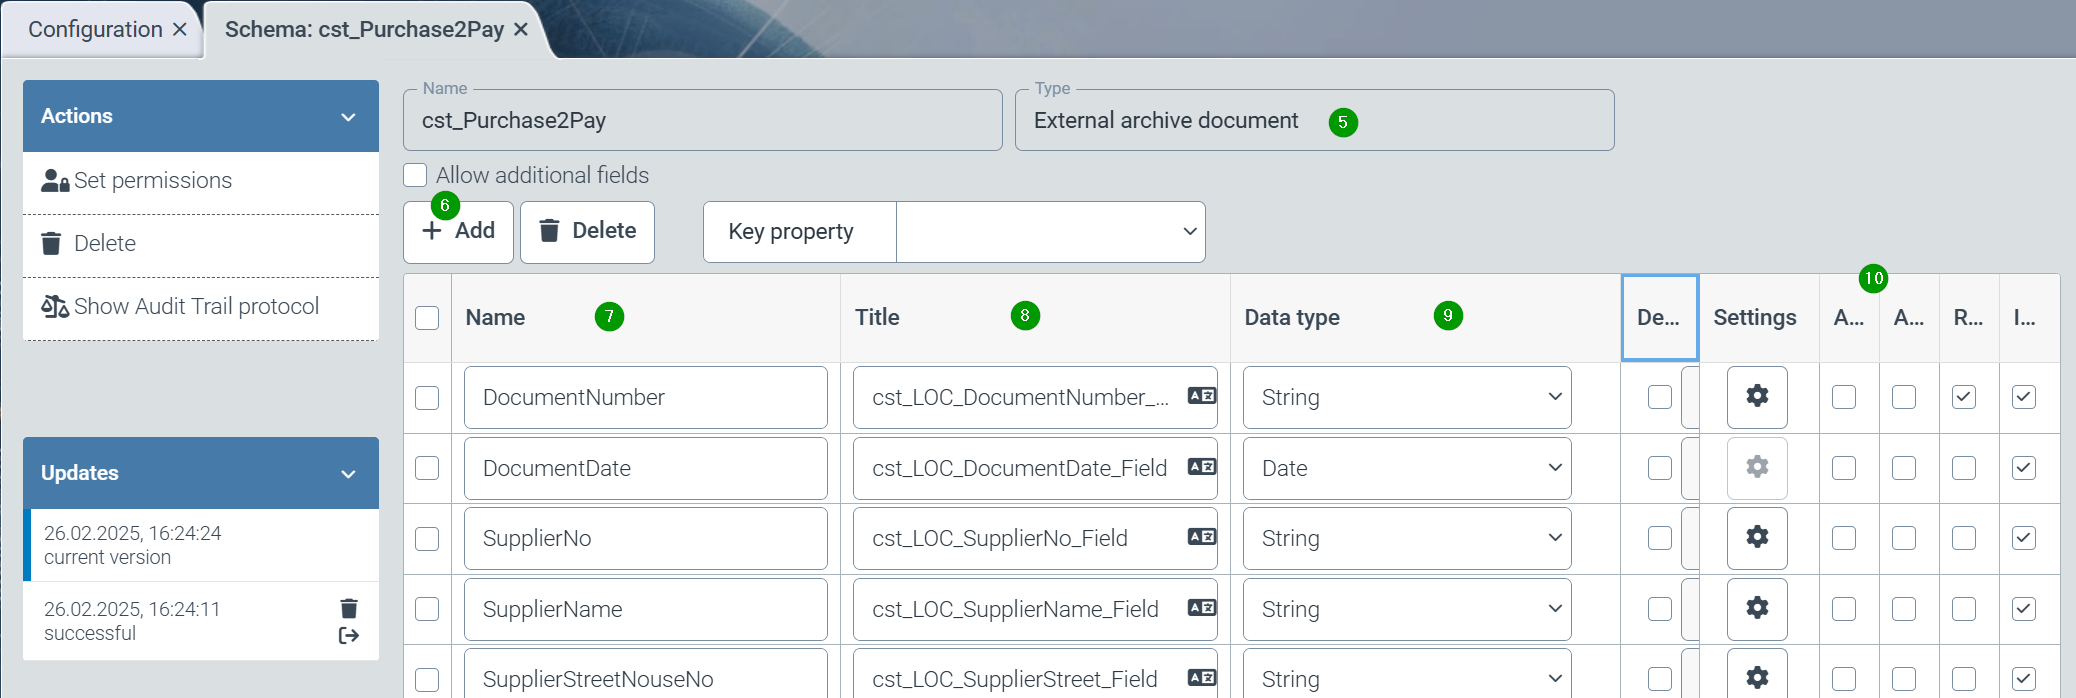
When creating a new schema, the type “external archive document” (5) must be selected for archive schemas.
The desired index fields can be added using the “Add” button (6). A meaningful, technical name (7), a localization for users (8), a data type (9) and the technical parameters of the field (10) should be specified for each field.
Finally, the “Set authorizations” function must be used to specify the helix roles that are authorized to use the schema.
Implementation of a hit list
Hit lists with search definitions are defined via the “Configuration” tile in the “Archive” category in the menu item “Hit lists on archives” (1) and can also be changed if necessary
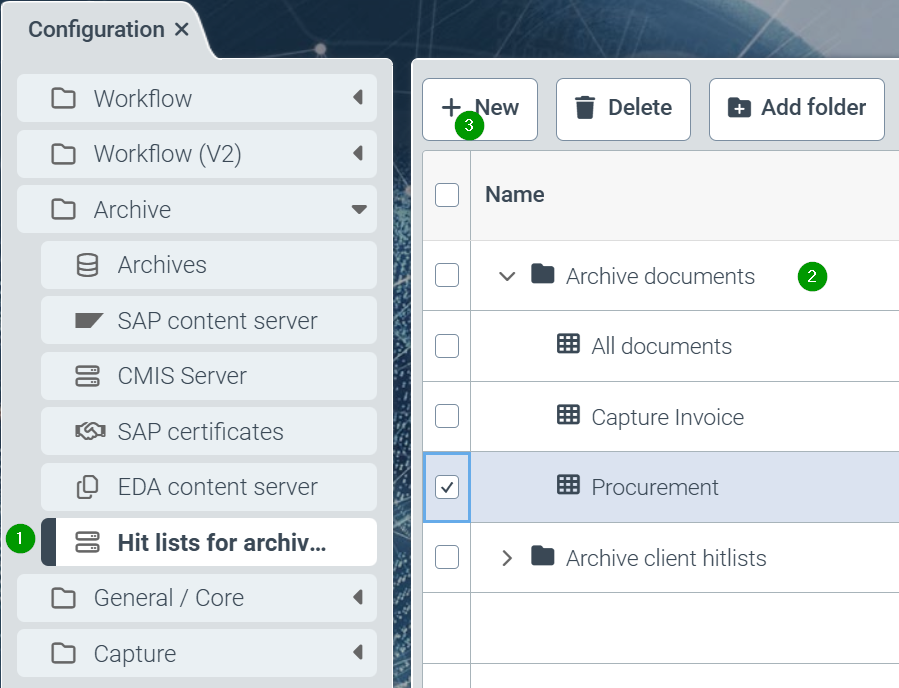
A new hit list is created using the “New” button (3). This newly created hit list must be filed in the Archive documents folder (2). If necessary, newly created hit lists can be moved to this folder using drag & drop. Hit lists in this folder are taken into account in the interface. Hit lists in the “Archive-client search lists” folder are available for external access via the Helix API (e.g. xSuite interface).

The hit list should be given a meaningful name for display in the archive interface via localization (4). The list of index fields that are to appear in the hit list can be extended using the “Edit fields” button.
In the search restriction (7), the search index for archives (“sys_searchindex_archiveDocumentMeta.archive”) should always be restricted to the archive to be searched as the default restriction. Further restrictions (e.g. for company codes) can also be specified. Furthermore, a definition for a standard sorting of the hit list is often desirable.