xSuite Viewer in the SAP GUI
xSuite Viewer: Main Overview in the SAP GUI
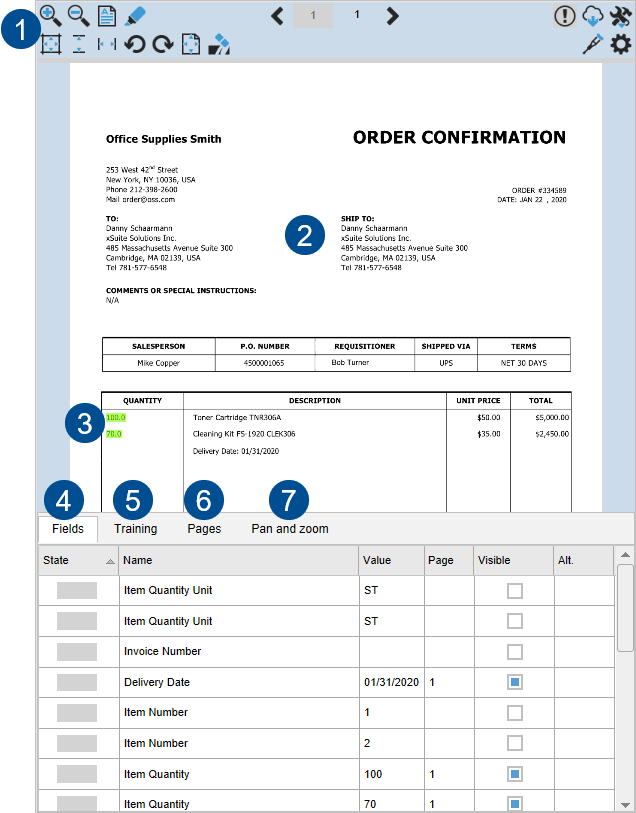 |
Section | Information and comments | |
|---|---|---|
1 | xSuite Viewer toolbar | The xSuite Viewer toolbar consists of two lines:
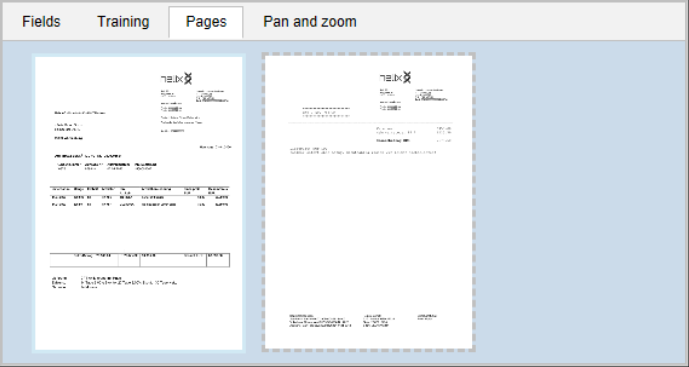
For information on the buttons, see xSuite Viewer: Default Buttons in the Toolbar. |
2 | Image display | This is where the individual pages of the image are displayed. |
3 | Highlighting | The following elements can be highlighted on a page:
|
4 | Fields tab | This is where the properties of the image are displayed in the form of fields. For information on the fields, see Displaying Field Values. |
5 | Training tab | This is where the business partner or the fields of a business partner are trained. For information on training, see Business Partner and Field Training. |
6 | Pages tab | This is where the pages of the image are displayed as thumbnails. For information on navigation, see Navigating to a Page in the Image. To prevent thumbnails from loading, use the The Pages tab will then be blank. Performance will improve the more pages an image has. |
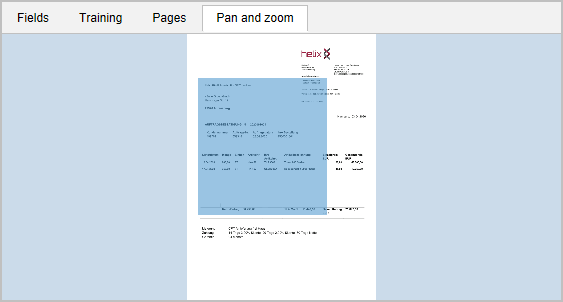
7 | Pan and zoom tab | This is where the current page is displayed as a thumbnail. The section that is visible in the image display is shown in blue. You can move the frame with the pan and zoom function. For more information, see Moving the Frame. |


xSuite Viewer: Default Buttons in the Toolbar
Button | Name | Description |
|---|---|---|
| Increase zoom | Zooms in on the page. |
| Decrease zoom | Zooms out of the page. |
| Switch select recognized fields | Ends full-text mode and starts field mode. In field mode, you can highlight found field values in green. For more information, see Displaying Field Values Found in the Image. The field mode is started automatically when you click the |
| Switch select fulltext | Ends field mode and starts full-text mode. In full-text mode, you can select the entire page or individual sections of text. For more information, see Selecting Text. |
| Show all recognized fields | Starts the field mode and highlights all field values found. |
| Go to previous page | Scrolls one page back. |
| Direct entry of page / current page | Displays the current page number. You can navigate to any page by entering the page number and pressing Enter. |
| Number of pages | Indicates the total number of pages in an image. You can navigate to the last page by clicking on the page number. |
| Go to next page | Scrolls one page forward. |
| Shows/Hides the additional information panel | Shows or hides the tabs. The color of the button may be gray, green or red. The color indicates the status of the completeness check for the image. For information on the status, see xSuite Viewer: Field Status in the SAP GUI. |
| Download | Downloads the image. |
| Additional features | Shows or hides the additional buttons. |


xSuite Viewer: Additional Buttons in the Toolbar
Button | Name | Description |
|---|---|---|
| Fit page size | Fits the page to the overall size of the pane. |
| Fit page height | Fits the page to the height of the pane. |
| Fit page width | Fits the page to the width of the pane. |
| Rotate left | Turns the page 90° to the left. |
| Rotate right | Turns the page 90° to the right. |
| Enable navigation mode | Ends selection mode, in which you can select by drag-and-drop. Starts the navigation mode, in which you can move the frame by drag-and-drop. For more information, see Selecting Text. |
| Enable selection mode | Ends navigation mode, in which you can move the frame by drag-and-drop. For more information, see Selecting Text. Starts selection mode, in which you can move the frame by drag-and-drop. For more information, see Moving the Frame. |
| Clear all highlighted areas | Removes all highlighting. |
| Reload with no thumbnails | Reloads the image without any thumbnails. The Pages tab will then be blank. Performance will improve the more pages an image has. |
| Show settings dialog | Opens user settings for display of pages in the xSuite Viewer. For information on the user settings, see xSuite Viewer: Settings for Page Display in the SAP GUI. |


xSuite Viewer: Keyboard Shortcuts in the SAP GUI
Keyboard shortcut | Description |
|---|---|
Alt Pos1 | Brings you to the first page. |
Alt End | Brings you to the last page. |
Alt ↑ | Scrolls one page forward. |
Alt ↓ | Scrolls one page back. |
Alt H | Fits the page to the height of the pane. |
Alt W | Fits the page to the width of the pane. |
Alt T | Fits the page to the overall size of the pane. |
ALT + (on the number block) | Zooms in on the page. |
Alt - (on the number block) | Zooms out of the page. |
Alt Backspace | Removes all highlighting. |
Alt * (on the number block) | Selects all fields. |
Alt . | Switches between field mode and full-text mode. |
xSuite Viewer: xSuite Monitors in the SAP GUI
The table below shows the xSuite monitors that use the xSuite Viewer.
xSuite monitor | Transaction | Documents handled |
|---|---|---|
Invoice Monitor | /WMD/FP_INVM |
|
Order Confirmation Monitor | /WMD/FP_OC | Order confirmations |
Sales Document Monitor | /WMD/FP_SDM | Orders |
xSuite Public Sector Monitor | /WMD/FP_PSM | Requests |
Delivery Notes Monitor | /WMD/FP_DNM | Delivery notes |
Making User Settings for the xSuite Viewer
You can set how the xSuite Viewer is displayed in the user settings section.
Setting Page Display
Open a document from the associated xSuite monitor. For more information, see xSuite Viewer: xSuite Monitors in the SAP GUI.
➣ The image of the document will be displayed in the xSuite Viewer.
Click the Show settings dialog button
 in the xSuite Viewer toolbar.
The Settings screen will open.
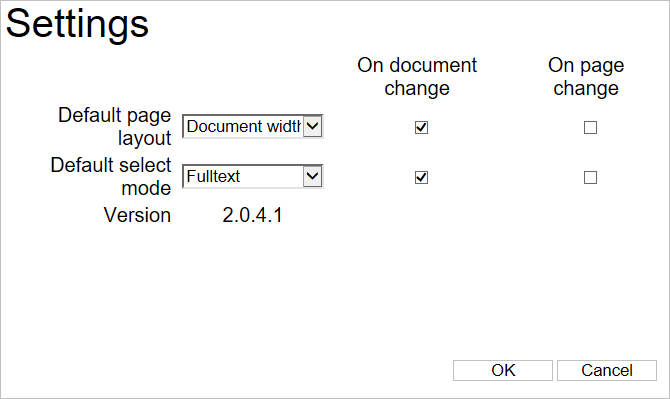
Make your default settings for image pages.
For information on the settings options, see xSuite Viewer: Settings for Page Display in the SAP GUI.
Click OK.
xSuite Viewer: Settings for Page Display in the SAP GUI
Setting for | Field | Option | Explanatory notes |
|---|---|---|---|
Page size | Default Page Layout pick list | Whole page | Fits the page to the size of the pane. |
Document height | Fits the page to the height of the pane. | ||
Document width | Fits the page to the width of the pane. | ||
Selection mode | Default Select Mode pick list | Fulltext | The page is displayed in full-text mode. |
Fields | The page is displayed in field mode. | ||
Behavior when opening a document | On document change checkbox | Selected | When opening a document, the first page of the image will be displayed based on your default page settings and your default selection mode. |
Cleared | When opening a document, the first page of the image will be adjusted to fit the size of the pane and shown in field mode. | ||
Behavior when opening a new page | On page change checkbox | Selected | When opening a document, the first page of the image will be displayed based on your default page settings and your default selection mode. |
Cleared | Another page of the image is displayed like the last opened page of the image was. |
Displaying the xSuite Viewer Integrated or in a Separate Window
Open a document from the associated xSuite monitor. For more information, see xSuite Viewer: xSuite Monitors in the SAP GUI.
Select the Settings section.
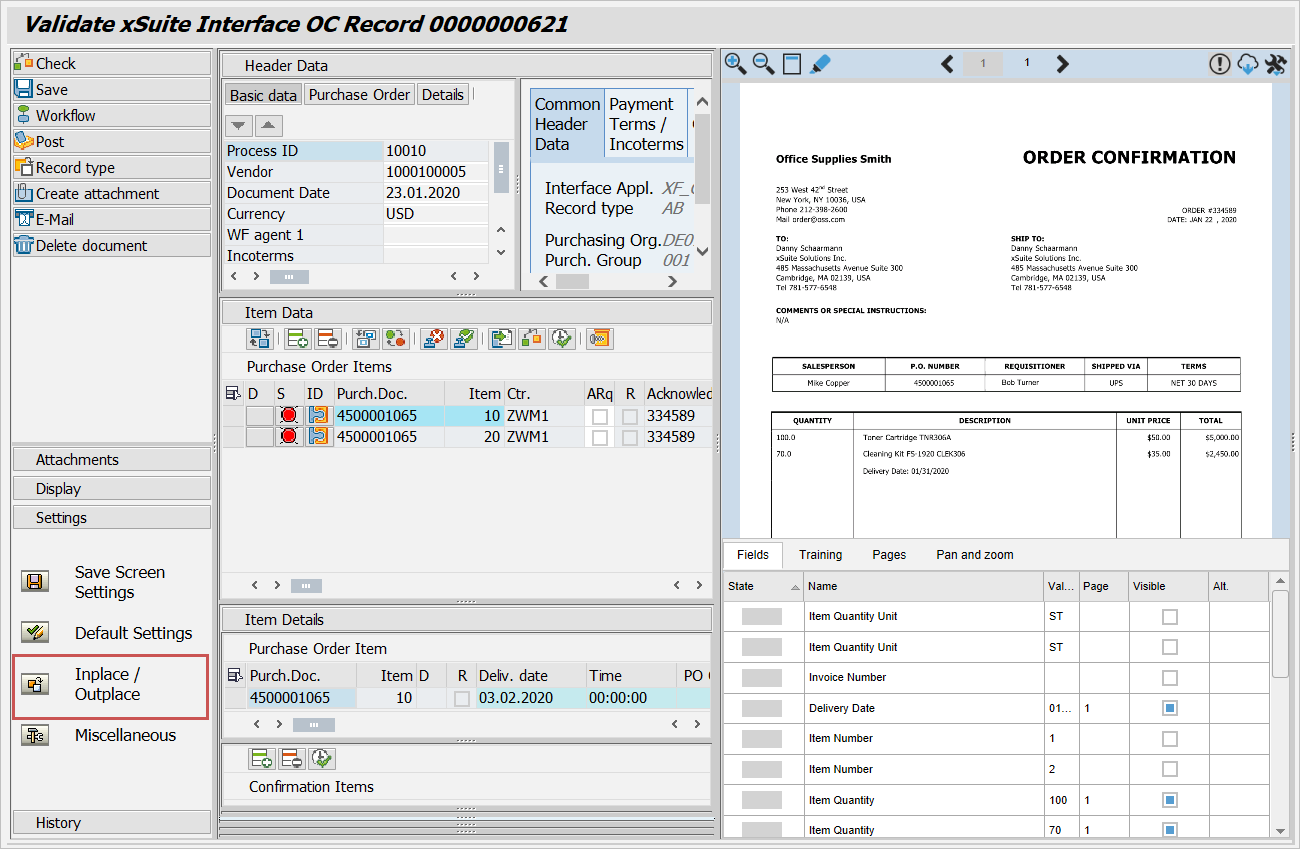
Click on the
 Inplace / Outplace button.
➣ If the xSuite Viewer was displayed integrated into the document, it will now be displayed in a separate window.
➣ If the xSuite Viewer was displayed in a separate window, it will now be displayed integrated into the document.
Click on the
 Save Screen Settings button in the Settings section.
Showing and Hiding the xSuite Viewer
○ The image has been automatically created in the document extraction and not been changed manually (Create attachment button).
Open a document from the associated xSuite monitor. For more information, see xSuite Viewer: xSuite Monitors in the SAP GUI.
Select the Settings section.
Click on the
 Miscellaneous button.
➣ The Image display options dialog box will open.
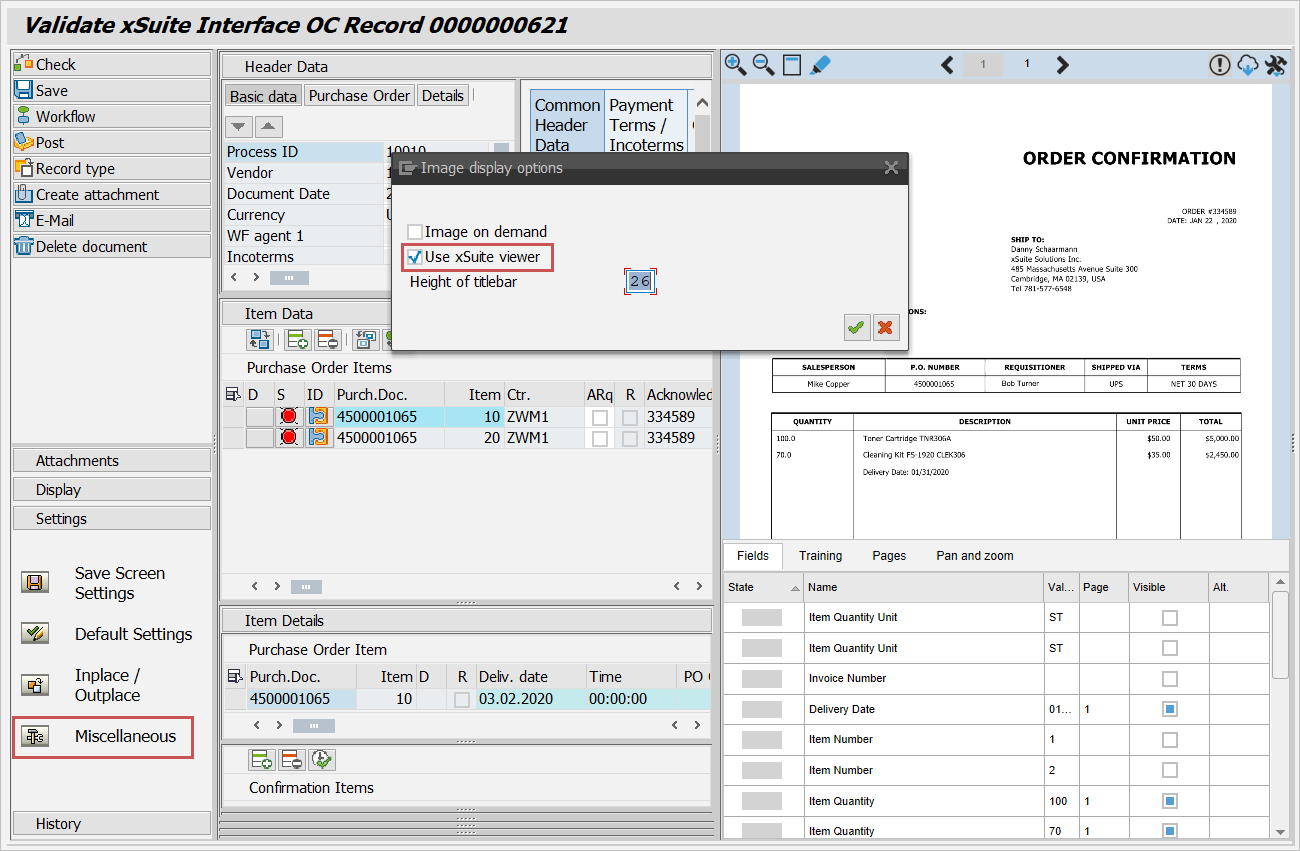
Execute one of the following steps:
Select the Use xSuite Viewer checkbox to display the image of a document in the xSuite Viewer.
Clear the Use xSuite Viewer checkbox to display the image of a document in a simple page view.
Click on the
Save Screen Settings button in the Settings section.
Navigating in the Image
You can navigate to a certain page in the image of a document and also zoom in, zoom out or move the frame.
Navigating to a Page in the Image
Open a document from the associated xSuite monitor. For more information, see xSuite Viewer: xSuite Monitors in the SAP GUI.
➣ The image of the document will be displayed in the xSuite Viewer.
Execute one of the following steps:
Click the
 Go to next page button in the xSuite Viewer toolbar or
  Go to previous page.
Enter a page number in the field in the xSuite Viewer toolbar which contains the current page number, and press Enter.
Click in the field in the xSuite Viewer toolbar which indicates the last page number. Then the last page will be displayed.
Select the tab Pages and click on one of the thumbnails.
Zooming In on a Page in the Image
Open a document from the associated xSuite monitor. For more information, see xSuite Viewer: xSuite Monitors in the SAP GUI.
➣ The image of the document will be displayed in the xSuite Viewer.
Execute one of the following steps:
Roll the mouse wheel forward.
Click the
 Increase zoom button in the xSuite Viewer toolbar.
Press Alt + (on the number block).
Zooming Out of a Page in the Image
Open a document from the associated xSuite monitor. For more information, see xSuite Viewer: xSuite Monitors in the SAP GUI.
➣ The image of the document will be displayed in the xSuite Viewer.
Execute one of the following steps:
Roll the mouse wheel back.
Click the
 Decrease zoom button in the xSuite Viewer toolbar.
Press Alt - (on the number block).
Moving the Frame
Open a document from the associated xSuite monitor. For more information, see xSuite Viewer: xSuite Monitors in the SAP GUI.
➣ The image of the document will be displayed in the xSuite Viewer.
Drag and drop the frame. Depending on which mode you have selected, execute one of the following steps:
Mode selected
Step(s)
Selection mode
(
 button is displayed.)
Hold down the mouse wheel and move the frame.
○ Always press the right mouse button first.
Hold down the mouse wheel and the left mouse key and move the frame.
Navigation mode
(
button is displayed.)Drag and drop the frame.
Selection mode or navigation mode
Select the Pan and zoom tab and drag and drop the area highlighted in blue.
Displaying Field Values
You can use the Fields tab to display all field values that have been identified during document extraction for the image. These field values also include ones which are not found in the image. The company code can thus be preset.
You can display all field values that have been identified right in the image.
Displaying Field Values Found in the Image
Open a document from the associated xSuite monitor. For more information, see xSuite Viewer: xSuite Monitors in the SAP GUI.
➣ The image of the document will be displayed in the xSuite Viewer.
Display the field values that have been found in the image. You have the following options:
Option
Step(s)
Displaying individual field values
Select the Fields tab.
All fields with values found in the image will appear in the Visible column with the checkbox in blue.
Execute one of the following steps:
If a field value has been found in the image exactly one time (the Alt. column will be blank), then click on the field value.
The page on which the field value has been found will be displayed. The field value will be highlighted in green.
If a field value is found multiple times in the image, click on the number in the orange field in the Alt. column. The places where the value was found will be displayed.
➤ The locations where the data was found will appear.
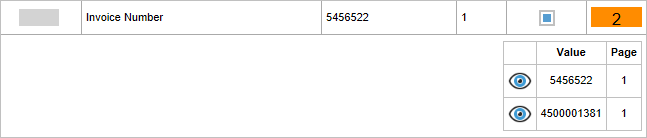
Click the
 Show button next to a field value.
The page on which the field value has been found will be displayed. The field value will be outlined in green.
Displaying all found field values of an area
Select the field mode and the selection mode. The
 Switch select fulltext and Enable navigation mode buttons will be displayed in the xSuite Viewer toolbar.
Navigate to a page in the image. For more information, see Navigating to a Page in the Image.
Drag a frame around an area of the page.
All found field values that are located within the frame will be highlighted in green. Alternatives will appear outlined in green.
Displaying all field values found in the image
Click the
 Show all recognized fields button in the xSuite Viewer toolbar.
All field values found in the image will be highlighted in green.
Displaying a field value from the header data (only available for invoices)
Double-click in a field in the header data of the document.
If the field value belonging to it is found in the image, it will be highlighted in green.
Displaying field values from the item data
Double-click on one of the values in a column in the item data of the document.
All found field values that are located in the column and found in the image will be highlighted in green.
Displaying All Field Values with the "Fields" Tab
Open a document from the associated xSuite monitor. For more information, see xSuite Viewer: xSuite Monitors in the SAP GUI.
➣ The image of the document will be displayed in the xSuite Viewer.
Select the Fields tab.
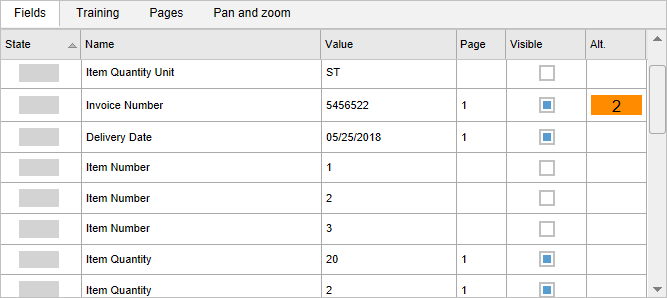
This is where all fields of the image are displayed with the field values identified.
For information on the columns, see "Fields" Tab: Columns.
"Fields" Tab: Columns
Column | Description |
|---|---|
State | The status of a field. For information on the field status, see xSuite Viewer: Field Status in the SAP GUI. |
Name | The name of a field. If a field is related to item data, then it will be output by item. An example: Item Quantity. |
Value | The value of a field. Field values are identified in the document extraction. If a field value in the image has a format other than the corresponding field value in SAP, the field value in the document extraction will be adjusted to the SAP format. The adjusted field value is located in the column Value. Example: In the document, the amount of the order is specified with two decimal places. In SAP it is specified without any decimal places. The document would contain |
Page | The number of the page on which the identified field value was found. |
Visible | Indicates whether an identified field value has been found in the document. You can highlight field values found in the document in green. For more information, see Displaying Field Values Found in the Image. |
Alt. | Indicates whether an identified field value has been found multiple times in the document. You can highlight the places where it is found in the image with outlining in green. For more information, see Displaying Field Values Found in the Image. |
xSuite Viewer: Field Status in the SAP GUI
Status | Color | Value | Explanatory notes |
|---|---|---|---|
| Gray | -- | This field is neither a mandatory field nor part of a rule. For this reason, the field value identified will not be checked. If all fields are grayed, the completeness check for the image will qualify as having been completed. In the xSuite Viewer toolbar, the button |
| Green | 1 | This field is mandatory. The field value identified has been found in the image. If all fields are green or gray, the completeness check for the image will qualify as having been completed. In the xSuite Viewer toolbar, if one or more fields are green, the button |
| Red | -1 | This field is mandatory. The field value identified has not been found in the image. If one or more fields are red, the completeness check for the image will qualify as not having been completed. In the xSuite Viewer toolbar the button |
| Red | -2 | This field is part of a rule. The field value identified goes against a rule. Example of rules:
If one or more fields are red, the completeness check for the image will qualify as not having been completed. In the xSuite Viewer toolbar the button |


Selecting Text and Applying it to the Document
You can select the entire text of a page or individual sections of text and apply them to the document.
Sections of text are separated with blank spaces or paragraphs. "44 Market St" thus consists of three sections of text and "Number/Date" of one.
Selecting Text
○ The full-text mode and the selection mode have been selected. The indication for this is when the  Switch select recognized fields and Enable navigation mode buttons are visible in the xSuite Viewer toolbar.
Open a document from the associated xSuite monitor. For more information, see xSuite Viewer: xSuite Monitors in the SAP GUI.
➣ The image of the document will be displayed in the xSuite Viewer.
Navigate to a page where you wish to select a section of text. For more information, see Navigating to a Page in the Image.
Select a section of text. You have the following options:
Option
Step(s)
Selecting individual sections of text
Click on a unit of text.
➤ The selection will be highlighted in yellow.
Selecting multiple individual sections of text
Click on individual sections of text one after another.
➤ The selection will be highlighted in yellow.
Selecting an entire text from a section
Drag and drop a frame to surround the desired text.
➤ The selection will be highlighted in yellow.
Adopting Selected Text as Header or Item Data
Select the desired section of text in the xSuite Viewer. For more information, see Selecting Text.
Click on the header or item data of the document, in the field to which you wish to add the text.
In the xSuite Viewer, move the mouse over the selected text.
➣ In place of the cursor, a hand will appear.
➣ In addition, a tooltip will appear for the selected text.
Click.
➤ If the data type of the selected text and the data type of the field in the header data or item data are identical, the selected text will be copied.
➤ If the data types are different, you will receive an error message.
Adopting Selected Text as a Comment
Select the text that you wish to adopt as a comment. For more information, see Selecting Text.
Drag and drop the selected text to the comment field in the Text section.
➤ The text will be adopted free of formatting.
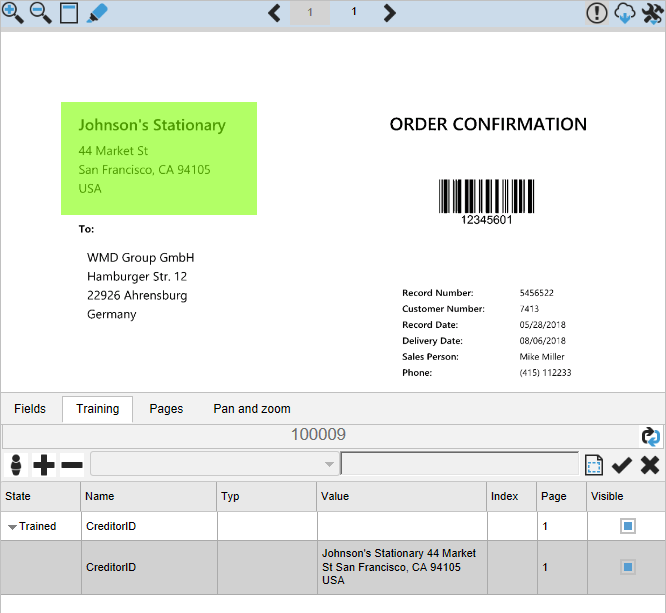
Business Partner and Field Training
During document extraction, an attempt will be made to identify the business partner and properties of the document.
If it was not possible to determine the business partner, you can train the business partner.
If the business partner has been identified but the properties have not, you can train the properties in the form of fields for the business partner.
The training improves the results of future document extraction and reduces manual follow-up work.
Typical causes of error in document extraction
In the document extraction step, there may be incidences of incorrectly identified business partners or business-partner fields.
These errors may be caused by one of the following.
Typical cause | Example | Relates to business partner | Relates to field | Can be trained |
|---|---|---|---|---|
Contrast is too low. | Light gray letters on medium-gray background | X | X | |
Font size is too small. | IBAN in font size 6 | X | X | |
The business partner is new and has not been created in SAP yet (only possible in the case of invoices). | -- | X | ||
The field name and the field value are located too far apart from one another. | "Delivery date:" and "April 15, 2018" | X | X | |
The field name has not been clearly selected. | "Number" instead of "Customer Number" | X | X | |
Fields are no longer legible because of comments made by hand or dirt on the paper. | -- | X | X |
Training Options
You can train business partners and business-partner fields that have not been identified correctly.
You have the following options for training:
Training option | Application | Information and comments |
|---|---|---|
Business-partner training without safeguarding | The business partner has been identified incorrectly or not at all. AND The page layout of the business partner is unique. | A business partner can be uniquely identified based on the page layout used. In other words, there will be no other business partners that use the same page layout in the context of a given xSuite product. The layout of the first page is saved like a fingerprint in the form of a dactylogram and is linked to the business-partner ID. When, in the future, a document is scanned and the trained page layout recognized, then the document will automatically be matched to the business-partner ID that is linked. For information on the procedure to be used, see Training a Business Partner without a Safeguard. |
Business-partner training with safeguard | The business partner has been identified incorrectly or not at all. AND Multiple business partners use the same page layout. | A business partner cannot be identified merely based on its page layout because many business partners saved in a given xSuite product use the same page layout. An example would be multiple business partners belonging to the same corporation. In a case like this, an additional property which identifies the business partner uniquely must also be saved along with the page layout. Examples would be a zip code, an account number, or a sender line. The page layout is saved in combination with the additional property and linked to the business-partner ID. When, in the future, a document is scanned and the trained combination of page layout and property then recognized, the document will automatically be matched to the business-partner ID that is linked. For information on the procedure to be used, see Training a Business Partner with a Safeguard. |
Field training for a business partner | The business partner has been identified correctly. AND Individual field values have been identified incorrectly or not at all. | To train field values effectively, they must have a fixed position in the page layout. An example would be field values in the header data. Field values with varying positions, e.g., net amounts, are not effective for training. The position of a field value in the image is saved for the business partner. When, in the future, a document is scanned and assigned to the business partner, the trained field will automatically be allocated to the value that is found at the position that has been saved. For information on the procedure to be used in a search, see Training a Field for a Business Partner. |
"Training" Tab: Buttons
Button | Name | Description |
|---|---|---|
| Update training | Refreshes the status of the trainings. For information on the status of trainings, see xSuite Viewer: Training Status in the SAP GUI. |
| Business Partner Training | Starts the business-partner training with or without safeguard. For information on how to train a business partner, see Training a Business Partner without a Safeguard and Training a Business Partner with a Safeguard. |
| New training | Starts field training. For information on training a field, see Training a Field for a Business Partner. |
| Remove selected training | Deletes the selected training. For information on deleting a training, see Deleting a Training. |
| Select field area | Removes your selection, enabling a new selection. |
| Accept training | Saves the training started. |
| Cancel training | Aborts the training started. |

"Training" Tab: Fields
Field | Description |
|---|---|
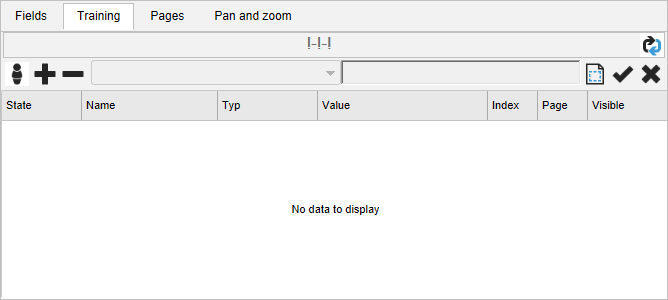
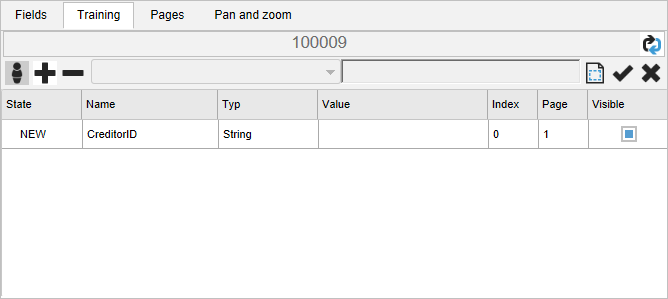
 | Indicates the business-partner ID. The business partner has either been recognized in the document-extraction step or trained later. If the business partner has neither been recognized nor trained, the value "!-!-!" will be displayed in place of the business-partner ID. |
 | The following trainable fields are available:
|
 | This is where the value set for the trainable field selected is displayed. |
"Training" Tab: Columns
Column | Description |
|---|---|
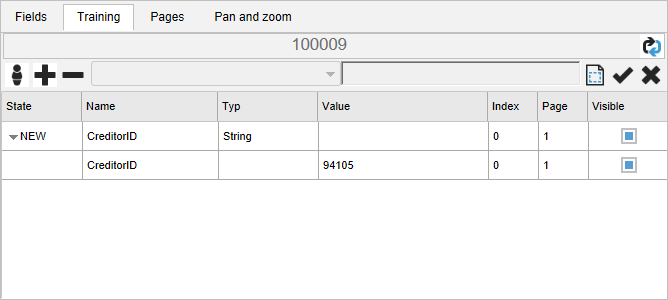
State | The status of a training. For information on the status of trainings, see xSuite Viewer: Training Status in the SAP GUI. If the training is a business-partner training with safeguard, an arrow will appear next to the status. Use the arrow to display the field value that serves as the safeguard. For more information, see Training a Business Partner with a Safeguard. |
Name | Name of the training |
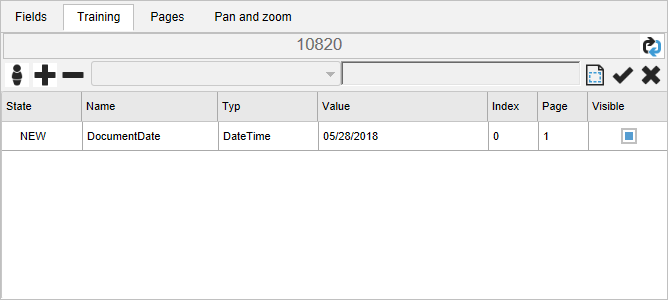
Type | Data type of training, e.g., String or DateTime The data type will only be displayed if the status is NEW. |
Value | Value that is selected when creating the training |
Index | Intended for use in a future version. |
Page | Number of the page on which the training is based |
Visible | Indicates whether a field value has been found in the image. A field value does not qualify as found if there is no field value in the trained position or if the field value has a data type that is not identical to the data type trained. You can show the trained position. For more information, see Displaying Trained Positions in an Image. |
xSuite Viewer: Training Status in the SAP GUI
Status | Explanatory notes |
|---|---|
NEW | The training has recently been created ( Processing has not been started yet ( Training has not yet been used for document extraction. |
Pending | May apply to one of two scenarios:
|
Trained | Creation of the training has been successfully processed. Training is used for document extraction. |
ToDelete | The training was deleted ( Processing has not been started yet ( Training continues to be used for document extraction. |
Training a Business Partner without a Safeguard
Notice
To replace an existing business partner training, delete the existing training before creating a new one.
For information on deleting a business partner training, see Deleting a Training.
Open a document from the associated xSuite monitor. For more information, see xSuite Viewer: xSuite Monitors in the SAP GUI.
➣ The image of the document will be displayed in the xSuite Viewer.
Select the Training tab.
Click the button
 Business Partner Training.
➣ The upper field will be activated.
Enter the business-partner ID in the upper field.
Click the
 Accept training button.
➣ A training for the CreditorID field will be created in the table. The status will be NEW.
Click on the
 Update training button.
➣ The new training will be processed. The status will switch to Pending.
➤ Once editing is completed, the status will switch to Trained.
Training a Business Partner with a Safeguard
Notice
To replace an existing business partner training, delete the existing training before creating a new one.
For information on deleting a business partner training, see Deleting a Training.
Open a document from the associated xSuite monitor. For more information, see xSuite Viewer: xSuite Monitors in the SAP GUI.
➣ The image of the document will be displayed in the xSuite Viewer.
Select the Training tab.
Click the button
Business Partner Training.➣ The upper field will be activated.
Enter the business-partner ID in the upper field.
Select the entry Creditor ID (Safe Guard) in the drop-down list to the left of the field.
Drag and drop a frame around those fields of the image that uniquely identify the business partner, e.g., the postal code, the account number, or the sender line.
➣ The fields will be transferred to the field Training text.
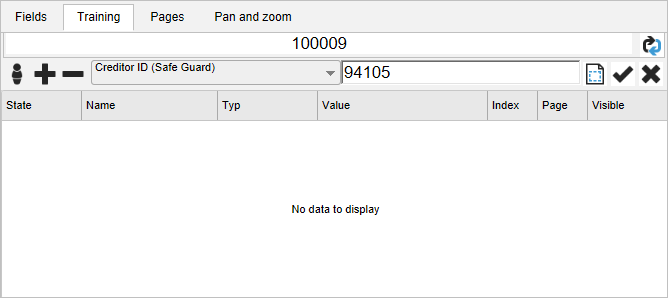
Notice
The fields will only be adopted if the frame you have drawn is large enough.
If the fields are wrong, you can overwrite them or click the
 Select field area button and draw a frame again.
Click the
Accept training button.A training for the CreditorID field will be created in the table. The status will be NEW.
➣ The selected fields that serve as a safeguard are written to an additional line, as shown below:
Click on the
Update training button.➣ The new training will be processed. The status will switch to Pending.
➤ Once editing is completed, the status will switch to Trained.
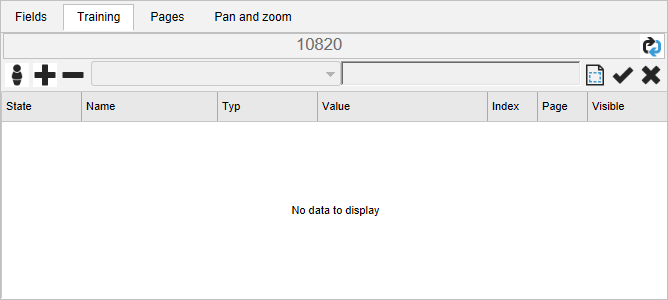
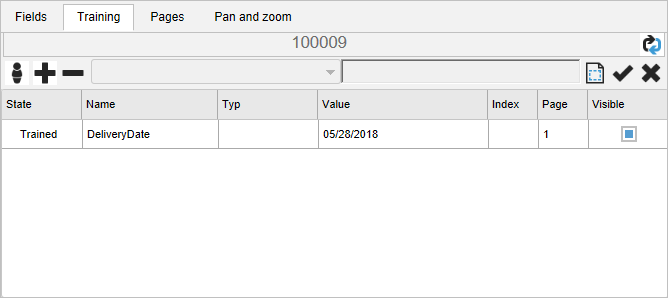
Training a Field for a Business Partner
Open a document from the associated xSuite monitor. For more information, see xSuite Viewer: xSuite Monitors in the SAP GUI.
➣ The image of the document will be displayed in the xSuite Viewer.
Select the Training tab.
➣ The business-partner ID is located in the upper field.
Click on the
 New training button.
➣ The pick list will be activated.
Select the field from the pick list which you wish to train, e.g., Document Date.
Go to the image and drag and drop a frame to surround the value of the field to be trained.
➣ The field value will be transferred to the field Training text.
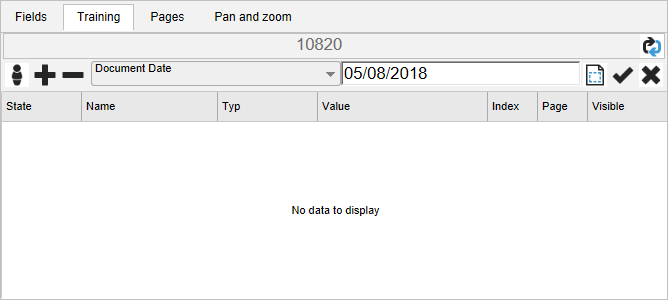
Notice
The field value will only be adopted if you have made the frame around the fields large enough.
If the field value is wrong, you can overwrite it or click the
Select field area button and draw a frame again.Click the
Accept training button.➣ A training for the selected field will be created in the table. The status will be NEW.
Click on the
Update training button.➣ The new training will be processed. The status will switch to Pending.
➤ Once editing is completed, the status will switch to Trained.
Displaying Trained Positions in an Image
Open a document from the associated xSuite monitor. For more information, see xSuite Viewer: xSuite Monitors in the SAP GUI.
➣ The image of the document will be displayed in the xSuite Viewer.
Select the Training tab.
Double-click on a training.
➤ If you click on a field training, the trained position of the field value will be highlighted in green.
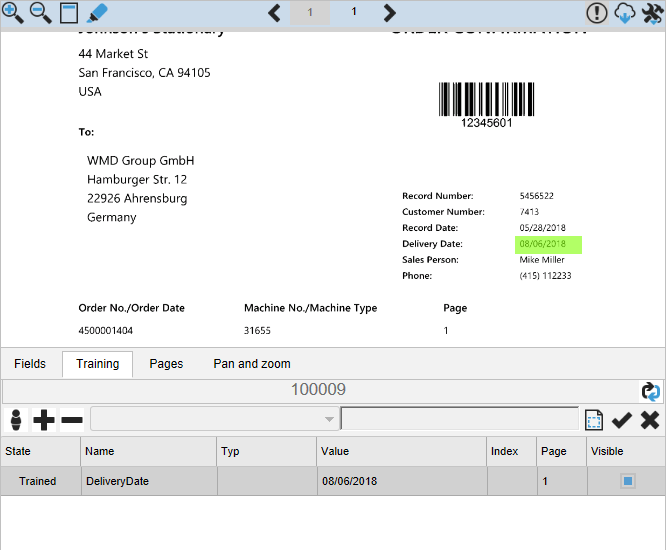
➤ If you click on fields that are used to save a business-partner training, the trained position of the fields will be highlighted in green.
➤ If you have clicked on a business-partner training, then the trained page layout will be highlighted in green. In other words, the entire page will be highlighted in green.
Editing a Training
Notice
Editing trainings is only possible indirectly, by recreating the training. The existing training will then be replaced automatically.
Open a document from the associated xSuite monitor. For more information, see xSuite Viewer: xSuite Monitors in the SAP GUI.
➣ The image of the document will be displayed in the xSuite Viewer.
Select the Training tab.

Recreate the business-partner training or field training that you want to edit. You have the following options:
Option
Information and comments
Recreating a business-partner training without safeguard
Recreating a business-partner training with safeguard
Recreating a field training
➣ The new training will be created in the table. The status will be NEW.

Click on the
Update training button.➣ The new training will be processed. The status will switch to Pending.
➤ Once editing is completed, the status will switch to Trained.
The previous training will be removed.
Deleting a Training
Open a document from the associated xSuite monitor. For more information, see xSuite Viewer: xSuite Monitors in the SAP GUI.
➣ The image of the document will be displayed in the xSuite Viewer.
Select the Training tab.
Click on a training and then click the
 Remove selected training button.
➣ If the training status is NEW, it will be removed immediately.
➣ If the training status is Trained, the status will change to ToDelete.
Click on the
Update training button.➣ The deletion process will begin. The status will switch to Pending.
➤ Once processing has been completed, the training will be removed.