The PNG Viewer in the SAP GUI
PNG Viewer: xSuite Monitors in the SAP GUI
The PNG Viewer is available in the following xSuite monitors:
xSuite monitor | Transaction | Documents handled |
|---|---|---|
Invoice Monitor | /WMD/FP_INVM |
|
Order Confirmation Monitor | /WMD/FP_OC | Order confirmations |
Sales Document Monitor | /WMD/FP_SDM | Orders |
xSuite Public Sector Monitor | /WMD/FP_PSM | Requests |
Delivery Notes Monitor | /WMD/FP_DNM | Delivery notes |
PNG Viewer: Main Overview in the SAP GUI
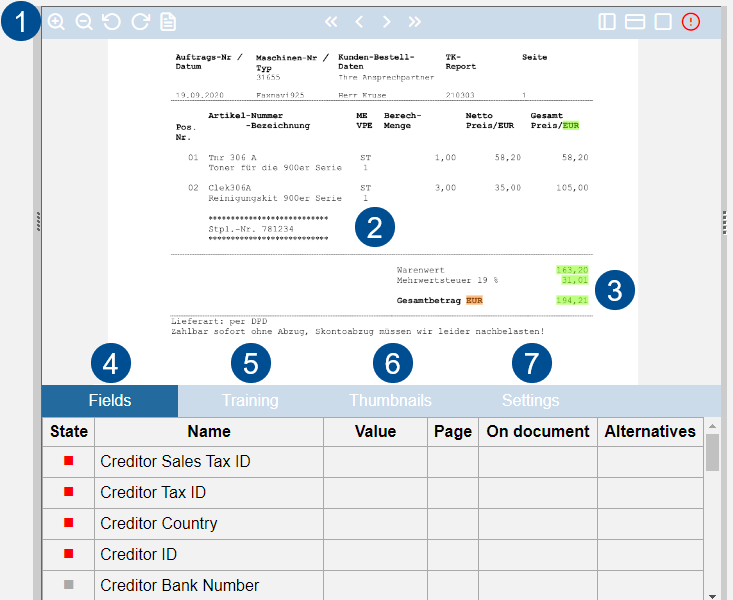 |
Section | Information and comments | |
|---|---|---|
1 | The PNG Viewer toolbar | Contains the buttons of the PNG Viewer. For more information, see PNG Viewer: Buttons in the Toolbar in the SAP GUI. |
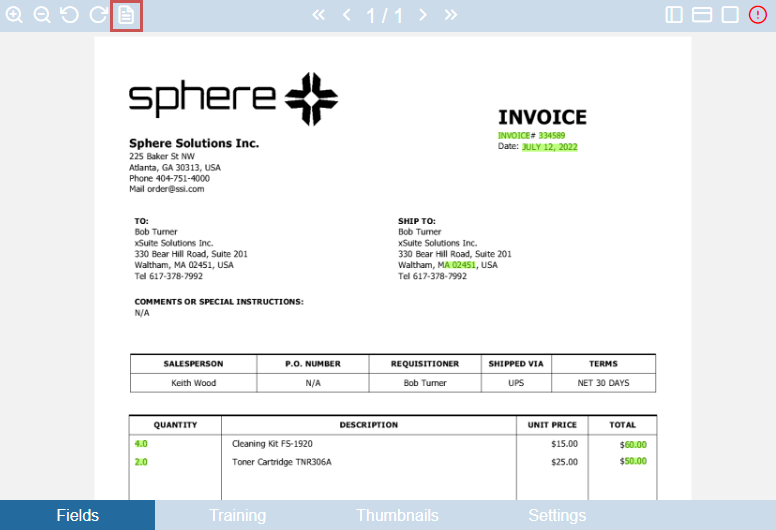
2 | Image display | This is where the individual pages of the image are displayed. |
3 | Highlighting | In the PNG Viewer, found field values are highlighted in green. |
4 | Fields tab | Shows the properties of the image in the form of fields. |
5 | Training tab | Here, you can train the vendor or the fields of a vendor. For more information, see PNG Viewer: Vendor and Field Training in the SAP GUI. Note: When using xSuite Capture Helix, this tab is hidden, because xSuite Capture Helix always runs an implicit training when posting or parking an SAP document. |
6 | Thumbnails tab | A gallery view of all individual pages is displayed here. Clicking on a single page will open that page in the Viewer pane. |
7 | Settings tab | This is where you can configure your settings for how a new document or a new page is displayed. These settings will determine whether additional PNG Viewer functions are shown or hidden. |
PNG Viewer: Buttons in the Toolbar in the SAP GUI
Button | Name | Description | |
|---|---|---|---|
| Zoom in | Zooms in on the page. | |
| Zoom out | Zooms out of the page. | |
| Rotate left | Turns the page 90° to the left. | |
| Rotate right | Turns the page 90° to the right. | |
| Highlighting | Highlights all field values found. | |
| First page | Brings you straight to the first page. | |
| Page back | Scrolls one page back. | |
| Page forward | Brings you forward a page. | |
| Last page | Brings you straight to the last page. | |
| Fit page | Fits the page to the overall size of the pane. | |
| Fit height | Fits the page to the height of the pane. | |
| Fit width | Fits the page to the width of the pane. | |
| Additional functions | Shows or hides the tabs. The color of the button may be gray, green or red. The color indicates the status of the completeness check for the image. For information on status, see PNG Viewer: Field Status in the SAP GUI. |


PNG Viewer: Display Settings in the SAP GUI
Defining Page Display
Open a document in the associated xSuite monitor. For more information, see PNG Viewer: xSuite Monitors in the SAP GUI.
➣ The image of the document will be displayed in the PNG Viewer.
Select the tab Settings.
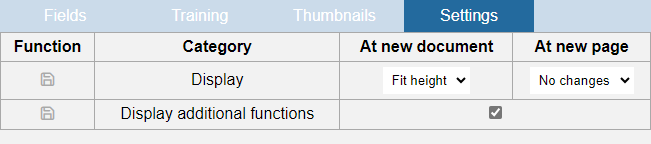
In the column At new document, select one of the following values:
Fit page: Fits the first page of a new document to the size of the window.Fit height: Fits the first page of a new document to the height of the window.Fit width: Fits the first page of a new document to the width of the window.
In the column At new page, select one of the following values:
No changes: The new page is displayed in the same way as the previous one.Fit page: Fits a new page to the size of the window.Fit height: Fits a new page to the window height.Fit width: Fits a new page to the window width.
In the line Display of the column Functions, click
 Save.
Save.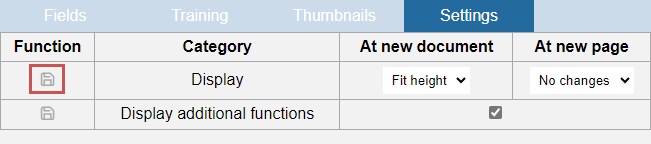
➤ The page display settings have been saved.
Displaying the PNG Viewer Integrated or in a New Window
Open a document in the associated xSuite monitor. For more information, see PNG Viewer: xSuite Monitors in the SAP GUI.
➣ The image of the document will be displayed in the PNG Viewer.
Select the Settings section.
Click on the
 Inplace / Outplace button.
➣ If the PNG Viewer was displayed integrated in the document, it will now be displayed in a separate window.
➣ If the PNG Viewer was displayed in a separate window, it will now be displayed integrated in the document.
Click on the
 Save Screen Settings button in the Settings section.
Showing or Hiding the PNG Viewer
Open a document in the associated xSuite monitor. For more information, see PNG Viewer: xSuite Monitors in the SAP GUI.
➣ The image of the document will be displayed in the PNG Viewer.
Select the Settings section.
Click on the
 Miscellaneous button.
➣ The Image display options dialog box will open.
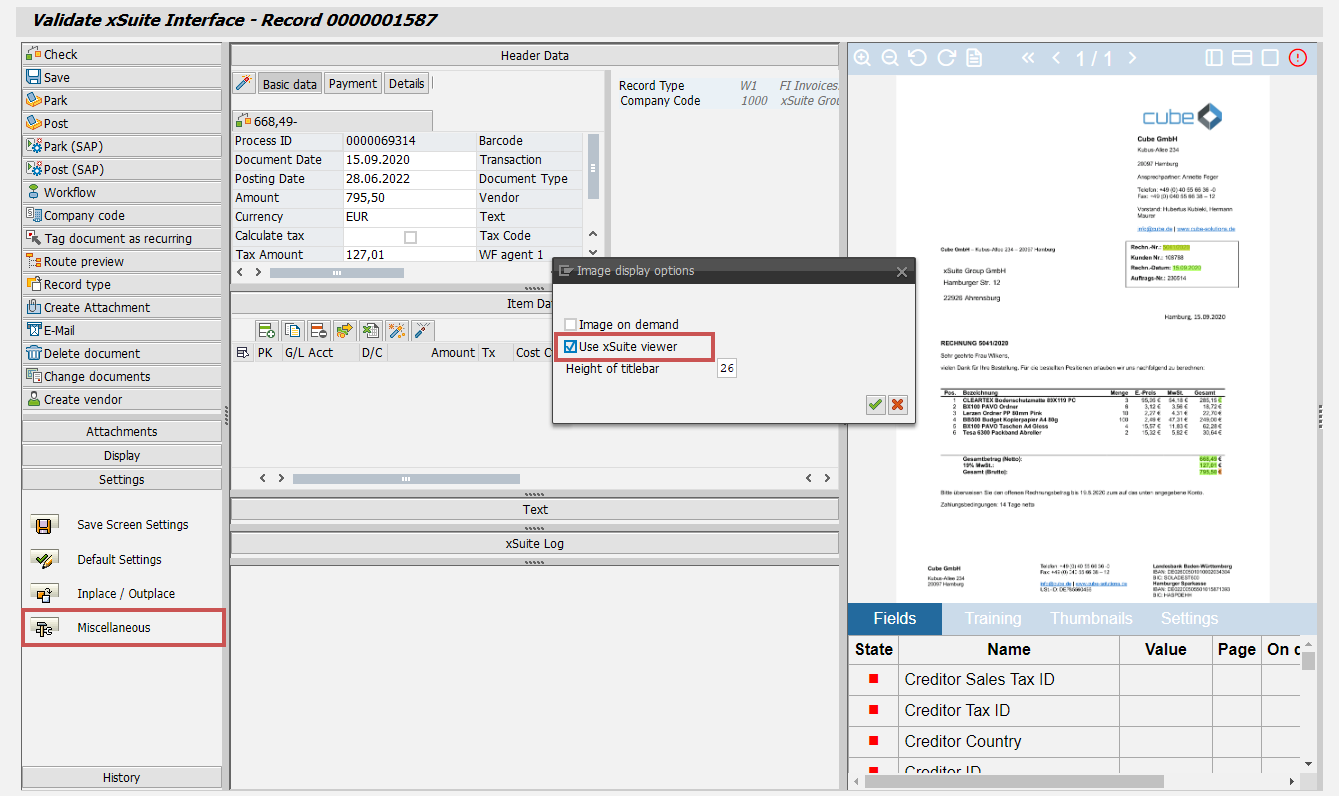
Execute one of the following steps:
Activate the Use xSuite Viewer checkbox to display the image of a document in the PNG Viewer.
Clear the Use xSuite Viewer checkbox to display the image of a document in a simple page view.
Click on the
Save Screen Settings button in the Settings section.
Showing or Hiding Additional Functions in the PNG Viewer
Notice
You can click the Additional Functions  button any time to hide or show additional functions.
The following setting determines whether additional PNG Viewer functions are shown or hidden by default.
Open a document in the associated xSuite monitor. For more information, see PNG Viewer: xSuite Monitors in the SAP GUI.
➣ The image of the document will be displayed in the PNG Viewer.
Select the tab Settings.
Activate or deactivate the checkbox in the line Display additional functions.
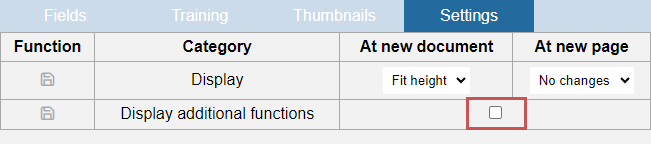
➣ If the check box is enabled, by default the additional functions will be displayed the next time the PNG Viewer is opened.
➣ If the check box is disabled, by default the additional functions will be hidden the next time the PNG Viewer is opened.
In the line Display additional functions of the column Functions, click
Save all.
➣ The settings are now saved.
PNG Viewer: Field Values in the Image in the SAP GUI
All field values extracted from the image during data extraction are displayed in the Fields tab. These field values also include ones which are not found in the image. An example of a preset field value is a company code.
"Fields" Tab: Columns in the SAP GUI
Column | Description |
|---|---|
State | Shows the status of a field. For information on field status, see PNG Viewer: Field Status in the SAP GUI. |
Name | Shows the name of a field. If a field relates to items, the field will be output by item, e.g. Item Quantity. |
Value | Shows the value of a field. Field values are identified in the document extraction. If a field value in the image has a format other than the corresponding field value in SAP, the field value in the document extraction will be adjusted to the SAP format. The adjusted field value is located in the column Value. Example: In the document, the amount of the order is specified with two decimal places. In SAP it is specified without any decimal places. The document would contain |
Page | Shows the page number on which an identified field value was found. |
On document | Indicates whether an identified field value has been found in the document. |
Alternatives | Indicates whether an identified field value has been found multiple times in the document. Alternative field values can be highlighted in the document. For more information, see PNG Viewer: Highlighting Alternative Field Values in the Image in the SAP GUI. |
PNG Viewer: Field Status in the SAP GUI
Status | Color | Explanatory notes | |
|---|---|---|---|
| Gray | This field is neither a mandatory field nor part of a rule. For this reason, the field value identified will not be checked. If all fields are gray, the document is considered complete according to the criteria in the completeness check. In the PNG Viewer toolbar, the | |
| Green | This field is mandatory. The field value identified has been found in the image. If all fields are green or gray, the document is considered complete according to the criteria in the completeness check. If any field is green, the | |
| Red | This field is mandatory. The field value identified either was not found in the image or it violates a rule. Example of rules:
If any field is red, the document is not considered complete according to the criteria of the completeness check. In the PNG Viewer toolbar, the |


PNG Viewer: Displaying Field Values Found in the Image in the SAP GUI
Open a document in the associated xSuite monitor. For more information, see PNG Viewer: xSuite Monitors in the SAP GUI.
➣ The image of the document will be displayed in the PNG Viewer.
Execute one of the following steps:
Option
Steps
Displaying individual found field values
Select the Fields tab and then click a field value in the list.
➤ The page on which the field value was found will now be displayed. The field value will be highlighted in green.
Displaying all field values found in an area
Holding down the right mouse button, drag a frame in the image.
➤ All field values that are located in the selected area and were found will be highlighted in green.
Showing all field values found in the image
In the Viewer toolbar, click the
 Highlighting button.
➤ All field values found in the image will be highlighted in green.
➤ All alternative field values found in the image will be highlighted orange.
Displaying field value from header data (only available for invoices)
Double-click in a field in the document header data.
➤ If the associated field value was found in the image, the value will now be highlighted in green.
Displaying field values from item data
In the item data of the document, double-click one of the values in a column.
➤ All values that are in the column and were found in the image will be highlighted in green.
PNG Viewer: Highlighting Alternative Field Values in the Image in the SAP GUI
Open a document in the associated xSuite monitor. For more information, see PNG Viewer: xSuite Monitors in the SAP GUI.
➣ The image of the document will be displayed in the PNG Viewer.
Select the Fields tab.
Notice
The number of alternative field values appears in the column Alternatives.
Click on the number in the column Alternatives.
➣ The alternate values of the field will be listed.
In the list alongside an alternative field value, click the
 button.
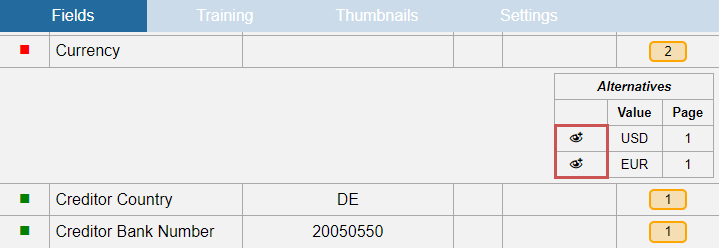
➤ The alternative field value will be highlighted in the image.
Selecting values and transferring them to the document – the PNG Viewer in the SAP GUI
Open a document in the associated xSuite monitor. For more information, see PNG Viewer: xSuite Monitors in the SAP GUI.
➣ The image of the document will be displayed in the PNG Viewer.
In the PNG Viewer toolbar, click the button
 Show all recognized fields.
In the PNG Viewer toolbar, click the
Highlighting button.➣ All field values identified in the document will be highlighted.
Holding down the right mouse button, drag the mouse over a field value that you want to apply.

Click in a header or item data field in the document where you want to insert a field value.
In the image, double-click the field value you want to apply.
➤ If the data type of the selected field value and the data type of the header or item field are identical, the selected value will be adopted.

➤ If the data types are different, you will receive an error message.
➤ If you drag the value into a comment field, the value will be transferred unformatted.
PNG Viewer: Vendor and Field Training in the SAP GUI
The document extraction function will attempt to determine the vendor of a document as well as the properties of a document.
If it was not possible to determine the vendor, you can train the vendor.
If it was possible to determine the vendor but not the properties, you can train the properties in the form of fields for the vendor.
Training will improve the results of future document extraction and reduce manual post-processing work.
Notice
For a field to be trained effectively, it must have a fixed position in the page layout. Field values in the header data are a good example of values that can be trained well.
Field values whose positions vary – net amounts, for instance – cannot be trained well.
"Training" Tab: Columns in the SAP GUI
Column | Description |
|---|---|
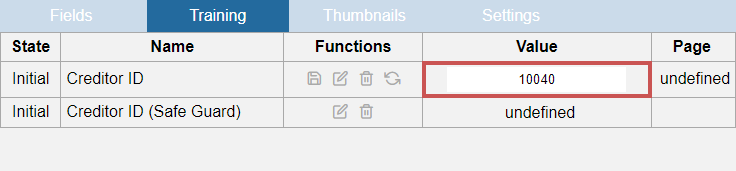
State | Shows the status of a training. For information on training status, see PNG Viewer: Training Status in the SAP GUI. |
Name | Shows the field name. |
Functions | Contains the buttons of the field training. The following buttons are available:
|
Value | Shows the value that you selected when creating the training. |
Page | Shows the page number to which the training refers. |
PNG Viewer: Training Status in the SAP GUI
Status | Explanatory notes |
|---|---|
Initial | There are no associated trainings for this field. |
New | The training has just been created. Processing has not been started yet ( Training has not yet been used for document extraction. |
Trained | Creation of the training has been successfully processed. Training is used for document extraction. |
ToDelete | The training was deleted ( Processing has not been started yet ( Training continues to be used for document extraction. |
PNG Viewer: Training the Vendor without a Safeguard in the SAP GUI
Caution
When you replace an existing vendor training with a new vendor training, the associated field training will be deleted.
Open a document in the associated xSuite monitor. For more information, see PNG Viewer: xSuite Monitors in the SAP GUI.
➣ The image of the document will be displayed in the PNG Viewer.
Select the Training tab.
Enter the creditor ID in the column Value of the line Creditor ID.
Notice
The system always uses the entire first page of the document as the area to be trained.
In the line Creditor ID in the column Functions, click
Save.➣ The new training will be processed.
➤ After processing is complete, the status will switch to Trained.
PNG Viewer: Training the Vendor with a Safeguard in the SAP GUI
Caution
When you replace an existing vendor training with a new vendor training, the associated field training will be deleted.
Open a document in the associated xSuite monitor. For more information, see PNG Viewer: xSuite Monitors in the SAP GUI.
➣ The image of the document will be displayed in the PNG Viewer.
Select the Training tab.
Enter the creditor ID in the column Value of the line Creditor ID.
Notice
The system always uses the entire first page of the document as the area to be trained.
Holding down the right mouse button, drag a frame around the fields that uniquely identify the vendor, e.g. the postal code, the IBAN or the sender line.
In the line Creditor ID (Safe Guard), click on
 Train safe guard.
➣ The text of the selected area will now be displayed in the Value field.
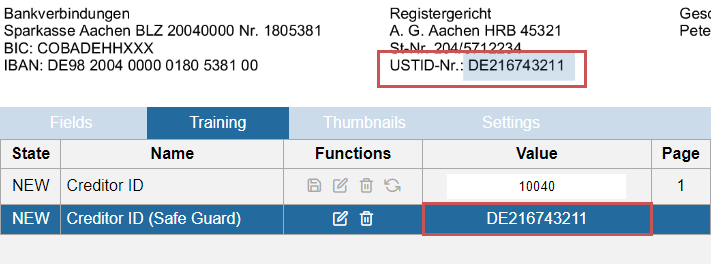
In the line Creditor ID in the column Functions, click
Save.➣ The new training will be processed.
➤ After processing is complete, the status will switch to Trained.
PNG Viewer: Training a Field of a Vendor in the SAP GUI
Open a document in the associated xSuite monitor. For more information, see PNG Viewer: xSuite Monitors in the SAP GUI.
➣ The image of the document will be displayed in the PNG Viewer.
Select the Training tab.
Holding down the right mouse button, drag a frame around the value of the field to be trained.
Notice
The field will only be adopted if the frame around it is large enough.
Perform one of the following steps:
In the field to be trained, click on
Training (Area + Text).➣ The selected area will be adopted with full text. The text will be displayed in the Value column.
➣ The status will change to New.
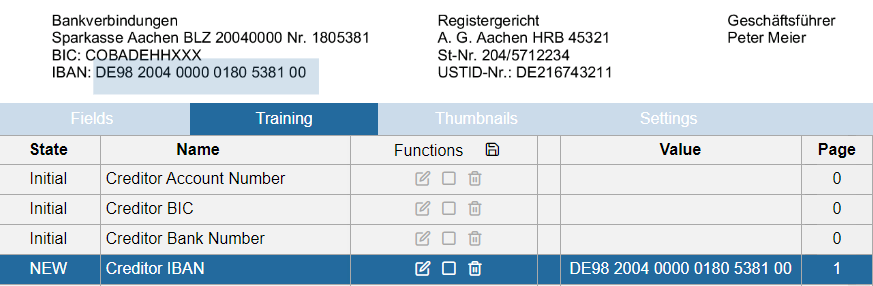
In the field to be trained, click on
 Training (Area).
➣ The selected area will be adopted.
➣ The status will change to New.

In the header of the column Functions, click
 Save all.
Notice
The training is always saved for all fields simultaneously.
➣ The new training will be processed.
➤ After processing is complete, the status will switch to Trained.
PNG Viewer: Deleting Field Training in the SAP GUI
Open a document in the associated xSuite monitor. For more information, see PNG Viewer: xSuite Monitors in the SAP GUI.
➣ The image of the document will be displayed in the PNG Viewer.
Select the Training tab.
In the line of a training, click on
 Delete.
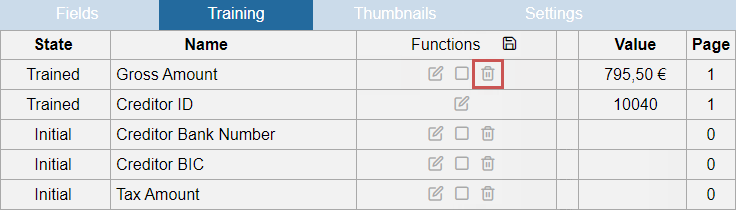
➣ The status of the training will change to ToDelete.
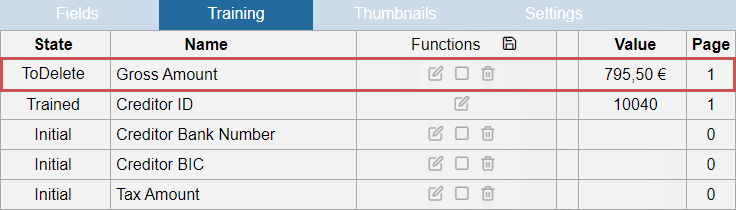
In the header of the column Functions, click
Save all.➣ The deletion process will now start.
➤ After the deletion process is complete, the training will be removed. The status of the training will now be Initial.
PNG Viewer: Deleting Vendor Training in the SAP GUI
Caution
When you delete an existing vendor training, the associated field training will also be deleted.
Open a document in the associated xSuite monitor. For more information, see PNG Viewer: xSuite Monitors in the SAP GUI.
➣ The image of the document will be displayed in the PNG Viewer.
Select the Training tab.
In the line Creditor ID, click on
Training (Area + Text).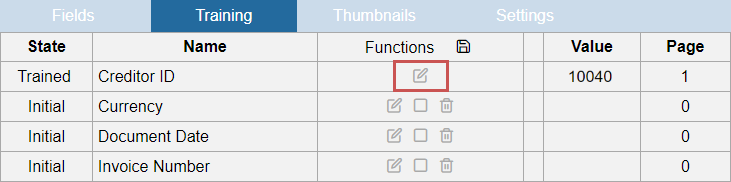
➣ The view will switch to vendor training.
In the line Creditor ID of the column Functions, click
Delete.
➣ The status of the training will change to ToDelete.

In the line Creditor ID in the column Functions, click
Save.➣ The deletion process will now start.
➤ After the deletion process is complete, the training will be removed. The status of the training will now be Initial.