Create Feeder
You can create your feeder in the SAP GUI via the transaction /WMD/XF_PF_CREATE, in SAP Fiori via the Feeder tile or in xSuite Web via the Create Feeder tile.
A log entry is created when the feeder is created, allowing the feeder to be traced through the phases of its lifecycle.
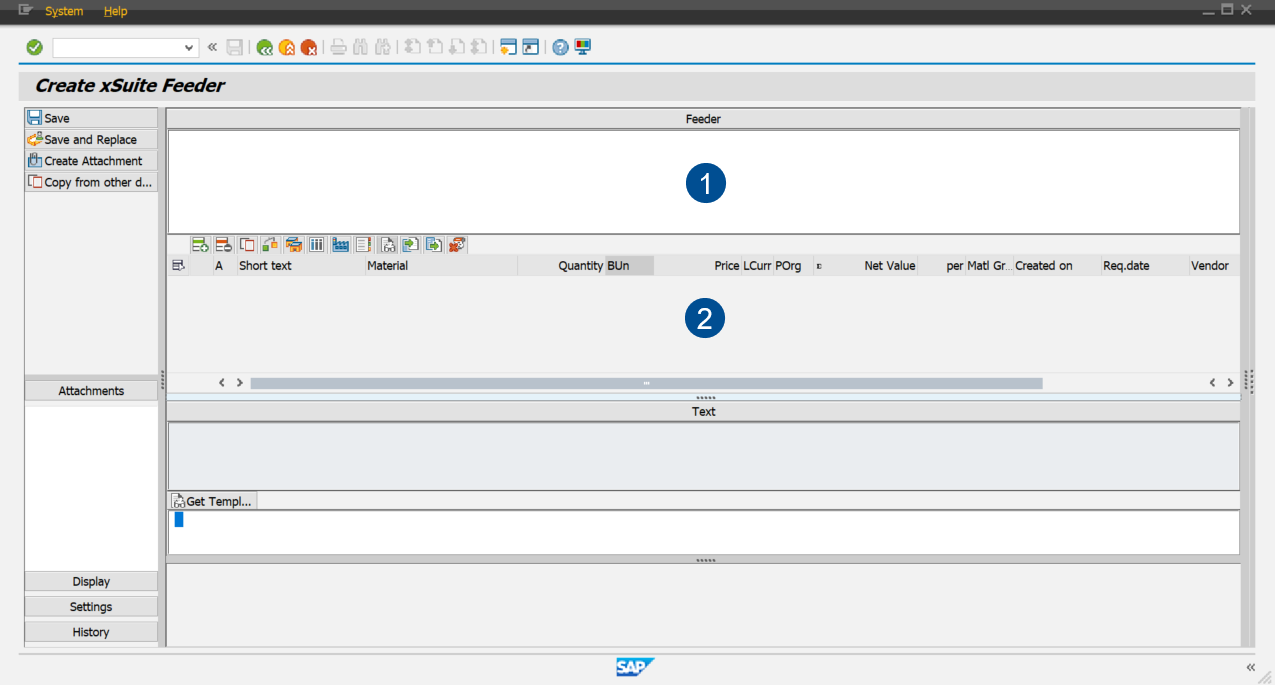
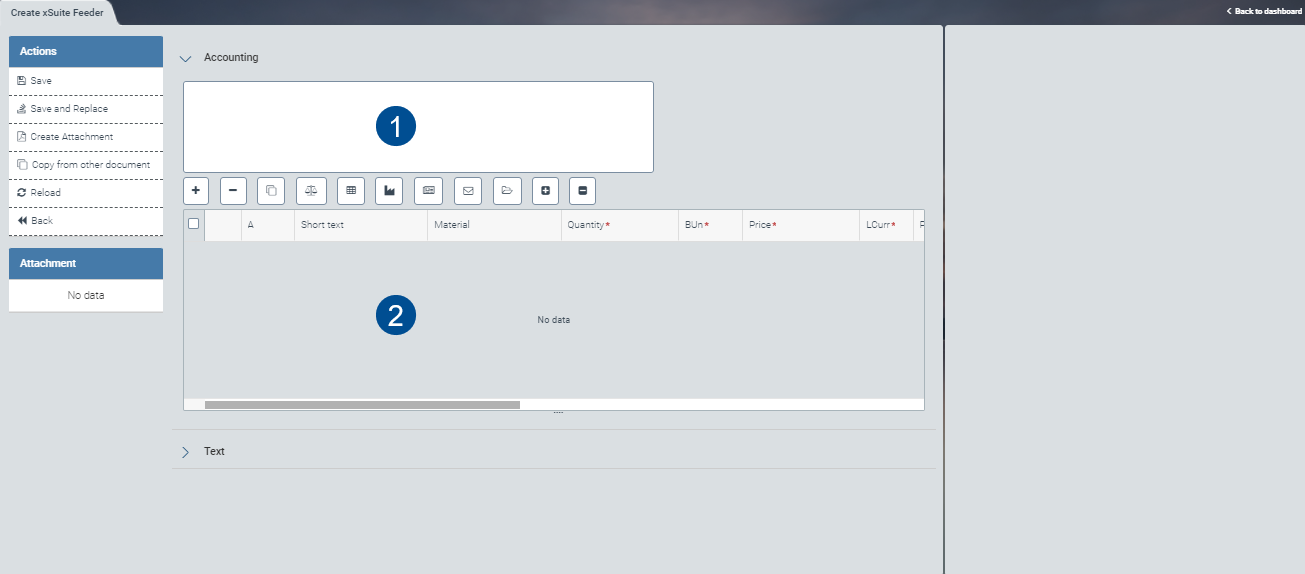
After opening the mask, you can enter your feeder details in two different ways:
As text in the text field (see "1" in the screenshot below).
As field values in the item lines of the item table (see "2" in the screenshot below).
To create the line items, use the buttons in the account-assignment block. For more information, see Account-Assignment Block: Buttons.
It is also possible to go straight to a linked catalog and to the data that has been transferred from it. For more information on the catalog, see Catalog and Opening the xSuite Catalog.
The creator of the feeder can add an attachment to provide additional information about the materials requested. Information such as quotes from different vendors can speed up subsequent review and approval.
SAP GUI Display:
For more information on the areas for work items in the SAP GUI, see Work Items: Main Overview in the SAP GUI.
SAP Fiori Display:

For more information on setting up a work item in SAP Fiori, see Work Items: Main Overview in SAP Fiori.
xSuite Web Display:
For more information on what a work item looks like in the xSuite web client, see Work Items: Main Overview in xSuite Web.
For more information on the buttons for creating the document, see Feeder Creation: Document Buttons.
Feeder Creation: Buttons
Feeder Creation: Document Buttons
SAP Fiori | SAP GUI / xSuite Web | Description | |
|---|---|---|---|
| Save | When you click Save, the feeder will be backed up and sent to the approval step. | |
| ––– | Clear: Deletes all unsaved data in the feeder you created. Note: This button is only available in SAP Fiori. | |
| Save and Replace | Updates the feeder and saves it in the inbox; the feeder can still be edited. The feeder is assigned a unique document number. This allows you to complete the feeder at a later time. | |
| Create Attachment | ||
| Copy from other document | Caution: Data already entered into the feeder will be overwritten if the template is used. Opens a dialog for selecting a template document. Enter the document number of the template document or select it from the drop-down list. You can select and adopt item data, item texts, account assignment data and linked image files from the document you have selected. Note: You can only use documents that you have created to function as templates. The distribution of the invoice amounts as percentages will be applied automatically from the account-assignment template. | |
––– | Reload | Note: This button is only available in xSuite Web. | |
––– | Back | Note: This button is only available in xSuite Web. |


Account-Assignment Block: Buttons
The default toolbar for the account-assignment block includes the following buttons.
SAP GUI | SAP Fiori | xSuite Web | Name / Description | |||
|---|---|---|---|---|---|---|
|
|
| Add row: Inserts a new item row into the document. | |||
|
|
| Delete row: Deletes one or more lines selected in the document. | |||
|
|
| Copy row: Copies one or more lines selected in the document. | |||
|
|
| Check: Checks existing item data for validity. This includes whether information has been entered correctly in terms of format, field, etc. | |||
|
| ––– | Delivery address: The delivery address can be changed here. For example, if you work remotely or at a new location, you can change the delivery address to have goods sent to there. Note: In SAP Fiori this button is available only in the step for feeder creation. In SAP GUI it is available only in the feeder edit roles PFER and PFET. In xSuite Web, the delivery address must be entered in the item data section. | |||
|
|
| Accounting data: Opens a menu for performing account assignment for the item line. Note: To save the work item with the selected account assignment, all mandatory fields in the account assignment table and the item data must always filled. If mandatory fields are left empty, an error message will appear. For more information on account assignment, see Account Assignment. | |||
|
|
| Save: Saves changes made to the item in the account-assignment block. Note: This button is only available in the workflow for editing feeder tasks. | |||
|
|
| Set plant: If a plant is saved for the agent in the user attributes, this field will automatically be pre-filled with that plant. A new plant can be specified by the administrator in user management. If no plant is specified, you as the user should do enter one. | |||
|
|
| Catalog: Opens the catalogs for selection. For more information on how to use the catalog, see Catalog. | |||
|
|
| Item text: Opens a dialog where text can be entered for each line item. If the TEXTID column is shown in the item table, the text will be displayed in the item data once saved. When a purchase requisition is generated from a feeder with item texts, the item texts are adopted. The item texts are displayed in the section containing release and item data. A text can be entered for the header, too. | |||
|
|
| Load template: Opens a dialog for selecting a template. Templates are available for feeder items and their account assignments. Note: This is for selecting, creating and saving a template. If you don't know the name of the template, you can use the F4 key to find it. When you enter the template name, you can select from recommended templates or cancel the operation. | |||
|
|
| Save template: Saves the previously accepted template in the item data. Note: Templates with the same name will be overwritten. Unneeded templates can be deleted with the input help. | |||
|
|
| Delete template: Deletes a previously saved template from the item data. | |||
––– |
|
| Total Calculates the total value of the feeder positions. Info: Feeder rows that are marked with a deletion indicator are not included in the calculation. In SAP Fiori, the calculation type Total must also be selected. |


Catalog
The xSuite catalog provides options for compiling articles from different catalogs. You can maintain the selection yourself and display and select items as needed.
When you select an item from the catalog, catalogued information such as price, supplier, and material group is always transferred to the feeder. This automatic transfer simplifies both feeder creation and the subsequent ordering process.
The following two catalog systems can generally be connected to the feeder:
Internal catalog: Administered by the customer.
External catalog: An external store system connected via OCI (Open Catalog Interface).
For information on how to configure an internal xSuite catalog, see the xSuite Cube Administration Guide.
The catalog referred to in the sections below is the internal xSuite catalog (also see Opening the xSuite Catalog, Account Assignment, Selecting Material Groups and Articles for the xSuite Feeder).
Opening the xSuite Catalog
The xSuite catalog is provided in SAP Fiori, in xSuite Web, and in the SAP GUI.
Notice
Your catalog selection is determined by your company administrator via User Administration.
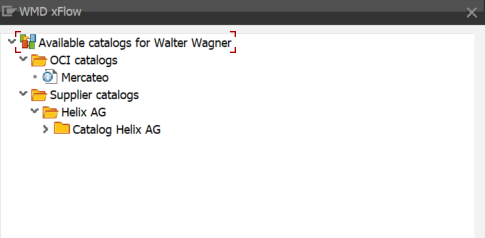
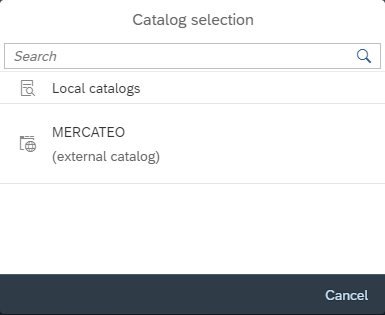
In the feeder, click the Catalog button.
➣ Catalogs will appear for selection.
Catalog in SAP GUI
Catalog in SAP Fiori
Catalog in xSuite Web
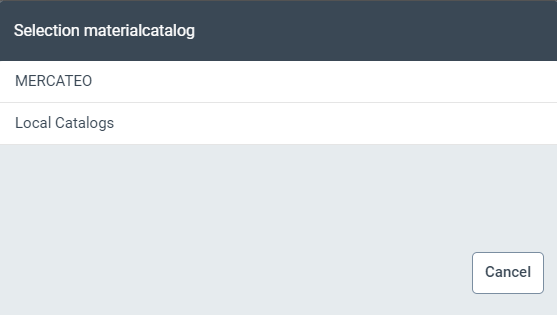
Click to select a catalog.
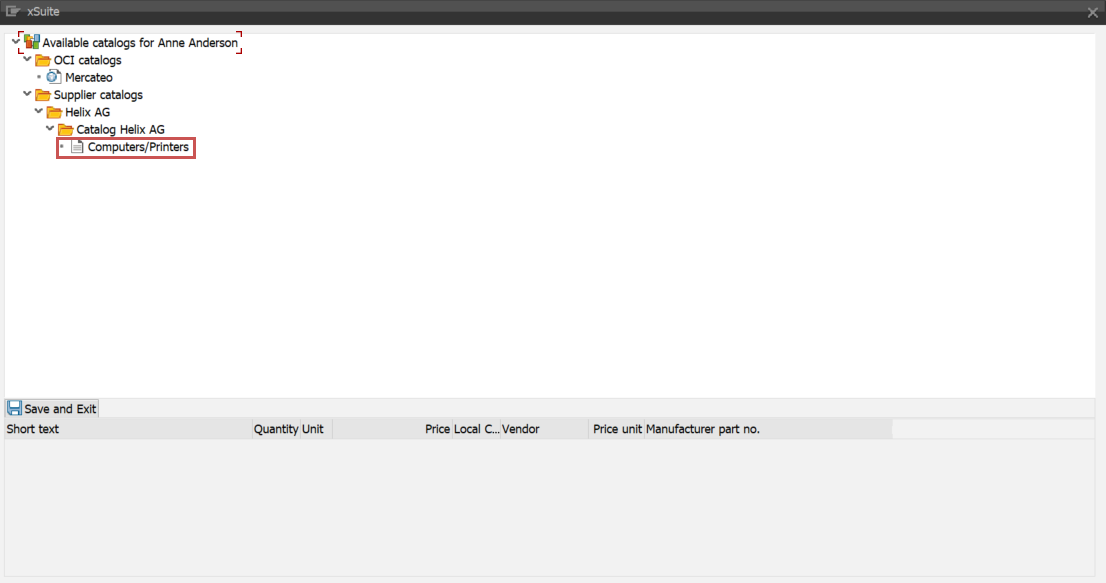
➤ The material group of the catalog will open in the SAP GUI.
➤ Click on the button Start (SAP Fiori) / Search (xSuite Web) in the catalog dialog. In SAP Fiori and xSuite Web, the respective catalog overview will open.
Catalogs may contain different material groups.
For more information, see Selecting Material Groups and Articles for the xSuite Feeder.
Selecting Material Groups and Articles for the xSuite Feeder
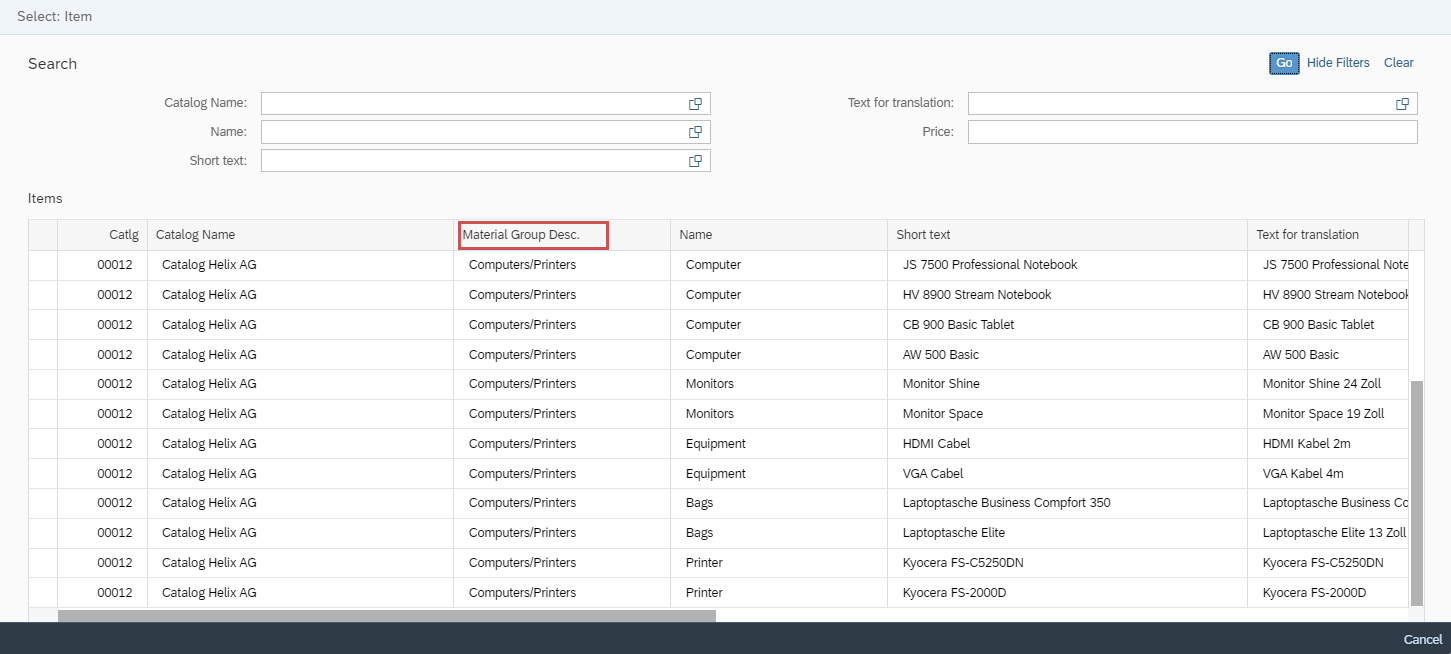
Open the material group in SAP GUI by clicking on it. In SAP Fiori, you can find the material groups in the Material Group Desc. column of the overview table.
Notice
The material group may be subdivided into different manufacturers.
SAP GUI:
SAP Fiori:
xSuite Web:
Notice
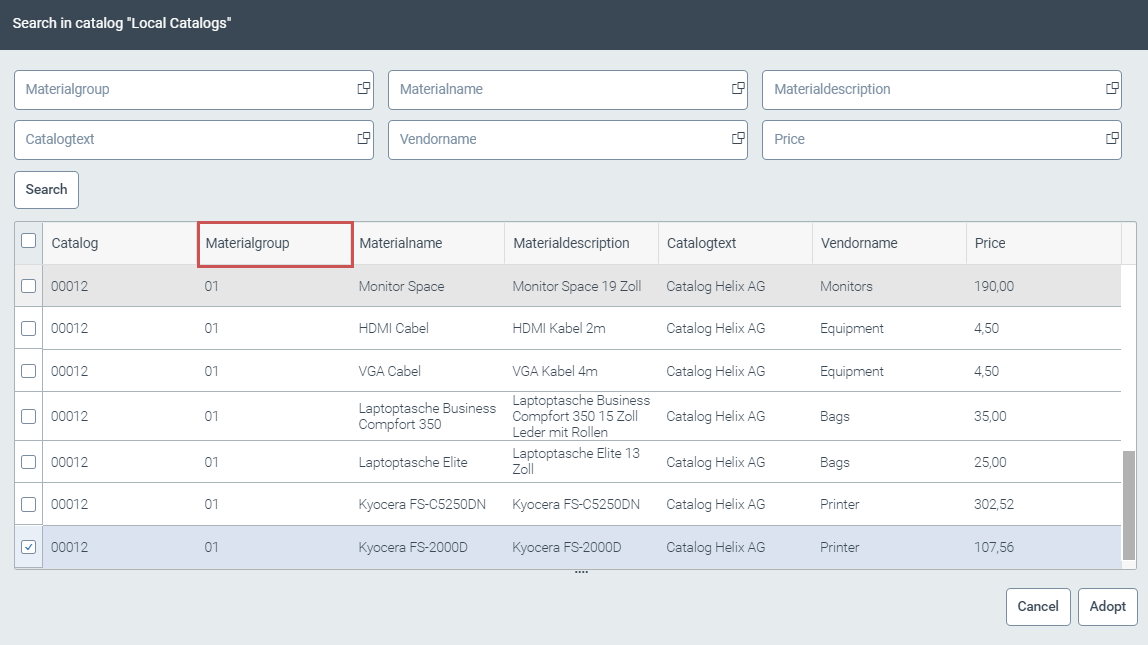
In xSuite Web, the material group is not displayed.
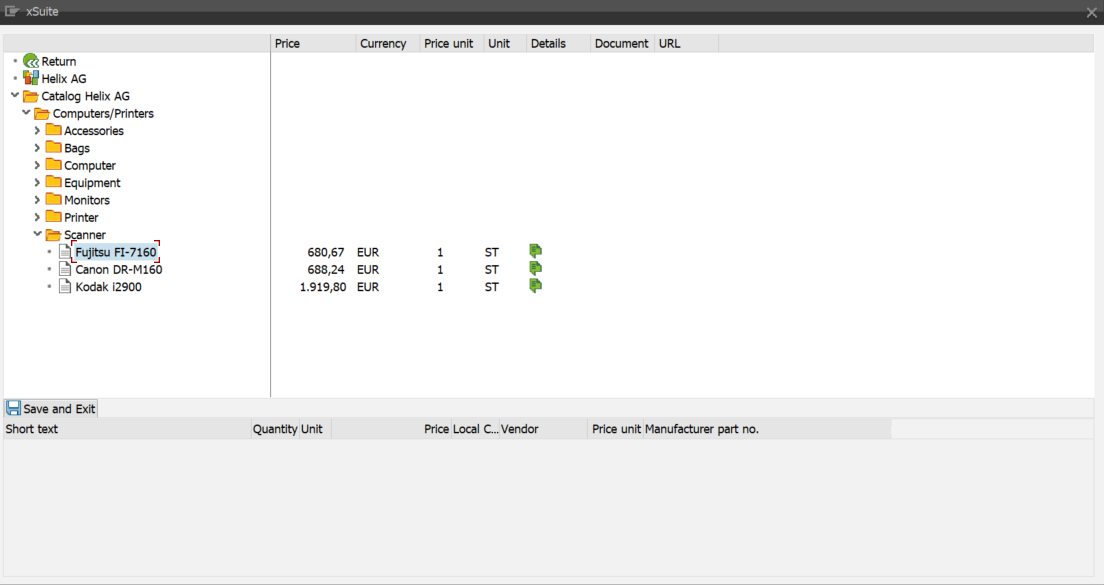
Navigate to an article. In the SAP GUI, this will be in the folder structure; in SAP Fiori and xSuite Web, it will be in the table.
SAP GUI:
SAP Fiori:
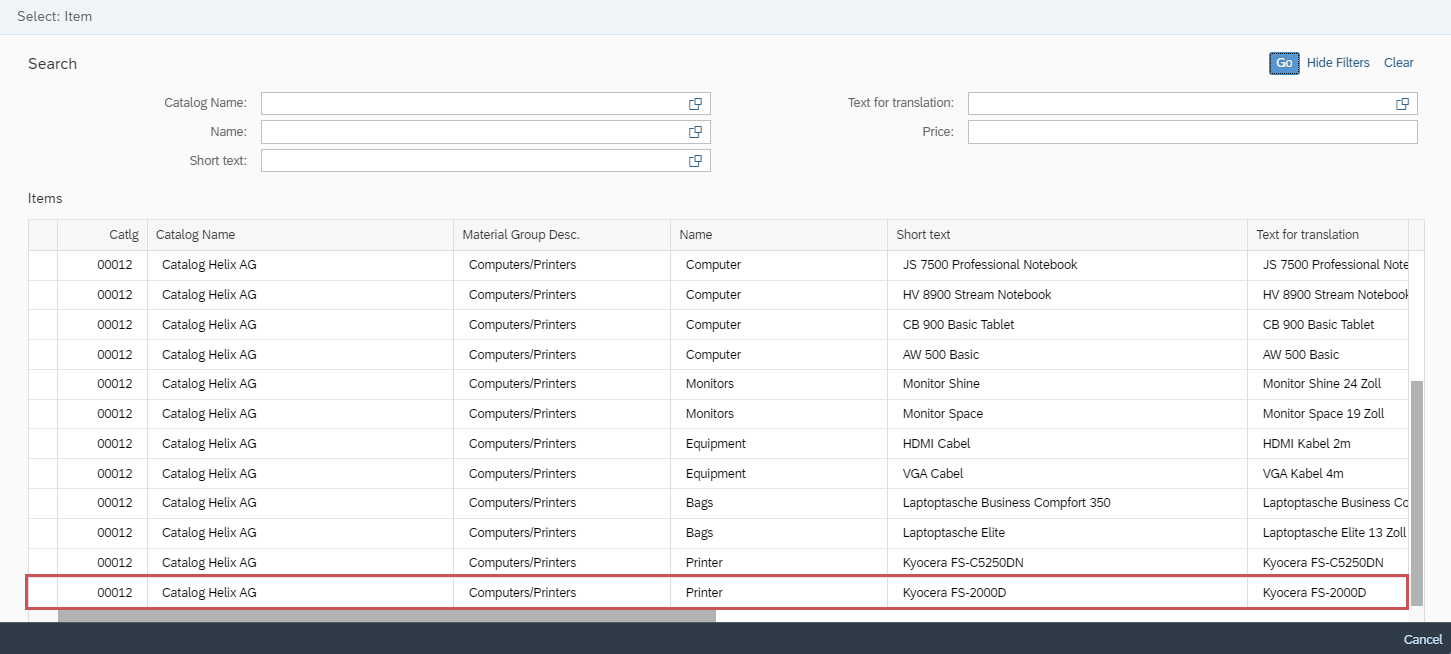
xSuite Web:
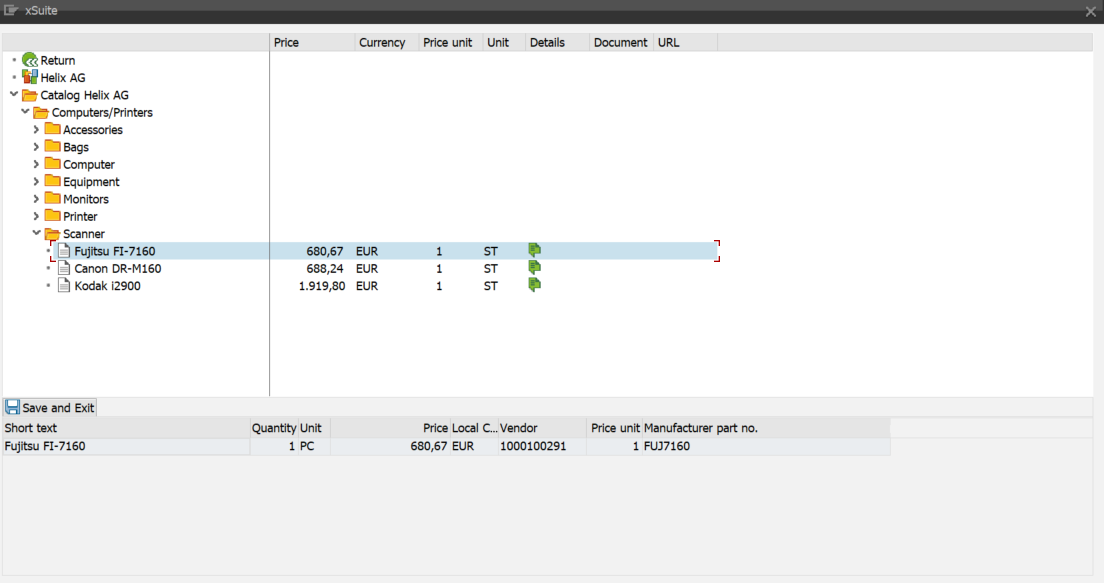
Click on an item. In the SAP GUI, use a double click; in SAP Fiori and xSuite Web, use a single click. When clicking on an item, the following information will be adopted:
Column
Description
Short text (SAP GUI und SAP Fiori) / Materialdescription (xSuite Web)
Item name
Price
Item price
Currency
Applicable currency for the article
Price unit
Price unit of the article
Unit
Unit of measure of the article
Vendor
Supplier of the article
Document
Attached document describing the article You can open the document in the SAP GUI with a double click, and in xSuite Web and SAP Fiori with a single click.
URL
URL matching the article
The URL points to a link such as a website. You can open the link with a double click, and in xSuite Web and SAP Fiori with a single click.
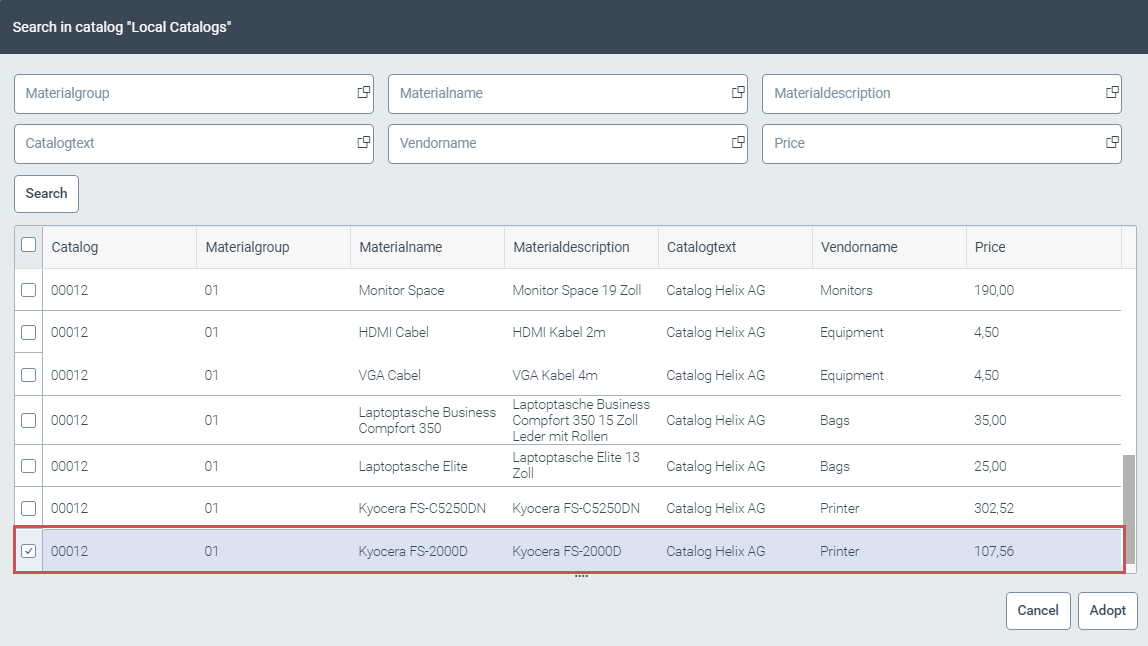
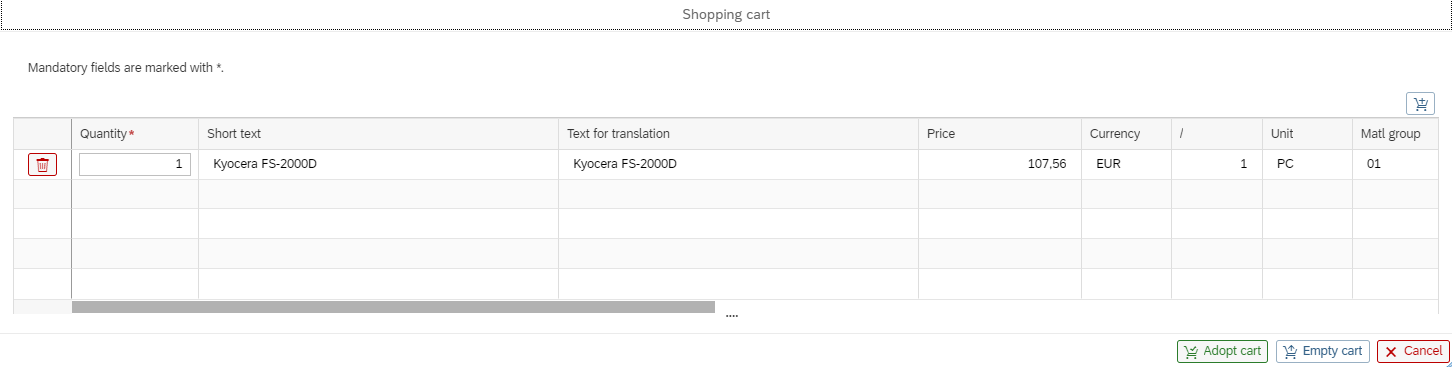
➣ The selected items will appear in your shopping cart.
SAP GUI:
SAP Fiori:
Notice
In xSuite Web, you can adopt the selected article directly from the overview table (see Step 5).
Repeat Step 3 until you have all the items you want in your shopping cart.
Save the items in your shopping cart by clicking the button Save (SAP GUI) / Apply Shopping Cart (SAP Fiori) / Apply (xSuite Web).
➤ Your selection of items has now been saved.
If you want to discard your selection, click the button Cancel / X.
➤ Your selection of items is now discarded. The contents of the shopping cart will not be transferred to the feeder.
Notice
In SAP Fiori, you can click the Empty cart button to empty the shopping cart without leaving the catalog.
Account Assignment
When creating an xSuite Feeder, you can assign each item in the xSuite feeder. You can assign multiple accounts to single items.
Multiple item lines can be selected and assigned to a single account. All items will receive the account assignment of the first item selected. Items not included in your selection will remain unaffected by the action.
If you want to open the dialog for a selected line item in the feeder, click the Account assignment button.
Depending on the account-assignment category selected, account-assignment fields will be included in the dialog. Different account-assignment fields are mandatory for different account-assignment categories. For instance, a document for assets will look different from a document for a customer.
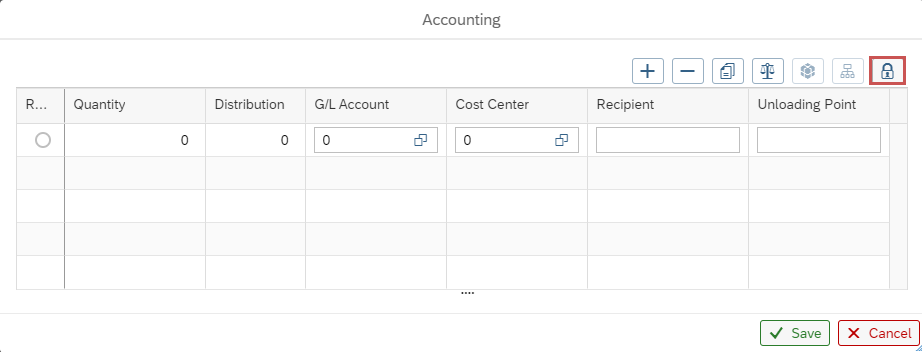
Account Assignment for Items
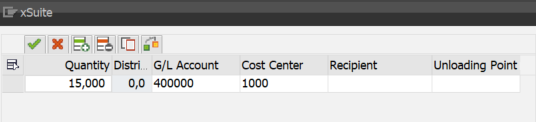
SAP GUI Display:
 |
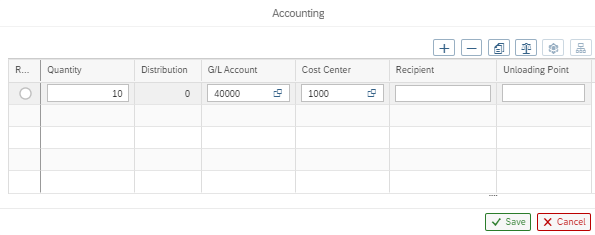
SAP Fiori Display:
 |
xSuite Web Display:
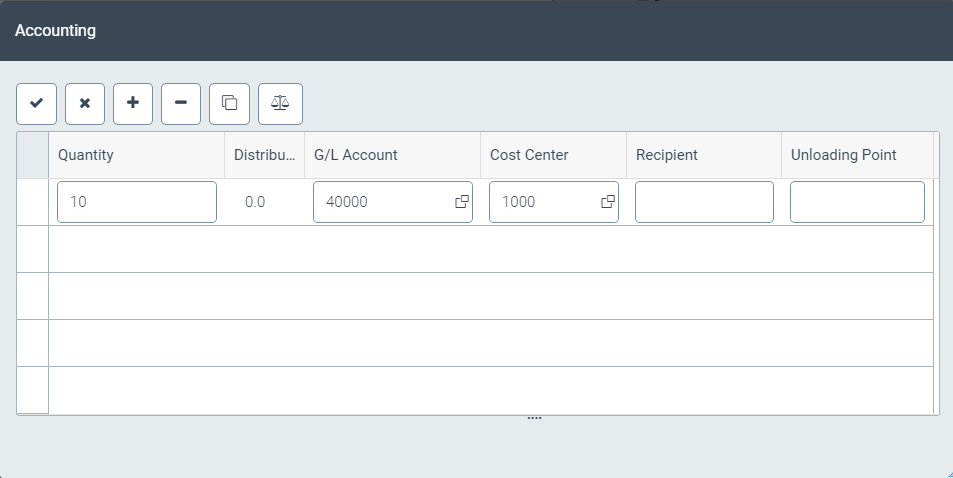 |
In the account-assignment dialog, you can create single or multiple account-assignment lines.
For each account-assignment line, categories can be specified. Categories might include the following:
G/L Account
Cost Center
Recipient
Unloading Point
To assign multiple accounts to an article, group accounts together and specify quantities or percentages. To assign multiple accounts, do so by item.
Notice
Note: To save the work item with the selected account assignment, all mandatory fields in the account assignment table and the item data must always filled. If mandatory fields are left empty, an error message will appear.
Multiple Account Assignment
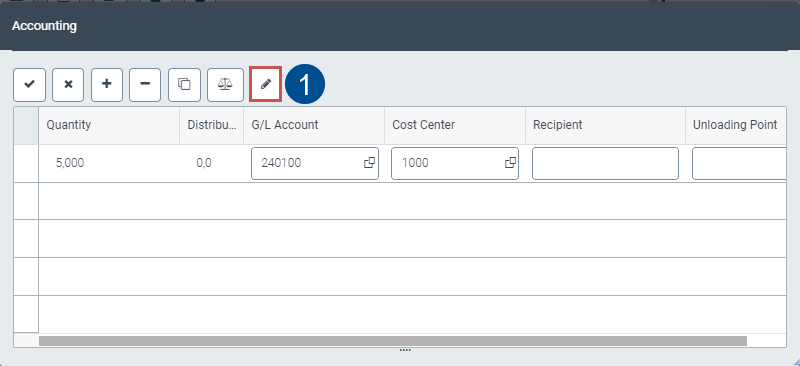
In feeder and procurement workflow tasks that have the account-assignment function, you can assign accounts for multiple items simultaneously.
SAP GUI Display:
 |
SAP Fiori Display:
 |
xSuite Web Display:
 |
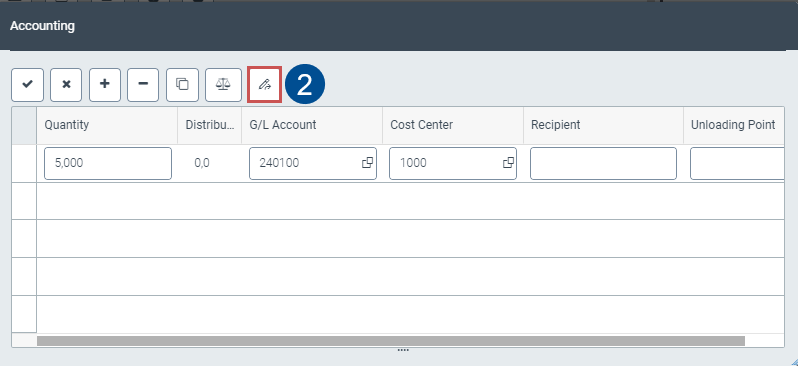 |
The options available in Change quantity differ according to which function you are using. When you open the account-assignment screen, it will appear as shown in screenshot 1; after clicking it once, it will appear as shown in screenshot 2. These two functions are as follows:
The quantities specified in the feeder item will be retained. The quantity cannot be changed in the account-assignment block. The quantity in the feeder item will not be overwritten.
The quantity specified in the account assignment will be applied to all items.
Notice
When assigning a single row to an account, the Change quantity or Unlock quantity button will not be available. Here, the quantity defined in the feeder item will be used.